

Introduction:
Now I get to review one of my favorite kits in the IBO series. Unfortunately, I was hoping to review the 1/100 FM but this kit is the only one available so far on my side. At least, I still get to see it in the 1/144 scale. There were a lot of versions or upgrades made for this mobile suit throughout the whole series of Season 1 to Season 2. I like the first one from the 1/100 where Barbatos already got the shoulder armors but I don’t have a good feel towards the other Barbatos models that followed especially the sixth form (if I’m correct). I know it’s an extra armor to protect Barbatos but I just like the model with the original design of the chest. Now after watching Season 2, I love both Barbatos Lupus and Lupus Rex. I would go for Lupus Rex if I have the budget to buy only one kit.
So yeah, this will be my short review for Bandai’s HG 1/144 Barbatos Lupus Rex. When I got the box, I saw some dents on the corners so it’s probably an old stock or just crammed with other kits. Good news there was no broken parts inside after inspecting it.
If you see any wrong terminologies used in my article, please do correct me. But if you see any typos, just forget about it. I’m a person that will always have typographical errors in any article (including Tagalog).
Unboxing:


There were only 2 bags inside the box and I thought there would be more or a separate sprue for the arms. It seems they will be using new parts in Sprue B to build the arms. You will not use the parts for the usual inner frame and leave them in Sprue A.

The construction manul shows the mobile suit and the pilot with a little information about them. There is also an English translation. I found out from a colleague that the Season 1 IBO kits do not have the translations in their construction manual.
Flip the manual and you get to see the model with its weapons or gimmicks.

Same with the other HG kits, the paper is folded into several pages and the front section has colors.

Here’s the list of the sprues and/or runners inside the box.
Sprues:


Sprue List: Left to Right - Sprue A (x1)
- Sprue B (x1, 4 runners)
- Sprue C (x1)
- Sprue D (x1)
- PC-002 (x1)
At first, I thought Bandai designed some stickers for the claws. Unfortunately, you will need to hand paint them or use any other painting tools to add the yellow color. Another thing I noticed is that some of the black parts that will be used as clamps on the back of arms have flashes. That’s kind of odd for Bandai to have such flaws. I know Bandai isn’t that perfect, but they are not that reckless to release sprues or runners with flashes in it.

And here’s the basic foil sticker that comes along with the kit. The yellow markings are for the claw on the feet and the tail blade. There will be black markings for the side skirts and legs as well.

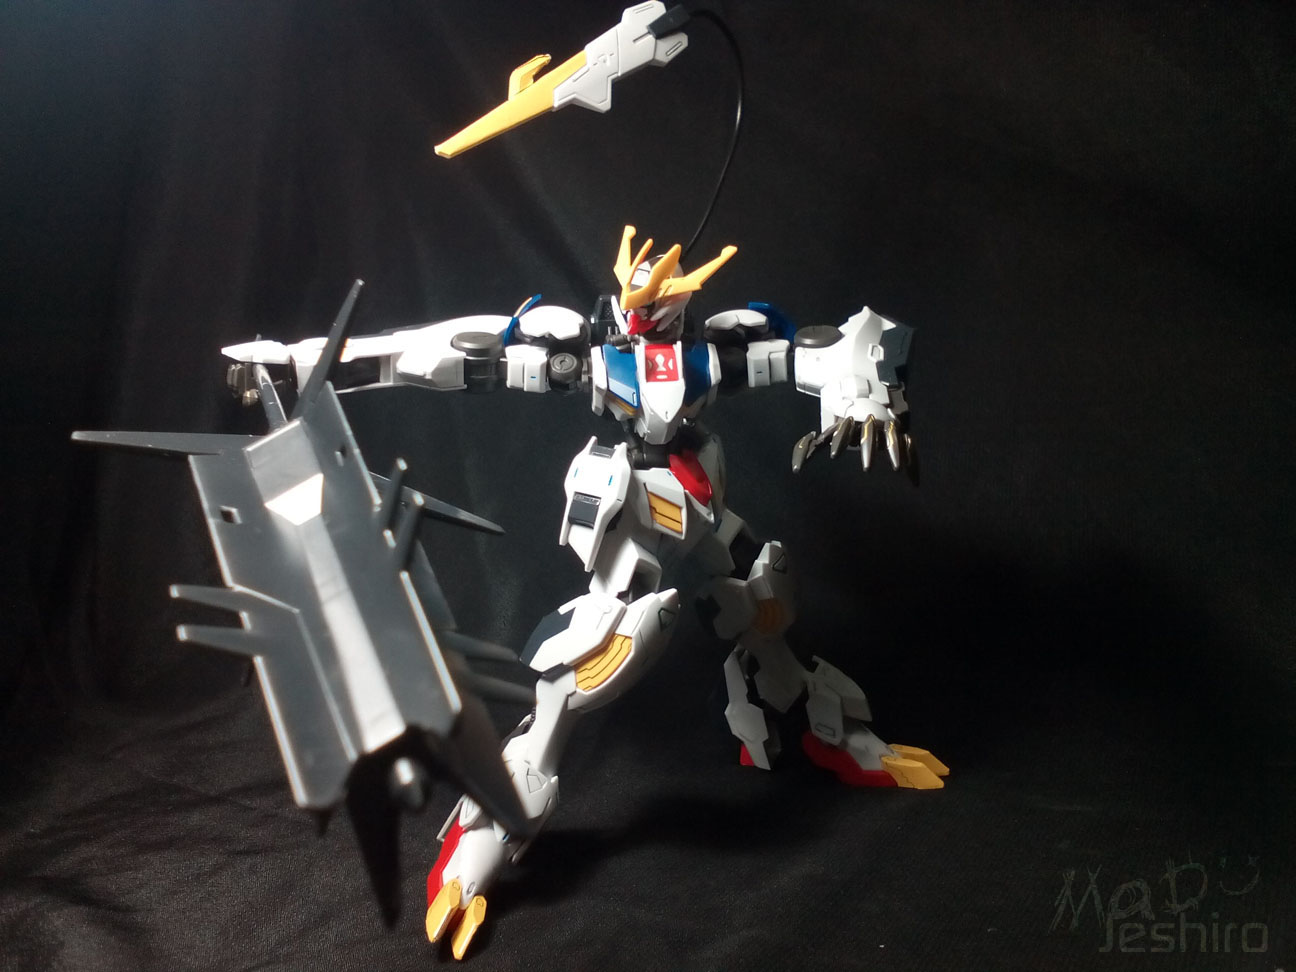
There is also a wire for the tail blade that you can use for posing. This serves as the gimmick of the model.
Body Unit:

The amount of parts here for the body are above average and that is cool on my side. This also gives other builders more option for color schemes. One factor to check here is that the inner frame may look the same but the polycaps for the waist is larger. The PC parts or PC sockets for the arms were also larger, probably to get a good support for the huge arms. The neck section is also different because of the new design of the collar.


The overall design here looks awesome credits to the designer of the model and of course thanks to Bandai for making this a real collectable kit. It was a smooth build here in the body so that’s a good start. The model doesn’t have any armor piece on the back or any backpack yet so I didn’t took any picture.
Head Unit:

The amount of parts here is above average because you get a lot of separated parts to add color. Another thing to take note of is that the head of Barba Rex isn’t using the usual head inner frame. These two yellow parts for the cheeks will serve as the inner frame itself that will hold the face mask.


No snap fitting problems here and everything fits just fine. No need to worry with the white face mask as well. The red piece just below it has a good grip to keep it stead. Detailing looks really cool but the design on the cheeks kind of reminds me of Megatron from Transformers 1. :v

As always, I used my metallic green to replace the foil stickers provided by Bandai.
Arm Unit:

The amount of parts here for the arms were above average. You get extra pieces for the mechanical arms and you will notice new parts for the inner frame because of the new design. The upper portion of the arm that will hold the shoulder armor will still use the usual inner frame.

For some reason, I can’t stretch the arms straight and you will notice the slight curve of angle in the elbow. My guess is that it’s probably the main design or look for the model to give it a “monster-like” posture. But the good news is that it was a smooth build so there were no troubles for me in this section.

I find the shoulder armors kind of lacking of support. You just simply tuck the peg in place here. The shoulder armor has a tendency to pop off in accidental bumps or when you try to pose the arms. Unlike the other HG IBO kits I have built so far, you insert it a rectangular peg. It’s not much of an issue if you are careful but Bandai should have at least closed that spot to give it a nice lock.

We don’t have stickers for the claws and I haven’t tried painting so I added some detail on the lines instead using my Uni-ball Signo Gold.

Movement range isn’t bad and you still get a nice bend here. The shoulder armor is lifted up if you look at the arm on the right side. Because of the bulky design in the elbow, the angle is limited. But if you can modify this a bit, maybe you can extend the range of movement for the arms.

I also noticed that this blue piece in the shoulder armor can be tilted up and down.


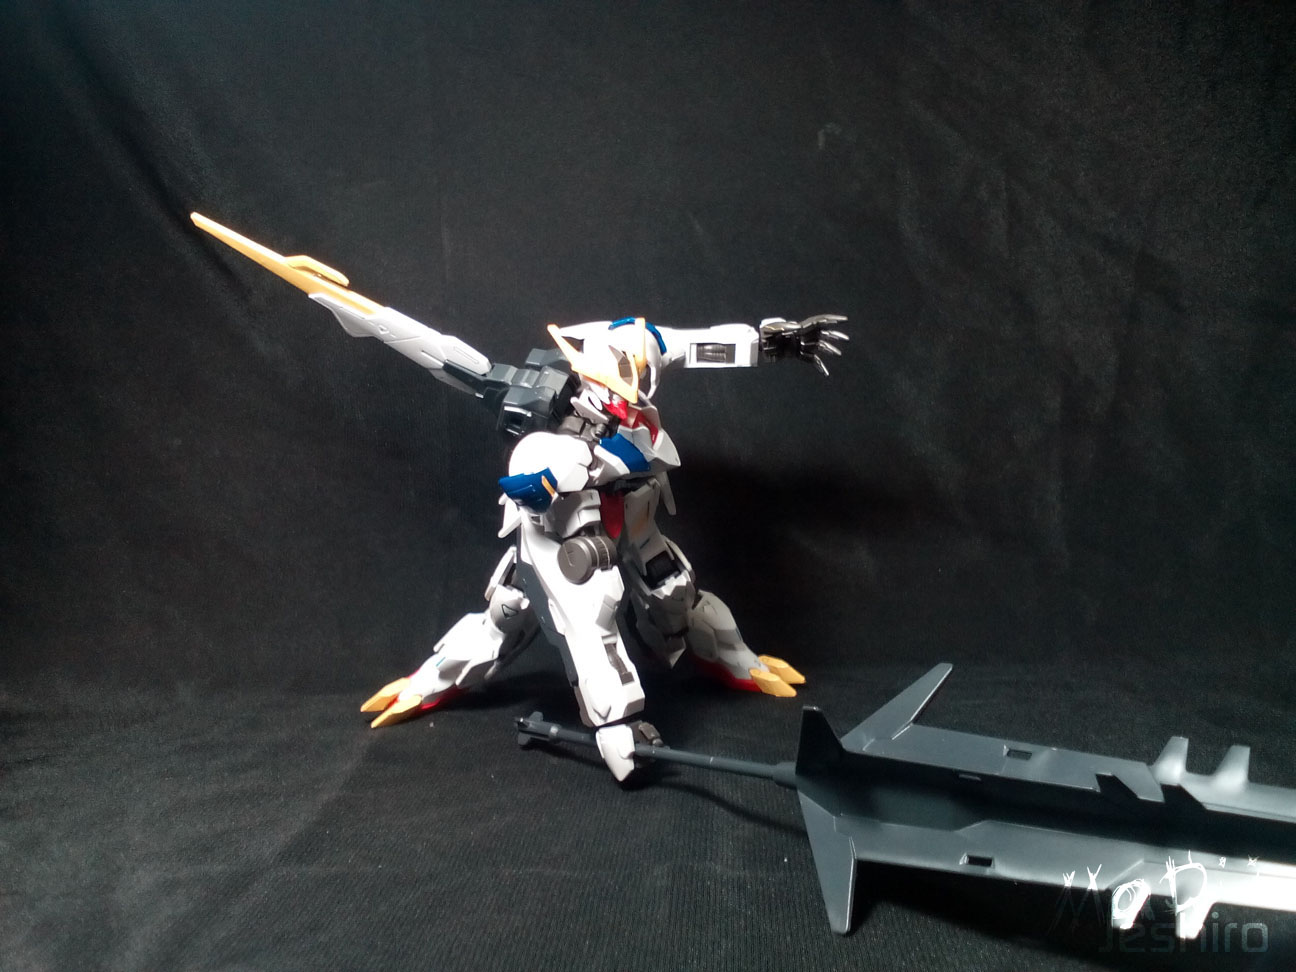
Now for the gimmicks here in the arms. Unlike the Barbatos Lupus that has guns on the arms; the Barba Rex has mechanical arms called Sub-Arms where you can attach the Ultra Large Mace. It features good articulation where you can lift it way up.
Leg Unit:

The parts here for the legs were above average for a High Grade. Still, you will need to apply those black markings to add some extra detail.

No snap fitting issues here and the parts fits just fine. I like the design of legs for Barba Rex where I did mentioned it has a monster-like posture. Of course, the designs from the older versions (Season 1) still share those same elements. Another thing I noticed is that the feet here is by far the largest in their series. I could be wrong but it seems really large when compared to the kits I have seen.

The legs may have a bulky design but it features great range in movement angles. The thighs have a nice bend here. You might also notice that I tilted the ankle joints on two positions. The one on the left moved towards the front and the right one is moved on the back. It doesn’t have any gimmicks to show off. You could so some small modifications here by adding thrusters on the back of the leg.
Waist Unit:

The amount of parts for the waist are just average and it’s the almost the same with the Gusion. But it was nice for Bandai to include the yellow parts for the front skirt. However, you will have to apply the black markings on the side skirts if you want the extra color. Or you can just paint that section to get a clean finish.

I checked the red crotch piece to see if it can hold the front skirts even if they are separated. They have sockets so the skirts won’t fall off, so I cut this front skirt in half again.


So there are no snap fitting issues here and every piece fits just fine. As you can see, I added the foil stickers to add some extra color. But seriously I reject the foil stickers even if that would make the model really plain.

Articulation is nice and the treatment I did for the front skirts worked out just fine. The side and front skirts have good movement range when lifted up.
Backpack Unit:

The backpack unit with the Tail Blade feature very few parts. Noticed the black part in the middle of the Tail Blade pieces? Yes, the flashes were noticeable and there were also flashes or excess plastic on the other black parts. I am not sure if this is an isolated case that the quality downgraded a bit for the black sprues.


If I were to get a 1/144 Barba Rex, I would probably place the yellow sticker for the Tail Blade as well. I am still not going into the painting business so I have no choice but to use the foil stickers. There are two foil stickers here and the one for the hook-like piece is kind of troublesome.

Another issue I noticed is the female peg that will hold the wire. It doesn’t have a good grip and the weight of the tail blade pulls it down. I stuck a small amount of blutac inside this female peg to fix the problem.
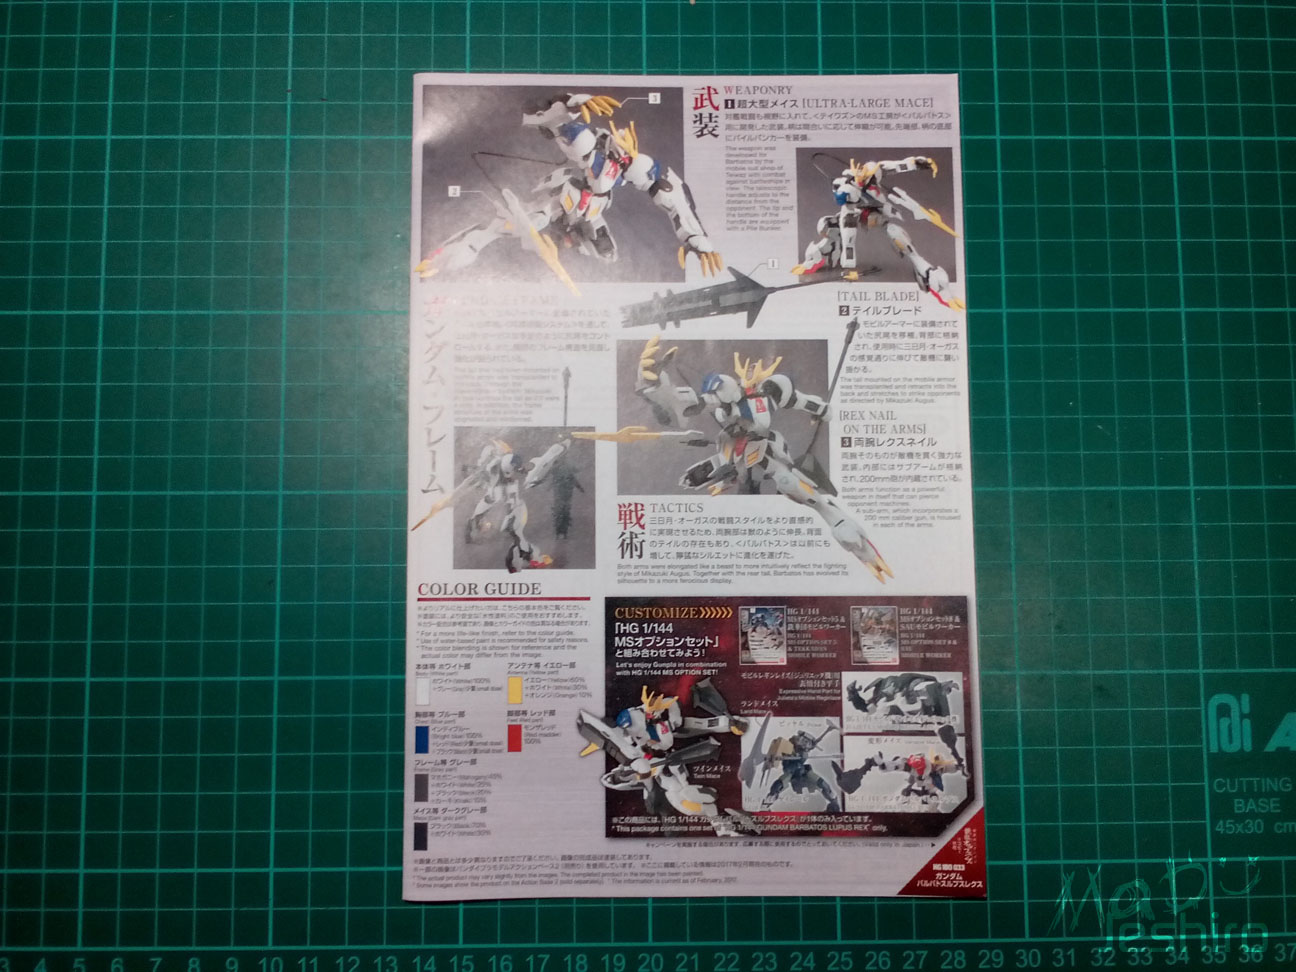
Weapons:
Ultra Large Mace:

It is the same weapon of Barbatos from the first series but with a new design and it is now larger. The original spec of the weapon having a “pile driver” on the tip is retained but you won’t get that gimmick here in the HG version. The parts were pretty straightforward and you get the usual construction for a HG weapon.

I don’t like the quality of the black parts. They have this rough texture when you cut the nubs. I am using a fresh blade for this kit but the blade isn’t much of a help. My recommendation is to sand the nubs to avoid the visible stress and nub marks.

You can shorten the handle as well.
Tail Blade:
This is one of the weapons of Barbatos Lupus Rex and it is attached on the back (see Backpack Unit). The only issue that I hate in this weapon are the two foil stickers to give it a separate yellow part.
Rex Nails:
According to the construction manual and info from gundam wikia, the huge claws known as Rex Nails of Barbatos Lupus Rex are counted as weapons especially for close-range combat.
Completed Model:


Articulation Test:


You can’t lift the arms higher than this. But you can work it out by twisting or rotating the whole arm including the shoulder armor give to give it an extra reach.
I forgot to take a picture of the legs lifted up but it has a decent range even with the front skirts blocking in the way. You can possibly get a perfect split here with the correct position of the side skirts. So yes, you have a good movement range in the lower body after the final assembly.
Rest of the shots:


Sorry if some of the shots have bad lighting or blurry. I’m working on it. :v
 |
| design based from GDC card |
And now to my personal ratings…
Plastic Quality: 9/10
I am thinking if I should give Rex a solid 9 or an eight because of the black parts with flashes. Then I thought that these were basic problems for a builder that can be fixed by sanding. Yes it was my mistake not to use all my options when building the kit and simply used my hobby knife ( I have a deadline :/ ). So it is just fair to consider the bigger positive factors of this kit to outweigh the negative factors I have found. The quality is really great and the detailing is sharp.
Assembly: 9/10
There’s nothing much to say here after experiencing 3 to 4 Bandai kits. The issues in snap fitting were very minimal to zero. This model doesn’t have any problems unlike Kimaris Vidar with a few tight parts in the Body Unit.
Detailing: 9/10
Even without the markings or foil stickers, the detailing here looks awesome. Aside from the well-molded parts, the extra parts of yellow added color. It was indeed a good move for Bandai not to rely on too many foil stickers here. I was kind of disappointed it was messy when I built the Gusion Rebake. The visible markings are on the side skirts and on the legs, but I don’t think it would look bad if you leave it as it is.
I want to point out that the construction manual features a painted model, so it might be a disappointing view to get darkish brown claws instead of the original yellow-colored claws for Barba Rex. I guess it was okay for me if Bandai did produce foil stickers for the claws, just because I wanted the yellow color.
I don’t think we will see the IBO series in the Master Grade line, but I am still putting my hopes up that at least the main protagonists are featured and get a treatment for the “extra” detailing. I want to get the 1/100 and think of a way for these issues about foil stickers.
Articulation: 8/10
Generally, the inner frame doesn’t have a problem with articulation and it was meant to be a good basic inner frame for a High Grade model. Another factor is the articulated sections in the body like the blue parts on the shoulder armor and the sub-arms on the back of the arms. The downside of the whole model is that the bulky feature is getting in the way. I am expecting a good range for both arms and legs, because I know Barba Rex is good in close-combat with or without a weapon.
Or maybe the way he fought in the anime just got into me and expecting too much in the model (.. again). Still, I wanted more range or angle in movement especially in the arms. The arms are one of its great assets because of the new design. But as you have seen earlier, I can’t even get pass the 90-degree angle. I don’t have any complaints with the legs and the range of movement there is great.
Gimmicks: 5/10
There were two major gimmicks I have noticed here. First are the Sub-Arms that can hold the Ultra Large Mace. Back in its previous version as Lupus, it’s supposed to be guns for mid-range battles. Of course, I saw in the series that the Lupus Rex still retained these guns only that they were place in a different section of the arms (Forearm). There’s room for modification here and you can replace these Sub-Arms with other weaponry.
The second gimmick is the new signature weapon of the Lupus Rex called tail Blade. At the very least, Bandai featured it to be separated and that you can use a wire to copy the same one from the anime series. The wire provided in the kit isn’t long but you can replace it with any wire that will fit in the backpack and Tail Blade rear. The backpack unit also shows some room for modification. Maybe some thrusters, a wing, or extra weaponry would be nice to make it less plain. I saw a picture of a modified Lupus Rex where more than 6 Tail Blades are used. It was really cool and the idea was kind of similar with the Astray Blue Frame D. The image I saw was different from the 3rd party resin conversion kit with at least 2 tail blades on the backpack unit.
Weapons: 5/10
Counting the Rex-Nails as part of Lupus Rex’s weaponry, you have a total of 3 visible weapons for this model. I’m not saying it is very few for the Lupus Rex. You can still have a nice set of action poses for the kit. But if you want more, the construction manual features another kit and these are just extra weapons not just for the Lupus Rex but for other HG 1/144 IBO models as well.
I think it was just right here in my personal rating to give this model a 5. I mentioned about the guns on the forearms that was seen during its last fight. It’s not featured or shown here. It could have been nice if there were visible barrels or at least a small portion of the muzzles.
Another weapon that isn’t featured here are the Heel Bunkers. This is something similar with the Gundam Crossbone X1 where pile bunkers are fitted in a peg in the sole. Bandai should have added them even if they were just simple weapons or attachments for Lupus Rex.
Extras: 3/10
You don’t have much to get here as extras aside from the spare inner frame parts meant for the regular arm. There were no additional weapons or other stuff for the Lupus Rex. But at the very least you still get open-palm fixed manipulators and I am also counting the wire as part of the extra items.
Patience: 3/10
It was very smooth and easy to build so giving the rating is just right. Same with the other IBO kits I have experienced, I’m sure you can do a straight build of this kit with just a few hours.
Overall Rating: 9/10
I got hooked with the looks and ferocious nature of the Lupus Rex after its first appearance in season 2. It’s definitely one of the best HG kits I have encountered as well with very few stickers to use. The parts separation was just enough to add detail to each section of the body. And even if you don’t apply the foil stickers, the model still looks great.
If I were to answer if this can be a starting kit, I would say “yes”. It’s not much of a surprise to get a good smooth build here in Bandai because these factors have always been their forte. They may have flaws back then, but they surely try to move up in terms of quality. As I mentioned in the Patience section, it was easy to build. I don’t think building the 1/100 FM poses as a problem for beginners or first-timers in the Gunpla world.
I got a question from a certain colleague what if the bootleg brands decided to release the Lupus Rex in either 1/144 or 1/100 (could be Daban Model). He asked me if I would still go for Bandai and that was a tough question considering my financial status. Well in my case, I might go for both brands especially that I have a blog to update. If I were just to collect the model, I think I will choose Bandai. The price isn’t that expensive and I can save up for that one. If I were to recommend the bootleg (if Daban released the Lupus Rex), it would be for the builders who already have experience fixing certain issues. The 1/100 and 1/144 models in the IBO series may be a smooth build in Bandai, but you will never know what kinds of problems will appear once the bootleg brands releases them.
So yes, overall the Barbatos Lupus Rex in the HG 1/144 still looks awesome. With a good pedestal or action base, there will be a lot of options for dynamic poses. I still have the Astaroth origin to review and that might be next. That’s all I have to say for this kit, just do comment if I missed something.
Have a look on our Gunpla-related Facebook page - Click Here
Barbie is <3 you did not color the claws? haha
ReplyDeleteanyway, Good Day Mad Sir Jesh. I got a news for you... DABAN is on FIRE right now. They'll be releasing an MG Astray Blue Frame Type D.
Yeah I saw it and I already posted the box art sent to me last night.
ReplyDeleteAnd no I didn't paint the claws. I just used a gold pen to add details.