
 |
Update 10/04/2020: Will re-edit due to small size and unarranged images
Introduction:
(A little dramatic)
And many already thought that I was dead or have already quit making reviews. To be honest, that idea came to my mind when I was going to prepare the review for my 2 Bandai kits. I somehow contracted a ransomware virus and locked all my files including the raw images of the 2 kits I haven’t reviewed. I was in dismay that I can’t retrieve any of them back and I don’t have the backup for all the images. But even with that problematic incident, I tried doing my routine when building a kit; exploded views, taking notes, etc. The habit just grew on me. And I had to stop for a while because of the pandemic and I badly needed a job. I did get the job but it is taking now a lot of my time, so the blog went from hibernation to half-dead.
Enough of this drama, and I will try to revive my second hobby; writing reviews on the Gunpla kits I have built. A lot of my colleagues have been asking when I will go back on posting reviews. I guess this is finally the time to return. And what a perfect time to do that during the freshly released High Resolution Model Wing Zero Custom of Daban Model. Yes, Daban continues to release models but not as fast as before.
I might change my usual style just for this review because of the Inner Frame’s peg design, which I will discuss later probably in the Arm Unit section (because that’s the only part I managed to take a picture of what I was talking about). I would like to mention that I also forgot taking pictures of several pointers (I got rusty). Please correct me if there are bad terminologies used in the review. And just completely ignore the typos.
Unboxing:
.

Same like the other kits they have released after their so-called resurrection, the boxes no longer have the colorful box art and other features. Just a black box with the model number in the model and that’s it. I don’t have any complaints as long as they continue to deliver good kits for a poor cheapskate like me (I’m kidding, I still love Bandai).

Open it up and you have another sturdy brown box inside with all the plastic bags in it.


Daban didn’t include any construction manuals unless they are limited. A friend helped me find one and it was just a plain manual without the extra colored features from the original.
Runners (Sprue Frames):


And let’s not forget the usual foil sticker and a small sheet of waterslide decals. And this is great because the MJH brand didn’t bother giving away any decals for their consumers. Sad to say however, both MJH and Daban seemed to forget adding the wires that can be connected to the backpack and onto the buster rifle. Maybe you can improvise on this part.
Before I move on to the Head Unit, I want to mention the coloring. Both MJH and Daban Model feature the white, brown and dark gray for the Inner Frame. Of course, there are no gold parts and Bandai has that kind of feature. I looked at a few reviews for the MJH and I noticed that not all parts have the same detailing like Daban. For example would be the panel line on the shoulder armors’ round blue parts or the small notches on the machine cannon covers. And there might be many more. Even though these are just minor detailing, I’m sure a lot of consumers and other builders would want more.
Daban’s white runners seem cheap because it’s not as glossy as the other runners (blue and red). But apparently, it looks whiter to Supernova’s first Wing Zero. I kept the SN WZC in my box so discoloration from sunlight should be very minimal to none. But the whiteness of Daban’s runner is really good. I just hoped they could have made it glossy like the red and blue.
Another thing to point out is the price that probably affected the reason why some of the inner frame parts are brown instead of gold. As far as we know when they released the Strike Freedom ver MB, it was very easy for them to make the gold-plated runners but for an increase in the total price. The only shiny gold parts that we will have here are the v-fin, the ones for the shoulders, and the fins for the shield. Can’t remember anymore but please do tell if there are things I might have missed.
I will feature the full Inner Frame section after all the body units.
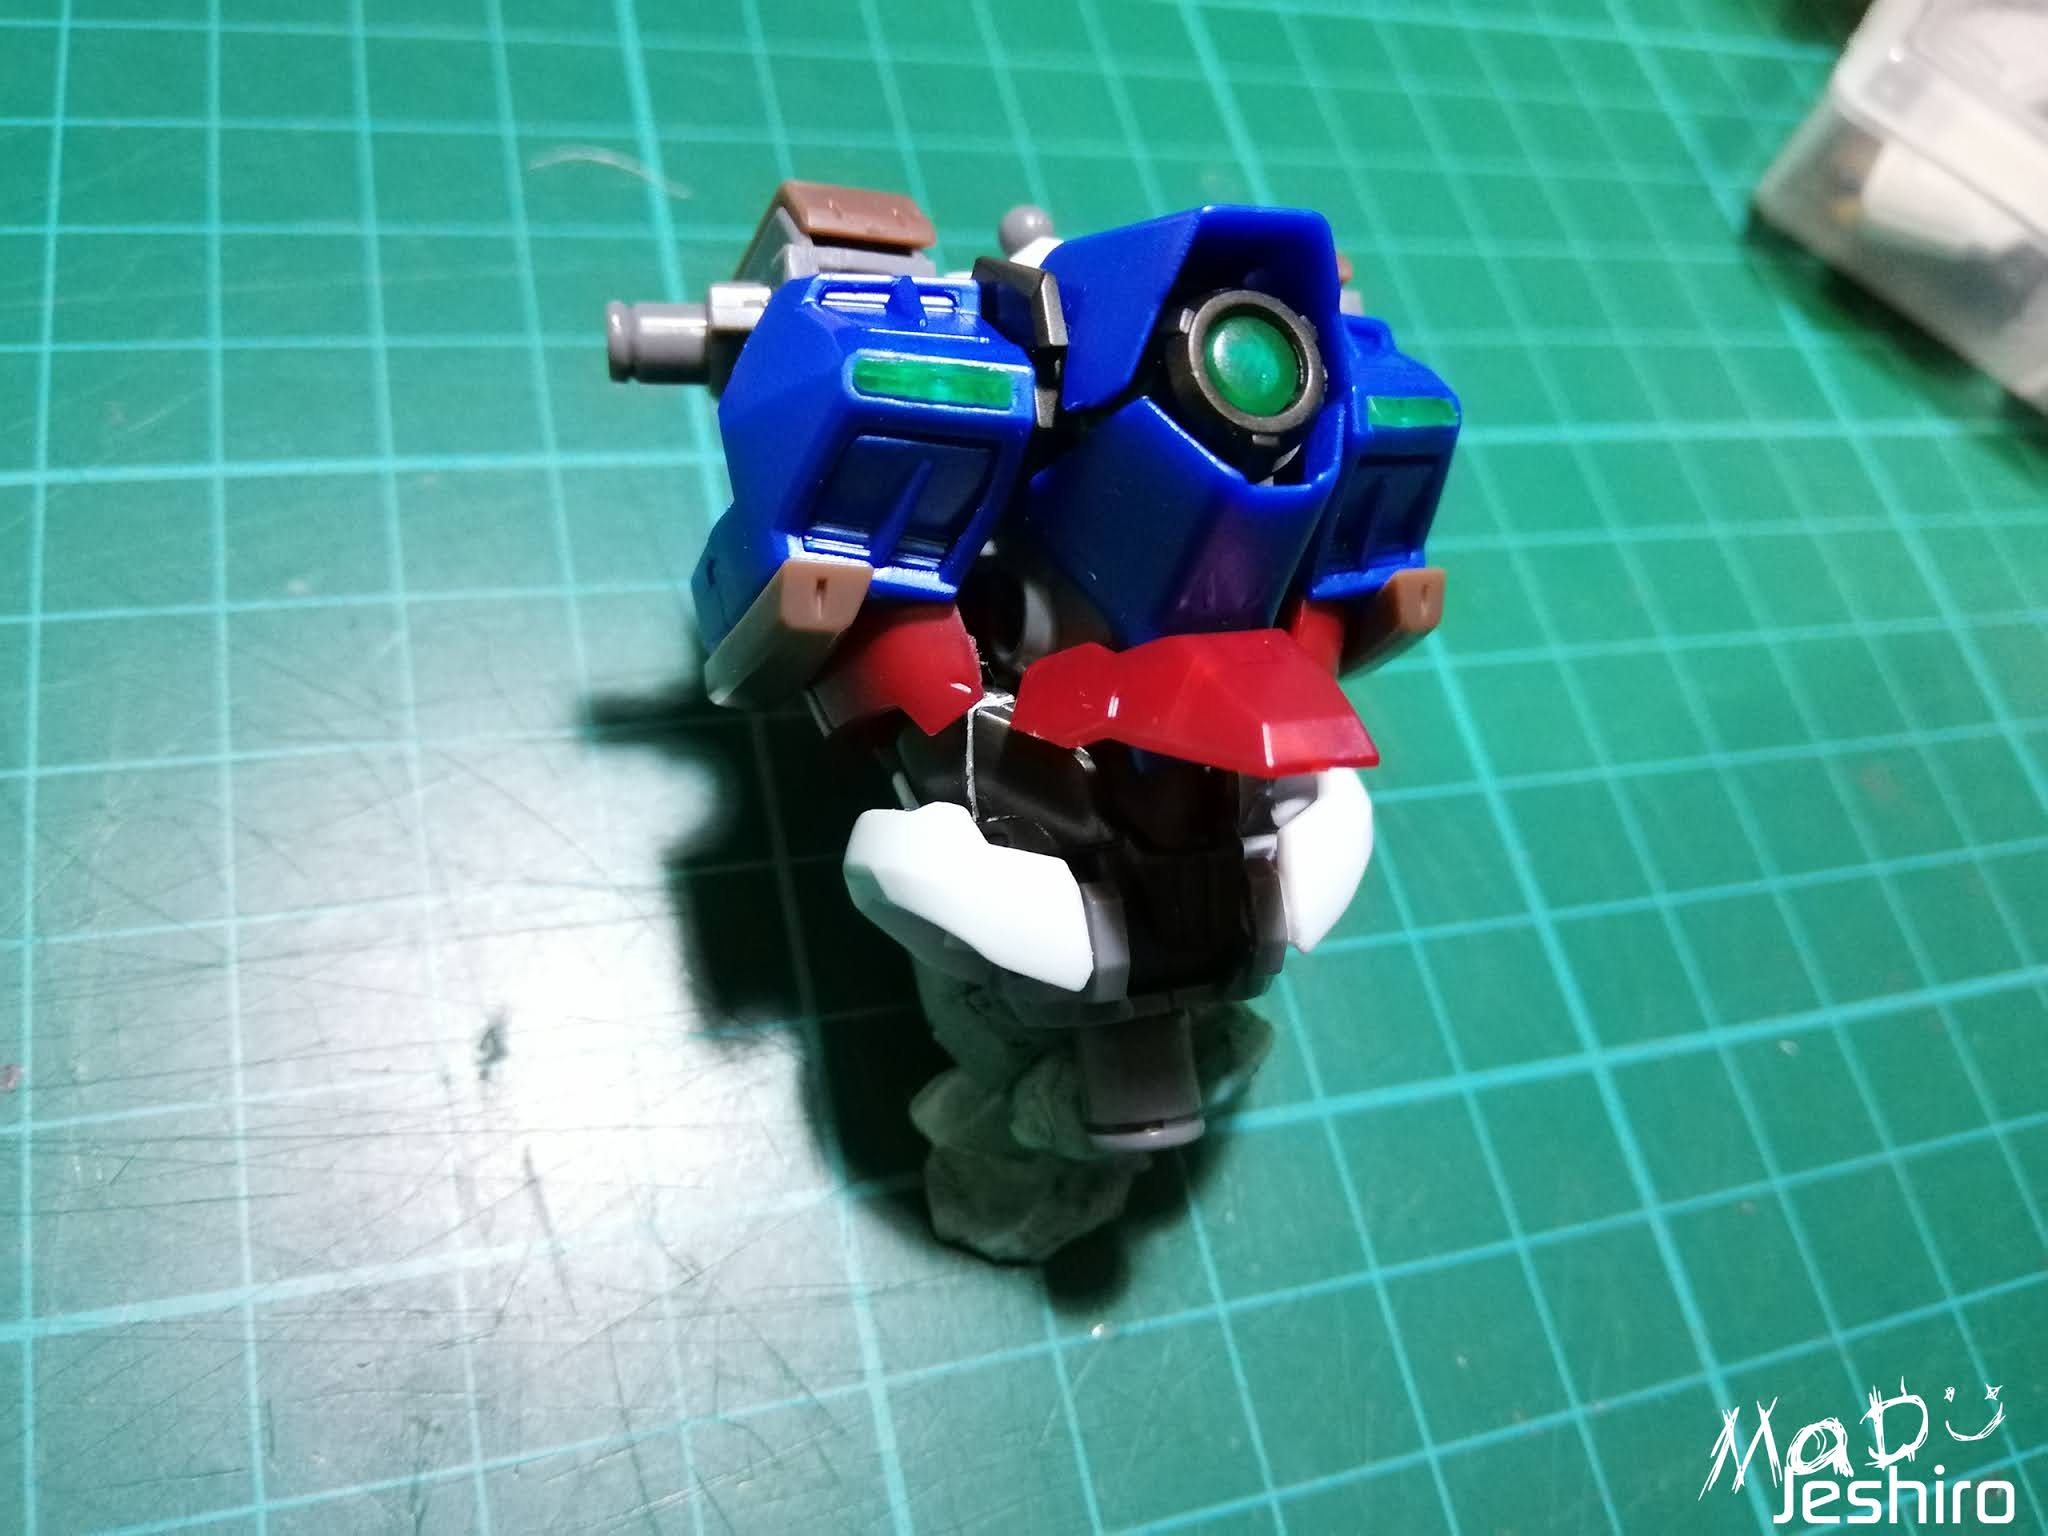
Head Unit:

Starting with the head, you get a decent amount of parts. It has good color separation from the extra light gray parts.


The only fitting issue I have experienced here are the parts E1 and E2. These are the two main base armor parts for the head (white). I can’t attach them properly so if you look at the front, there’s a seam just below the v-fin. The part on top (E7) helps locking these two into place though and the problem doesn’t affect the v-fin’s position.

Unlike the original Wing Zero Custom in the MG line, these blue ear-like parts are articulated and can be slid down to reveal another white part. I forgot to add some panel lining here though.
Body Unit:

 The amount of parts featured here in the body is above average. Most of the blue armor parts are separated, giving the builders a lot of options if they plan to paint this.


Design looks muscular and the abdomen part (red section) gives it more of a humanoid feel than a blocky robot look. It doesn’t feature a cockpit but that’s fine with me.
Now for the fitting issues; the clear green parts fits well but not to its fullest. I mean, you can touch the edges of the clear green parts. They should be inserted properly but I can’t push it any further in and I am scared to break them.
The blue chest parts (C1-17 and C1-16) are really hard to fit on the gray inner frame pegs (K32 and K31). I had to sand the inner frame pegs a bit to fit them nicely. But be careful when sanding or attaching the blue armor parts, the gray inner frame parts I mentioned are quite thin.
The white armor pieces (E21 and E22) on the abdomen rely on a slot-type peg. They don’t fit in very well on mine but I didn’t sand them to retain their grip.


As for the articulation; they are amazing. Because of joints in the inner frame, you can stretch the shoulder outward in an awkward way that it doesn’t look realistic anymore. More like a transformer if you ask me. :v

The red piece on the tummy can be flipped up but I haven’t tried this to check the ab crunch.

Not very noticeable but the body can be tilted left and right.

Another wasted extra gimmick are the machine cannons on the shoulder. I said ‘wasted’ because it’s very loose and it’s pretty scary pulling it outward.
Waist Unit:


The waist unit features decent amount of parts as well. Even though the colors are just white and blue, the parts separation makes up for it.


Design of the waist looks great even though this is not anime-accurate. (nice job Bandai)
Before we head to the articulation, let’s mention the issues. The Gray parts on waist sometimes hits the white parts of the abdomen (I mentioned earlier). I think the reason is that mine isn’t properly attached on the inner frame. This makes swivels and rotations really hard because it pops the gray parts off.
Before I move on to the Head Unit, I want to mention the coloring. Both MJH and Daban Model feature the white, brown and dark gray for the Inner Frame. Of course, there are no gold parts and Bandai has that kind of feature. I looked at a few reviews for the MJH and I noticed that not all parts have the same detailing like Daban. For example would be the panel line on the shoulder armors’ round blue parts or the small notches on the machine cannon covers. And there might be many more. Even though these are just minor detailing, I’m sure a lot of consumers and other builders would want more.
Daban’s white runners seem cheap because it’s not as glossy as the other runners (blue and red). But apparently, it looks whiter to Supernova’s first Wing Zero. I kept the SN WZC in my box so discoloration from sunlight should be very minimal to none. But the whiteness of Daban’s runner is really good. I just hoped they could have made it glossy like the red and blue.
Another thing to point out is the price that probably affected the reason why some of the inner frame parts are brown instead of gold. As far as we know when they released the Strike Freedom ver MB, it was very easy for them to make the gold-plated runners but for an increase in the total price. The only shiny gold parts that we will have here are the v-fin, the ones for the shoulders, and the fins for the shield. Can’t remember anymore but please do tell if there are things I might have missed.
I will feature the full Inner Frame section after all the body units.
Head Unit:


Body Unit:


Now for the fitting issues; the clear green parts fits well but not to its fullest. I mean, you can touch the edges of the clear green parts. They should be inserted properly but I can’t push it any further in and I am scared to break them.
The blue chest parts (C1-17 and C1-16) are really hard to fit on the gray inner frame pegs (K32 and K31). I had to sand the inner frame pegs a bit to fit them nicely. But be careful when sanding or attaching the blue armor parts, the gray inner frame parts I mentioned are quite thin.
The white armor pieces (E21 and E22) on the abdomen rely on a slot-type peg. They don’t fit in very well on mine but I didn’t sand them to retain their grip.


Waist Unit:


Before we head to the articulation, let’s mention the issues. The Gray parts on waist sometimes hits the white parts of the abdomen (I mentioned earlier). I think the reason is that mine isn’t properly attached on the inner frame. This makes swivels and rotations really hard because it pops the gray parts off.
The blue parts on the side skirts (C1-9 and C2-9) don’t fit well. It shows visible seams but can be fixed if you’re not lazy like me. Other than the two issues I mentioned, the rest of the armor parts fit just fine.
Moving now to the waist’s movement range. And this is the first time I have encountered an inner frame for the waist where the side skirts are already connected to the back skirts. I am not sure if this has something to do with the transformation gimmick or using it as a weapon holder.


Arm Unit:


Shoulder Unit:


The second one is gray parts G1-18 and G2-18 that connects the lowest white section. It isn’t tight so it’s your own decision if you want to glue this up.


Leg Unit:


There are no fitting issues here but you might try to be careful when attaching the inner frame parts without looking very well. The ‘snap lock’ design of the pegs and clamps can result in ugly stress marks especially if you need to dismantle them again due to wrong assembly.
The articulation is amazing is good but not that great. The rear ankle guards are already fixed to the main calf section. Unlike the other Master Grades I have built, they are usually separated to give you at least slight pivot. In here, you don’t have that and only the front ankle guard is separated or movable.


Backpack Unit:

I accidentally deleted the image for the backpack so I will just post that later along with the wings and the articulation of the binders in the full inner frame section. My apologies. :/
Primary Wing Unit:

The primary wing unit presents decent amount of parts. But I think it’s not as many compared to the Supernova WZC.

The Primary Wing Unit is separated into two and they have a very different design compared to the original MG WZC and the GFFMC version. I kind of like the GFFMC version more because it has a larger proportion and more feathery parts underneath. Maybe if you could modify this, you can probably add more stuff.

On the back of the first part, which I will just call Part A, you can already notice that hinge for the gray piece.


The white feather part can be rotated down. And you can fold the gray feathers outward.


The second part, Part B, in our primary wings looks a bit blockier. It also looked slimmer in a sort of way. It features raised surfaces or parts compared to the original design. I wonder if the feather effect add-on looks good here.


Part B is separated into two segments – the gray and the white. It’s not using a round male-female peg connection but a ball-joint connection.


That means, aside from the full 360 degree rotation, you can also pivot the white segment in any angle.


The GFFMC version has this gimmick where you can split the white segments. The HiRM features the same idea but in a different procedure. There’s a sliding joint in each part, dividing it into three. The gray part that let you slide them is rounded so you can slightly tilt each one.

Do not cut this peg because this will hook on the other wing to perform that ‘first launch’ scene. Unfortunately, I don’t want to mess up a lot of my decals so I skipped doing this as well.
There are few fitting issues though that you might want to look into.

Take a look at the part of the right. The male peg of this part F1-23 and F2-23 doesn’t fit very well on the female peg of the primary wing. It’s really tight and I am afraid to break the connector because it’s quite thin.

Another worrisome problem is that this same part has a huge female peg that needs to be connected to the binder. As you can see in the image, I have already scraped the F1-23/F2-23 parts to make sure they are not very tight. If you are fine with it being very tight (I can hear it creaking when I rotate the joints which is scary), then there is no need to sand or scrape this part. But do check it often if you are sanding it to avoid loosening the joints too much.
Secondary Wing Unit:

The parts here in the secondary wing unit seem few. I think I remember Supernova/Model heart having more parts.


I like the design but the gimmicks lacks a bit, or maybe that’s just me not being content.

Well, compared to the GFFMC version the secondary wing is divided into 3 segments. The middle part shows gray feather parts and you can do that here in the HiRM. But the GFFMC has another set of feather parts when the lowest segment is pulled down, and you can’t do that here. It’s already called High Resolution and Bandai somewhat pulled their punches. There are no snap fitting issues though which is good.

You can lift the secondary wing this high up.

The secondary wing is connected to the backpack using a round female peg that allows you to rotate it or swivel it left to right. There’s a small male peg on top and this is for the beam sabers.

Here’s a full view of the backpack including the secondary and primary wings
INNER FRAME:
PLEASE READ ( A MUST)
Before I feature the articulation of the fully built Inner Frame, I hope you guys will share some extra time reading this. A lot builders like myself sometimes just enjoy building and ignore most of the things that looked odd in their structure. After building the Bandai Freedom 2.0, I am now familiar with some of the peg designs that other builders doesn’t care about.

In this image from the Arm Unit inner Frame, you will see a notch or engraving in the middle of the male peg. Many thought this is just a design and I thought that too before building Freedom 2.0. But these notches actually serve a purpose making sure the other Inner Frame parts don’t fall off quickly. I don’t know the best term for this so I will just call it as the “snap lock” system. Why use this term?

This image shows the part where the male peg should go into. If you look closely inside, there is a hump-like excess in the middle. Many will probably think this is a common issue among bootleg kits that needs scraping, but you’re wrong. Even Bandai model kits have a few of them. This bulge or hump must align with the notch of the male peg once attached together. You will hear a faint snapping sound making them locked into place, thus the “snap lock” term. It is still removable but it’s quite hard. This peg design allows you to swivel or rotate the part without the worry that it will slide out after some time.
Do not scrape these bulges or lumps inside the female pegs. Be sure to check the male pegs first if they have this notch. And even if the male pegs don’t have the notch, I recommend leaving the lumps as it is, unless it’s really hard to fit the male peg in. You might want to scrape it a little bit.
Are there any problems if the lumps DON’T align with the notches? Yes, there is. Since it was designed to lock the parts together, the lumps will have a very tight grip on the male pegs (not the notched section). So if you twist them without getting them aligned…….well, you should ready your Tamiya cement. Yes – there’s a high possibility of breaking. And this is probably the same issue with other builders having broken pegs on the leg joint of their MG Freedom 2.0. I’m not saying it’s your fault guys. Just be observant next time.


Okay, so it’s a little hard to feature each unit one by one because of the ‘snap lock’ system so I did this before taking a gamble on dismantling all of them. It’s not as color-accurate to Bandai’s, but the separation of brown, black, light and dark gray parts did improved the look of the Inner Frame. Most of them will be covered anyway but it is still nice that they gave the Inner Frame some love and not just your usual all dark gray color.


Like you already seen in the Body Unit, the shoulder is highly articulated.


Without the outer armors, it’s quite easy to swivel the waist.


The ab crunch is easy to do as well.


The sideway bend however isn’t good and it’s barely noticeable.


Shoulder armor frame can slide here or rotated upward.

You can also rotate the whole shoulder armor if possible while the arm unit stays in the same position.


The front end of the wrist is movable but I can’t move it because of the forearm armor.


The back skirt frames can flip high up along with the connected side skirt frames.


The side skirt frame uses a hinge that allows you to flip it in and out.

And because of the rounded male pegs, you can fully rotate the whole side skirt frames. But I don’t think this is possible once you attach the armor parts.


It has a decent kick and can move far back.


I just bent it like this but I think you can go farther.

The foot also presents a good movement range forward or should I say upward?


You can also do a decent pivot here too.


As for the binders, they have a good swivel.

The first lowest joint (1) uses a round male peg so you can move that front or back. The second joint (2) also uses the same design like #1 so you can rotate that.


And the brown part (3) can swivel sideways.

The top piece (4) of the brown one is also movable. It can be rotated to a full 360 degree.
The top piece (4) of the brown one is also movable. It can be rotated to a full 360 degree.


And #6 can do a full 360 rotation.
So yeah, Even though the inner frame looks simple and easy to build, it still highlighted how movable the joints and body parts are. Well Bandai originally designed this anyway and Daban just copied it, so…. Kudos to you Bandai. :3
Armaments:
Rifle:

The main iconic weapon features decent amount of parts and this is for a single rifle. I like the brown because it helped add some extra color in the rifle and not just that simple dark gray scheme we always see in other master grades.

Before building, you might want to fix this clear green part (A2-21 and A5-21). The male peg on the rifle is to thick and can easily break the female peg of this clear green part. I scraped the inner rim with a hobby knife to fit it nicely. Other than that, all other parts fit just fine.


It’s your typical twin buster rifle of Wing Zero, just with the added brown color. I added some spring cable cover on the top section to add more details.

The rear end of the rifles can slide back but I am not sure if this is meant for the transformation. (I never tried the Bird Mode)

The handles can be folded down and each side has a slot for the manipulators, allowing you to have a decent hold onto them and recreate the iconic shooting pose.

The top brown part can be pulled up and the manipulators (hands) can carry them like some kind of music instrument.


Each side of the rifle has a foldable part with rectangular slots so you can combine them together.

And this gray part will be a surprise later in the Action Pose section. ;)
It was a little disappointing that they didn’t include the wires for the twin buster rifle. I wanted to use the same red coil charger cover but that would make my rifles look like an old telephone. :v
Shield:

The shield presents above average amount of parts. It’s not really your usual shield because of its shape and resembles more of a bird’s head for the Neo Bird transformation.

No fitting issues here and everything is a smooth build.

The gold fins below the nose are movable.

And the top section can slide forward.

You also get the adapter that you can connect to either left or right of the arms.
Initially, Wing Zero Custom doesn’t have the shield and only the twin buster rifles and beam sabers are supposed to be part of its weaponry. I don’t know why it became a trend for it having a shield as well. Well I don’t mind because I like extra add-ons. As for the design, I really like the …. the colors. To be honest, I prefer the shield design of Wing Zero Proto because it looks less of a bird. It still looks cool but I kinda don’t like the long slim look. Just my personal taste.
Beam Sabers:

And let’s not forget the beams sabers. Straight out of the runners with nothing much to do. I wish Bandai (or Daban if they wanted to change it a bit) could have added more details on it.

Or maybe add the extra details instead on the beam effects. Well it does have a curvy shape on it which is still nice for several action poses.
Extras:

Aside from the Action Base 1, we also get a set of fixed manipulators. Only the open hand variant is light gray and these are darker. (why Daban? why? >_> )

And the useless adapter for the action base. I think it's better to mention it here already. the shield is quite heavy and if you will try to pose the model with just the shield, the weight will lean towards the left (depends what arm the shield is attached). The adapter will get loosen up after some time so it's better to change it or create your own adapter. I asked a couple of builders and a few responded. It's not really useless, but I doubt it can hold the model for a very long time.
And the useless adapter for the action base. I think it's better to mention it here already. the shield is quite heavy and if you will try to pose the model with just the shield, the weight will lean towards the left (depends what arm the shield is attached). The adapter will get loosen up after some time so it's better to change it or create your own adapter. I asked a couple of builders and a few responded. It's not really useless, but I doubt it can hold the model for a very long time.
Decals:


Even though the waterslide decal sheet was small, at least Daban was generous enough to include one. MJH is already pricey and they didn’t even included decals that would have been a plus factor for their consumers. Daban’s waterslide decal wasn’t enough so I had to buy a few more online.


There were no manuals or guides where to position these markings so I just used the ones from the original MG Wing Zero Custom and Wing Zero Proto for references. Most of the other markings are just placed according to my personal taste.
Finished Model:
I forgot to do a height comparison when I was already typing the review. :/
Without the wings:


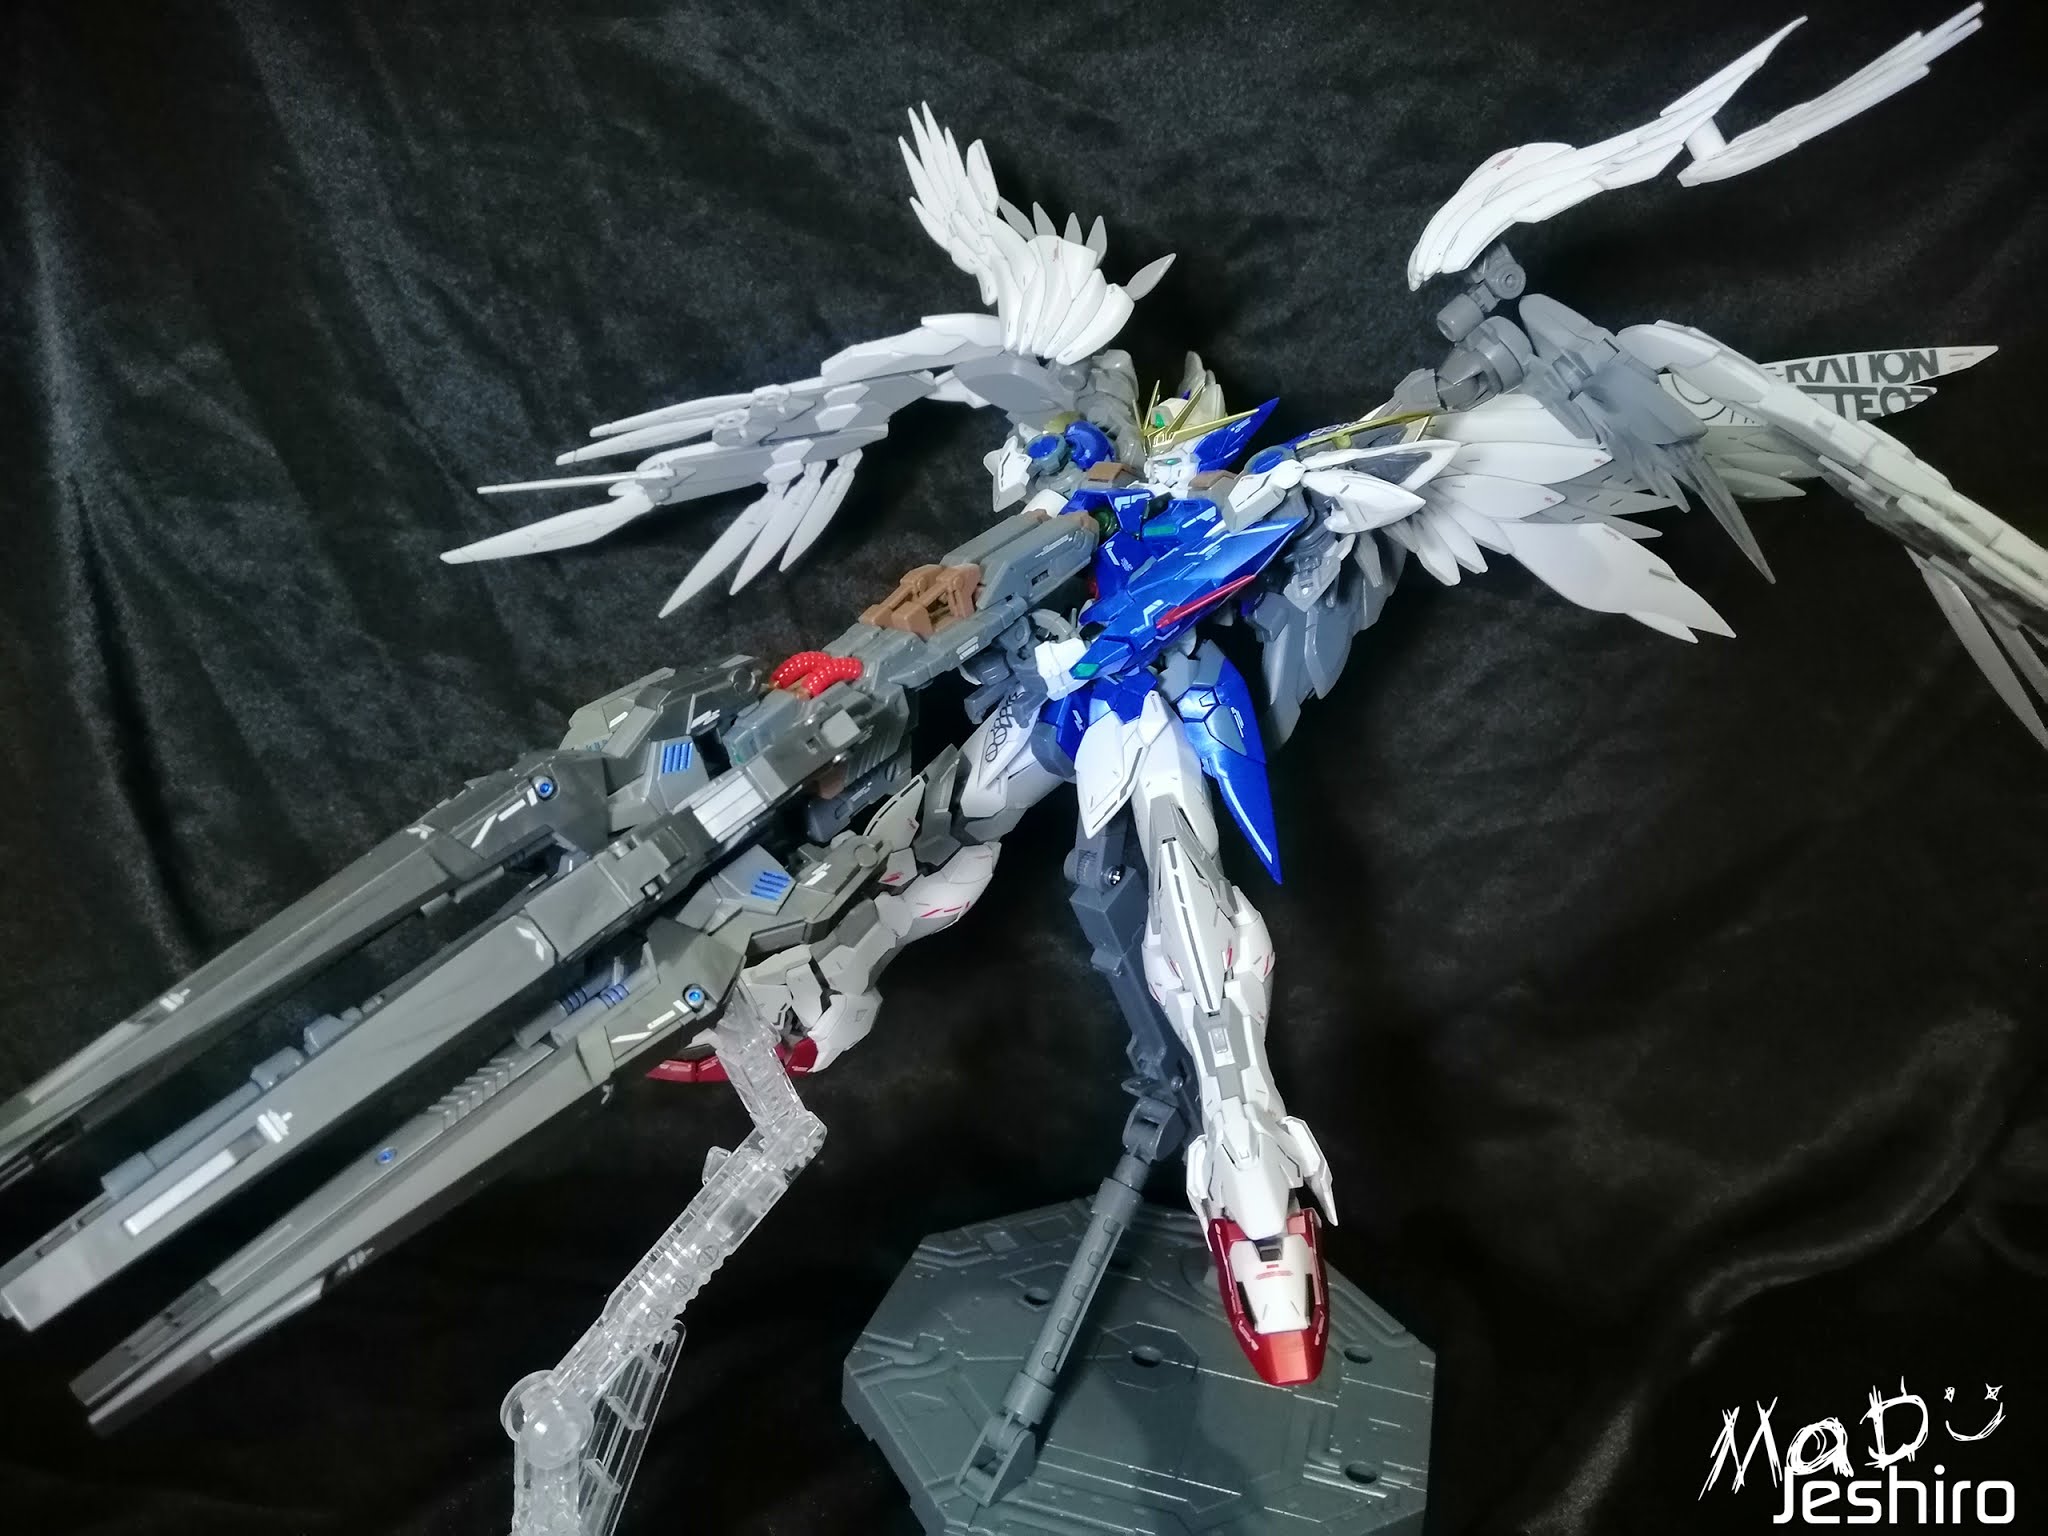
With the wings:


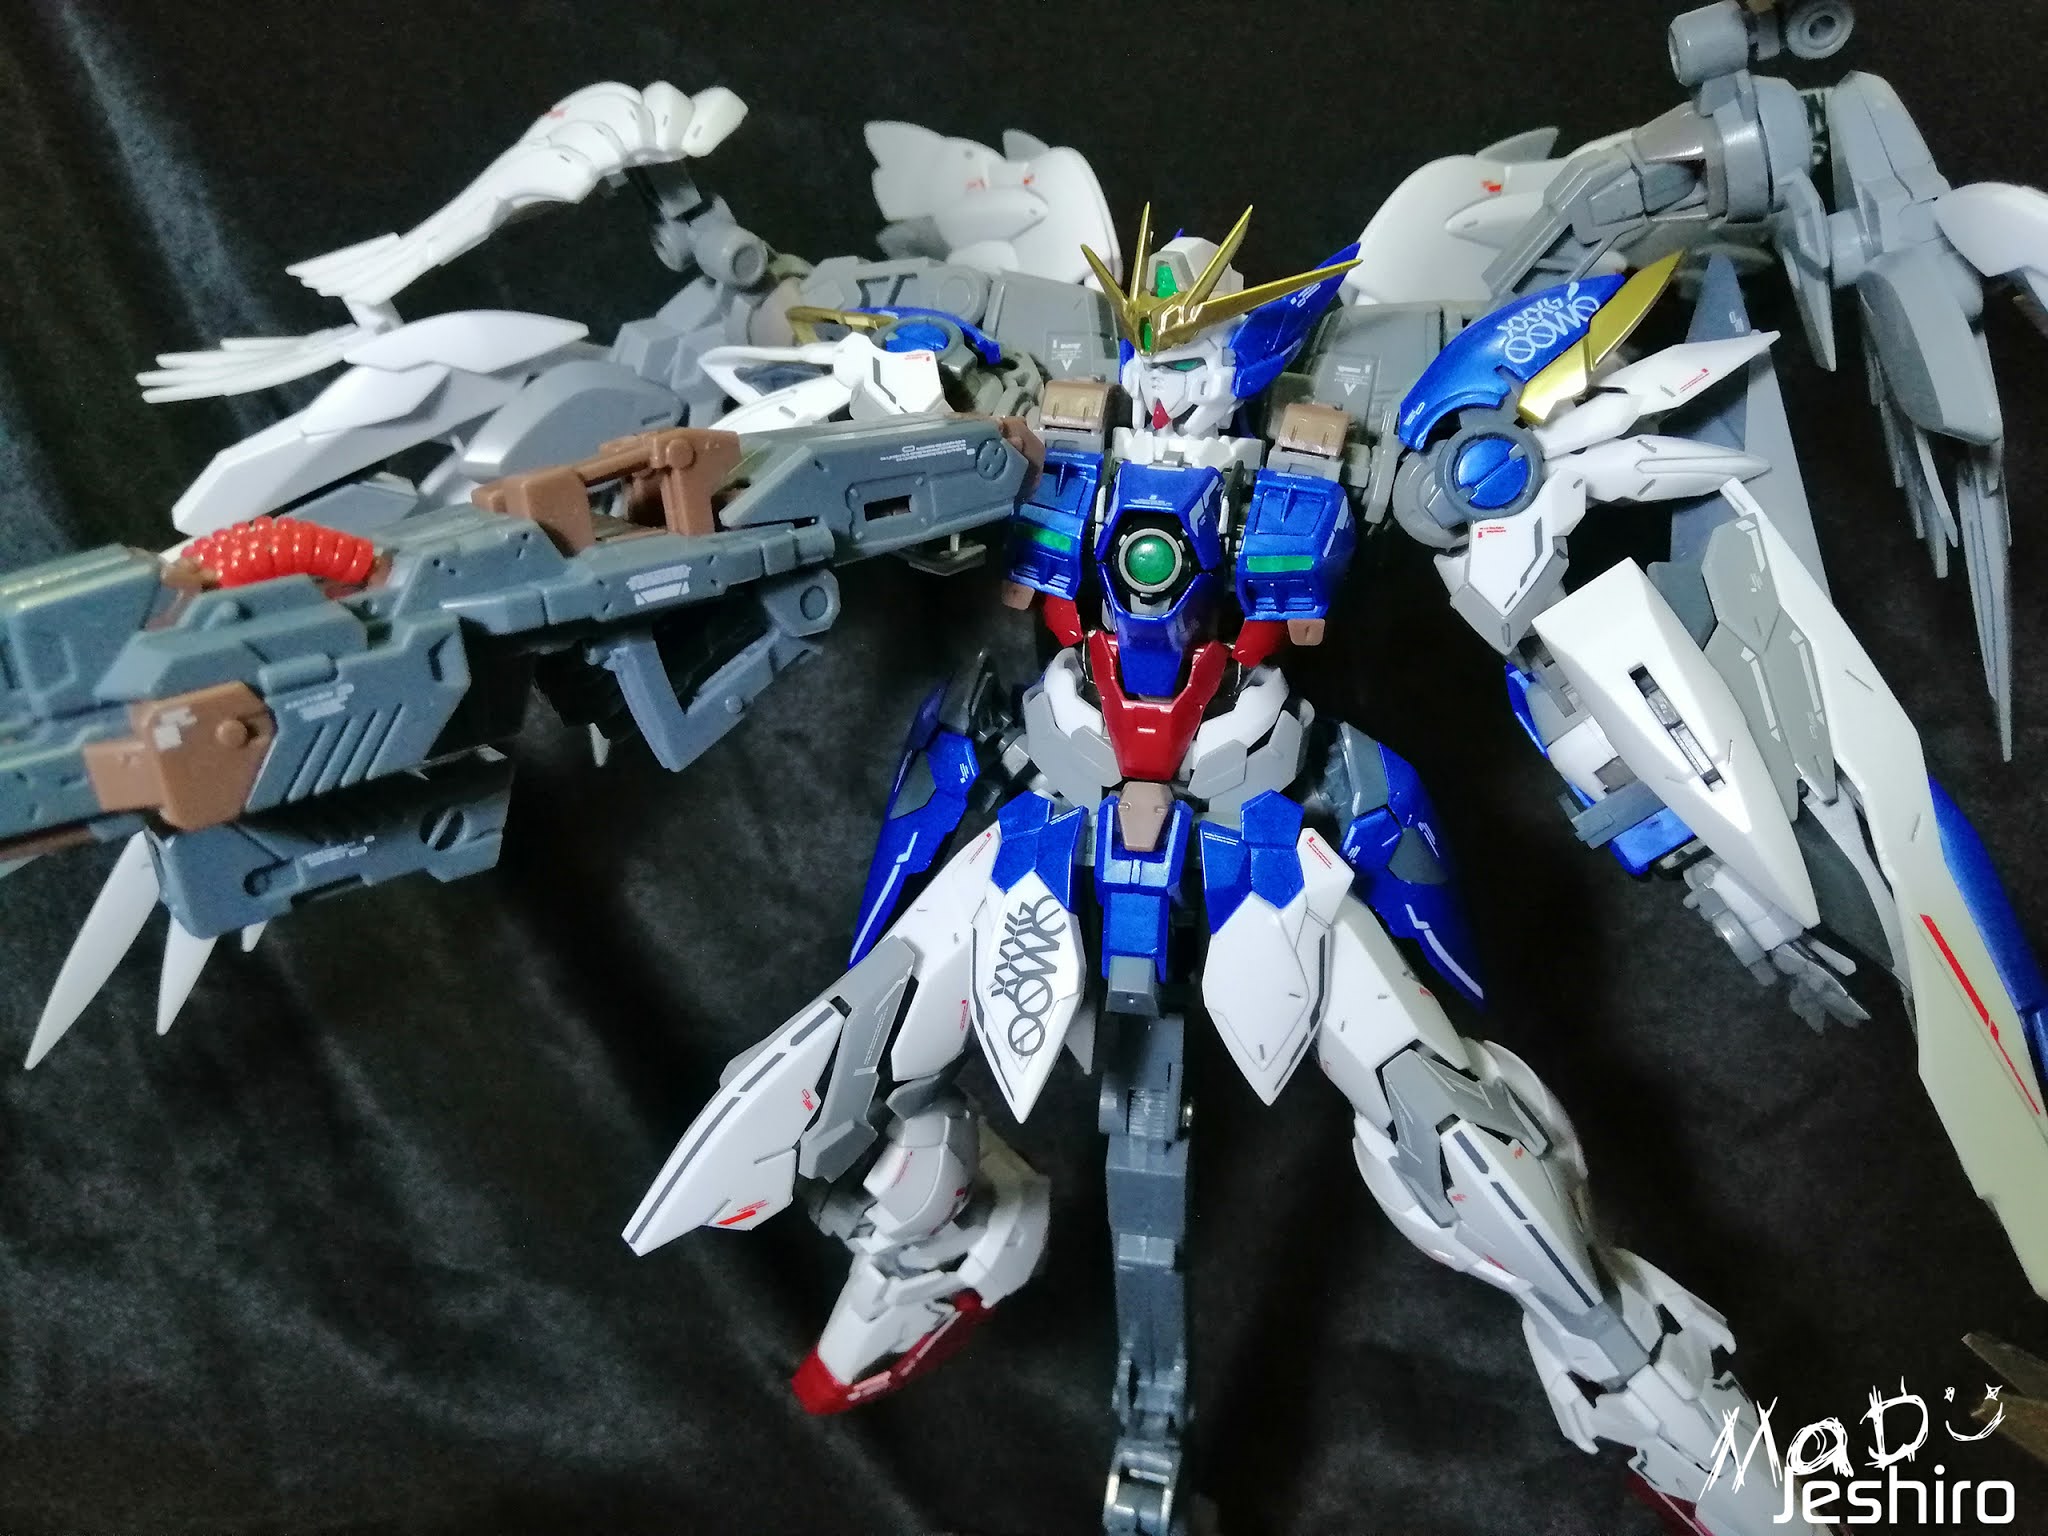
Plus Weapons:


Articulation Test:


The ab crunch seems bad or maybe it’s just my fault because I forgot to flip the red abdomen piece up. I didn’t try swiveling the waist because the gray parts keep on misaligning and hits the white abdominal parts I mentioned in the Waist Unit. But if fixed, I think it can do a fairly decent body twist.


The legs also present nice movement range on the legs. I tried doing the kneeling pose and I failed badly due to the lack of movable leg parts like the ankles.
Overall, it’s a really good posable chunky boy.
Close-up Shots:


Action Poses:
Apologies for the very limited action pose shots. You can just try the other poses for yourself guys. I don’t want my sweaty hands to ruin another decal/marking. 4 markings died during the action pose (too much excitement). :v
I would like to thank fellow builders Joseph Penaranda for giving me some tips regarding the weight of the model and how to balance it on the action base. And to Jun Cleofas on his suggestions with the action base adapters (check his YouTube channel HERE). Both of them suggested to use the widest variant of the U-shape or U-type adapter. It will spread the legs of Wing Zero a little bit, but it is more secured compared to the intended adapter from the kit.


Plastic Quality: 8/10
Even though the white parts didn’t have the same glossy metallic shine, I still love it. The white is better compared to the other white parts I have stored without direct sunlight. There were few flashes but they were barely visible and easy to clean. Some of the nubs that are automatically created from the factories were quite bit, but very well hidden. And these nubs don’t affect any of the joints – still have smooth movements. It was nice that at least 60% or 70% of the parts have the undergate treatment. The gate placement on the v-fin was a bad idea and I can still see the nub on the side.
Assembly: 8/10
Of course this is your usual bootleg so fitting issues are still there. But I will make this an 8 because I can use the tight fittings and joints to my advantage for posing. It means that it will take some time before they binders or the inner frame parts become loose. There were no parts popping off (except for decals :( ) during the time I’m doing action poses.
Detailing: 9/10
I have already seen the HiRM many times before MJH or Daban decided to replicate them. To be honest, I really like it and I was just holding my funds because of the negative issues I’ve been hearing about it. So yeah, the design is amazing for me and I like it. The shield as I already mentioned, have a so-so rating on my side. And as for Daban’s take on this model, the glossy color of the red and blue parts was really cool. I love the gold plating that they did for the v-fin. I just hoped that they have added more gold-coated parts to make it closer to Bandai’s original scheme.
This is just my own personal perspective. You see, there were several builders complaining about the design of the HiRM models. When I first saw their HiRM Barbatos, I thought that the design will be a little different and more on the ‘shiny’ side. Not same as the Metal Builds, but more like a glossier take on versus the MG line. But I was wrong when they released this Wing Zero Custom and the Astray. And then, their current last released model is the God Gundam. Do not complain if they have a very odd macho-like design. It’s just their signature when it comes to their overall design and proportion. I have watched the reviews for the Bandai HiRM WZC and one of those reviewers mentioned a very true fact about them – “it’s an EXAGGERATED re-envisioning of the iconic suit” (credits goes to MechaGaikotsu for this quote). And this is straight-up fact for all the HiRM models they have released so far. Expect that the future models will be like this and they [Bandai] will possibly avoid the original anime-accurate design. I remember that meme from Joker of The Dark Knight. Imagine him again saying, Bandai created a big-headed chibi Gundam that is not anime accurate and no one batted an eye. But when they released hunky designs everyone loses their minds. Come on guys, it’s Gundam. We should love ‘em no matter what they look. Even for those weird ones from Gundam G. :v
Articulation: 9/10
The rating says it all! The model is really posable but I just didn’t explored most of it because the decals were still freshly applied. I haven’t even used the setter/softer to make sure they are flatten out on the surface. But as you have already seen in each unit that the amount of movable parts is amazing and that is thanks to Bandai.
Gimmicks: 7/10
It was good that they continued adding the ability for Wing Zero Custom to perform the Neo Bird Mode and this is a nice gimmick for builders and/or collectors. I also like the part where you can attach the twin buster rifle on the side skirts. I don’t know if that was the original design in the series but it was good and bad for me. Good because it gave a different approach on how Wing Zero stores his weapons and bad because it looked messy. I checked the announcement and preview for the Wing Zero Custom ver. Ka and the foldable buster rifles that can be attached on the wings is a decent move. If only Bandai did the same thing where the twin buster rifles can be folded if they want it attached on the side skirts. I mean, the whole model is already out of its anime look, so why not go for more. Now I got curious guys; where does Wing Zero Custom actually place the twin buster rifles? O_O
Even though this is not part of the kit, the Messer Zwergs to form the Drei Zwerg Buster from Supernova’s (Model Heart) add-on is surprisingly compatible to the rifle. And I have checked our local online store and there is actually a Messer Zwerg add-on that can be bought separately. Quite heavy but looks destructive.
Armaments: 5/10
Come on, let’s face it. These are the only weapons Wing Zero has. If Daban tried adding the Messer Zwergs, my rating would probably change. I should've had gone for a lower rating too because of those loose machine cannons. I will just give it a decent 5 because the rifles contained good gimmicks.
Extras: 6/10
It was a good move for Daban Model to up their ante against MJH. Even though the waterslide decal sheet is small, it was already a good ‘Bright Noa slap’ to MJH. They even included an Action Base 1 to display the model. MJH added the construction manual but that’s not much of an offer because builders can still look online.
Patience Level: 4/10
It was easy and fun to build. The issues were minor and easy to solve. The undergated parts also helped reducing the amount of cleaning or sanding I had to make on some of the parts.
Overall: 9/10
I think it’s already a good answer to go for Daban Model compared to MJH. Daban Model is quite cheaper compared to MJH minus the loose parts I’ve been hearing about it. I think MJH contracted the issues Bandai made when they released the model. And because this is cheap, it’s not going to be much of heartache if you want to test new color schemes on it. Or you can repaint the whole model to give it a metallic look. There’s also a lot of room for extra improvements or modifications and it’s your take if you want to add more feather effects on its wings. I’m just good in giving suggestions but I haven’t tried any painting schemes on all the kits I own. :v
For me, the kit is beginner-friendly and I don’t see any problems having it as a first 1/100 kit. Just don’t rush and be observant especially if you notice the pegs don’t fit well. If you still want to go for Bandai, then go ahead. Just a reminder that from most of the reviews I have checked about the Bandai one, there’s a quite a number of loose fittings and you might probably think twice if these issues are worth the price. So that’s it for my review and I hope the issues I have experienced will be able to help you guys if you want to build it or planning to get it.