Introduction:
I don’t want to run out of articles so this is a big
opportunity for me even though it’s not my usual grade. Still, this is a good
way to take a rest from the 1/100 line. The problem though is that the brand
bothers me a lot. Yes, TTH is a very popular brand when it comes to a lot
issues. I did try my best here since I
have already experienced a lot of TTH kits from the past, but there were still
problems on my end and that can’t be blamed if the plastic quality becomes the
subject.
I want to be quick with this review or article because I
got a lot of kits to review for the next few weeks. Most of them are High
Grades but that doesn’t mean they are easy builds. They are not bootleg so I
have to be really careful (Bandai! Sa wakas! >_<). I also ran out of X-Acto blades and I need to get a
fresh set again. So yeah, I will try to be quick in this article but precise on
the main details or issues that need to be checked.
Anyways, please do comment any wrong terms/words I may
have used here. As for the typos, just don’t mind them and I will try to fix
them when I got the time.
Unboxing:
Nothing odd here because it’s always a common trait for
TTH to replace the word Gundam with Fighter and add a lot of Chinese characters
on the box art.
There are 2 plastic bags inside but TTH, as we know it,
packs 4 or 5 sprues in a single plastic bag so the parts are prone to
scratches. You may want to check the parts thoroughly if there were any broken
pegs.
As for the construction manual, it doesn’t have any new
changes and retains the usual 1 long paper folded in several pages. Well this
kit is quite old, so it’s kind of obvious. LOL xD
It features the built kit (which is a just a painted
model) on the front and the action poses on the last page.
The next images will be the sprues or runners
Sprues:
 |
| Sprue A (x1) |
|
 |
| Sprue B (x1) |
|
 |
| Sprue C (x1) |
|
 |
| Sprue D (x2) |
|
 |
| Sprue E (x2) |
|
 |
| Sprue F (x2) |
|
 |
| PC-132 (x1) |
|
This is the first time I have seen TTH with a nice
texture for their plastic. Or maybe it’s just here in Nu Gundam or Nu Fighter.
The brown parts were quite close to the texture of Dragon Momoko’s. The common downside here unfortunately is the
amount of flashes on the parts’ edges. The detailing (edges and panel lines)
are not that sharp compared to Daban Model.
The color of the yellow and red parts is also deeper than
the ones they have released before. I mean these parts are not dull and have a
good tone. This is really unusual for TTH to have a good plastic coloration and
texture. Anyways, you get the foil stickers and a small sheet of clear
stickers.
Body Unit:
And the painful journey here in TTH starts again. Yes
everything from pegs or movable joints are really tight. The good thing is that
if you apply more pressure, you can avoid the seams.
The abdomen or white art is using a clamp-like lock but
there are tendencies that it can be pulled off during movement (if the body is already
attached in the waist). Overall, the body looks great as long as the seams are
not visible.
You can move the main male pegs to a certain degree and that adds some extra range in movement.
Head Unit:
The head features very simple parts separation here with
no badly molded parts. There were few signs of flashes but that can’t be helped
if the brand is TTH.
The design is based from the anime series so it’s not as
cool as the “ver Ka” version in the MG line. Also, the A3 or red piece
(sometimes called “jewel” by other builders) is really tight. And you might
want to be careful when pressing this down or you might hit the v-fin.
I tried to put some color on the eye sensors using
metallic green but it’s not very visible because of the head’s shape.
Arm Unit:
Usual amount of parts for a High Grade but what makes the
arm unit unique is the gimmick for the left arm. I mentioned this earlier
that the texture or finish of the brown parts looks nice.
The way each section of the arm when already built kind
of reminds me or looks the same with the HG 1/144 Unicorn.
Anyways, the main issues here are still the same tight
pegs and joints. Good thing that the plastic is quite durable so it’s not that
prone to stress marks. The articulation is limited and the arm can bend to a
maximum of 90 degrees.
The gimmick I mentioned is the beam saber that you can
pull out here in the left arm. You will need to slide the blue part away from
the yellow cap and lift this tube like piece.
Leg Unit:
The leg features decent amount of parts and a lot of
polycaps to use.
Snap fitting was a real pain because of the tight pegs
here and there. I’m trying to press them hard to avoid wide seam lines and it was
fortunate there were no broken parts. The way you build it is also different. It was kind of a new experience again for me.
The range of movement here in the legs is also limited
because of the design. You only have a certain angle if the leg is bent forward
or backward. But this isn’t much of a big if the model is attached on an action
base. The flap or thrusters on the back of the legs can be move to a certain
degree as well.
Upper Body Unit/Shoulder Armor:
Very basic amount of parts here in the shoulder armor.
The yellow parts are not that loose but they are prone to
popping off if you don’t apply some good adhesive.
The pegs are not tight here but adding some extra
pressure when fitting them is still necessary.
Waist Unit:
The parts here for the waist are pretty simple and you
don’t have much separated pieces for the side skirts. You will just attach them
in the PC parts.
Do I have to mention if this part is a smooth build? :v
As for movable parts, the front skirts are separated from
each other so you can move either left or right when posing. The range of the side skirts and front
skirts’ angle isn’t bad. The back skirt is fixed and you can’t move this part.
Backpack Unit:
Nice amount of parts here to build the backpack and
Bandai didn’t release this to use white foil stickers. Instead you get separate
parts for the white ones.
The flashes are very visible on the edges and the alignment
of the corners or pointed edges are off. Well that’s what you get here in TTH.
There are lots of tight pegs again and my fingers are
already hurting during this period. As long as the parts don’t have any big
issues, that is fine.
Funnels:
We now move to the funnels and they included yellow foil
stickers here to add some extra coloring on the white parts.
The foil stickers are not that bad and stick pretty well
on the surface. Another good pointer for the foil stickers here is that the
cuts are good. The funnels can fold too but you may have to improvise in
building the rods to hold them.
Please do check out in the construction manual that the
funnels have a specific design where the connectors (brown) are placed. This is
to ensure that the original design (when attached all together) is followed
correctly.
As for the issues here in the Funnels, the F14 (brown
connectors) seems fragile and the female pegs are really tight. You may want to
scrape the inner rim a bit.
Also the tip of the funnels fits just fine but they have
a tendency to separate slowly thus the seams appear. Adding some glue might do
the trick.
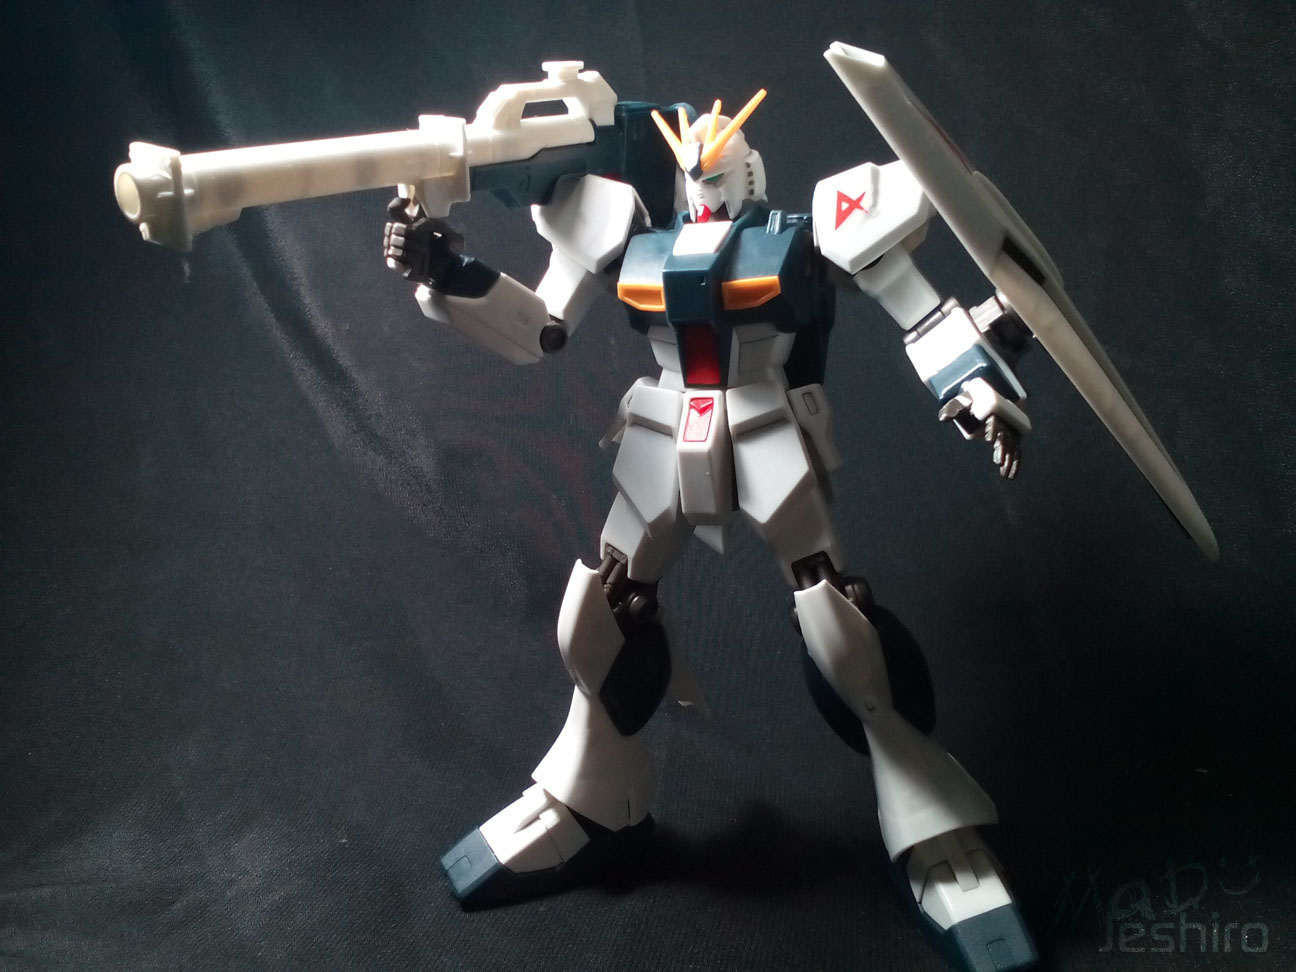
Weapons:
Beam Saber:
It’s nice that the there’s a movable guard in the handle.
There are no problems here and the parts fit nicely.
Beam Rifle:
The assembly is very straightforward here in the rifle.
But the good pointer is that they fit smoothly (FINALLY!).
Hyper Bazooka:
At least you get a colored piece for the ammo and that’s
neat.
No issues here with weapon and I’m already starting to
think that the bad route is always on the main model here in TTH.
Shield:
The detailing on that brown part for the shield looks
good. The lines are deep and it has the same metallic look I’ve mentioned
earlier.
The design is pretty plain though, so adding the clear
sticker is a must.
Extras:
This kit comes with a few extra fixed manipulators/hands
that you can use for posing. There are 3 beam saber effects and two of them are
for the main beam saber attached in the backpack. Also, you get another piece with
a hook so you can separate the funnels in three’s to balance the weight. This
is good especially you don’t have an action base here.
Completed Model:
Without the funnels:
Articulation test:
You can lift the legs this much which is still good even
though the front skirt hinders it a bit.
The legs are using a ball joint which is common in High
Grade kits so you can only stretch the legs this much.
The arms features a nice angle up to this degree. This is
really cool for a HG model.
With the funnels:
I didn’t lean the model forward to balance the weight,
but I assure you it took me more than 30 minutes to make him stand like that
without any support.
Here are the rest of the shots and I would like to
apologize to Master Paul Yasser with my bad lighting (LOL). But after a few
good shots, I am starting to get the idea where to aim or point my lamp.
So this is my personal ratings for the kit…
 |
| design based from GDC card |
Plastic Quality: 7/10
The quality isn’t bad as before or maybe this is just an
isolated case. I don’t know either but it was really uncommon for TTH to have
this nice texture on the brown parts. There were still a few flashes but most
of them are thinner than the other TTH kits I have encountered. There were no
badly molded parts and that’s also a factor to consider. Even though a lot of
them have tight pegs, the stress marks were not that visible and that often. I
think giving the kit a 7 for plastic quality is just right.
Assembly: 5/10
I don’t want to return to the TTH brand but I can’t stop
either if the kits would help add an article in my blog. Seriously, this kit is
a real pain in your fingers. Everything in main model is tight; pegs, joints,
and any parts that should move. The plastic quality may be nice but I am
starting to doubt if I would recommend this kit among beginners.
Detailing: 7/10
For some reason, I love the design and detailing of this
kit. The whole plain look really resembles the old fashioned anime design. You
may be able to add some few mods here but not as extravagant as the ver Ka
version. Or maybe some 1/144 caution seals/markings here to add more color.
Overall, the look of Nu Gundam here is awesome.
Articulation: 6/10
I think the model features good range of movement for a
High Grade. The Nu would look even better if placed on a pedestal/action base.
The movement range for the arms and legs are just right. It was not that too
extreme but not disappointing for builders either. Of course, it could have
been better if the legs have more range.
Gimmicks: 4/10
As far as I can remember and seen, the kit doesn’t have
any to boast off. But if I were to put the funnels in consideration, I think it
was nice that it can be folded. All you need now are improvised rods and some
effects to put them into action.
Weapons: 6/10
These are basic weapons for the Nu. They even add the
Hyper Bazooka in this kit so you get to play with other action poses aside from
just using the beam rifle.
Extras: 6/10
Having the option with 3 more fixed hands and two of them
have the white guard piece are already a good bonus. You get another part for
the backpack and put the funnels in a 3 by 3 design is also good.
Patience: 5/10
The only thing that consumes a lot of time here is
pressing the parts to fit them nicely. If you force them too much, the pegs may
break or the stress marks might appear. I think being “slow but sure” is a good
advice here in TTH. But as long as you know what you are doing and how to
handle these issues with fewer errors, then my rating of 5 is just right.
Overall Rating: 6/10
I would definitely recommend the Bandai one and avoid
those bad issues I have mentioned. If this was in Daban Model’s side, my
comments could have been more positive. But I just really don’t like it when
the arms or legs or the body have really tight parts. And getting injured with
these issues or problems would only put you in a more stressful situation. I
mean, you may be able to handle the issues, but don’t you think it is way
better to get the Bandai one? Just because the bootleg kit is cheap doesn’t
mean it is always good. You may want to think carefully if the price is worth
the trouble and hassle you will get here.
This is just my suggestion, so you still have the final
decision to go for this kit. If you just want to practice a new color
combination in painting, then why not. Or you just need a few parts for some
modifications and apply them on other kits. That’s all I have to say for this
kit and thanks for reading this article.
Again, if you have noticed any errors on what I said,
just comment them.
Have a look on our Gunpla-related Facebook page -
Click
Here