Introduction:
It was a hard time for my client what kit to buy, because there are lots of new released kits in Divi. He can only pick one from Altron, Deathscythe or Providence. And yes, Providence was selected and I get to review the kit he bought. Any kit from for me was just fine because they were al new and I hope I get to review the Altron of Supernova and Deathscythe TV ver of Dragon Momoko. My goal of getting Strike Freedom ver MB (Daban Model) was pushed back by a couple of weeks again of sudden financial problems.
If you get to see any typos, just don’t mind them and I will try to fix them after some time. As for terminologies and wrong use of information related to Gundam and/or Gunpla, please do correct me by sharing your comments below.
Unboxing:
The box was pretty much simple and you don’t get to see the finished model here. It has the same idea that of BTF’s Double Zeta ver Evolve [Slim].
The name “Providence ver. Sun” is written on the sides and you get to see the logo of Devil Arts as well. And speaking of “ver Sun”, I am guessing it was the shorten name of Sunkaka which is written on the front of the box along with the other individuals who have worked out for this kit.
And now for contents, they were quite few in my opinion and there was enough space to put in a couple of extra sprues.
The manual was pretty much the same with the boxart where the colored art of Providence is show and not the finished model. So technically, you don’t have any clue what the finished model would look like unless you try searching it the internet. The back of the manual shows the title Providence ver. Sun and the names of the individuals I have mentioned earlier. Here you can see the name Sunkaka and I think he’s the Director or you could say head of the team who designed the kit. Yes they have collaborated with Magictoys and we are familiar with their kits. That Kunio Okawara is kind of familiar though.
Inside this construction manual, you get to see the information about the mobile suit but they are all written in Chinese characters.
I took pictures of the list of sprues here in the manual. There are 23 sprues but most of them are just small. Please check the list because I won't be adding any sprues name below.
I also noticed that the plastic bags were different. It’s not the usual smooth and glossy ones from other kits. The plastic bags here were quite thick, blurry, and have a soft feel to it. What’s nice is that they packed a few single sprues on these plastic bags to avoid scratches.
The next images will be the sprues and other contents of this kit.
Sprues:
The detailing done here is really cool and I see a lot of raised parts and vent-like design. There were no flashes either and that is a good thing. I am not sure though if you can sand the nub marks because the plastic were same with Dragon Momoko having that “nougat”-like feel when you cut them.
A good factor on the other hand is that few of these parts are undergated which is a big plus for me since I can’t hide the nub marks easily.
The waterslide sheet looks really great giving enough logos and caution seals. I want more caution or warning seals than the logos because they can be placed on any part of the model. But overall, the sprues were complete with no bad moldings or melted parts.
So let’s start with the model.
Head Unit:
The parts separation here is nice. You get separated parts for CIWS which is connected to the ear-like fins.
It is not very visible in the image above, but the face mask has vents where you don’t need to worry about panel lining. Yes, they have the similar idea with Perfect Grades where the face mask have holes or has a hollow vent.
Please do not mind about the mask being misaligned. It was my fault not fitting it firmly when I took these pictures. I fixed it up on the completed model section. There were no issues here and everything gits just fine. There were no tight parts too, and that is a good pointer.
I also used my angelic green to color the eye sensors instead of using the foil stickers. I’m supposed to use my metallic green but the angelic colors matches the texture of the plastic giving it a nice highlight for that matte look.
Body Unit:
As I thought when I first saw the sprues, there will be no cockpit for the pilot fig. The inner frame here is also simple and it’s more like a support for the outer armor. Of course, the inner frame was also a help to add movable or articulated parts that will be used for the arms and neck. The model was indeed the same with BTF’s Double Zeta.
So far so good – there were no problems building the body of Providence and it was a smooth one. Detailing overall looks awesome and I am glad the angelic green blended well here. I also used the Uniball Signo to add some color on those parts in the upper body.
The articulation is amazing considering it features very simple mechanism in the inner frame. You can move the male peg this much.
The body can be tilted left and right with ease. The seam on the peg was also my fault for trying to add super glue. I didn’t trim the female pegs but these gray parts tend to slowly separate from each other. I tried disassembling them again but it was tough. Fortunately, I can still press the parts for the abdomen and that means it can still fit in the waist unit.
Waist Unit:
The waist features very simple parts for the inner frame with few outer armor parts. Well, the DRAGOONS will become the back and side skirts here that is why it looks few. But the detailing done here makes up for the lack of parts separation.
To add some life in the waist, I used the angelic blue and angelic green again here for minor coloring. There are no major issues here except for the ball-joint pegs connecting the front skirts because they were tight.
As for articulation here in the waist unit, you can lift the front skirts this high up. I am not sure if you can still do this once the body is attached.
And because of the ball joint and clamp mechanism connecting the front skirts, you can tilt it up like so. If you noticed, the left front skirt is raised upward.
Just like most 1/100 Master Grade Gundam models, the main female pegs here in the waist can be moved up and down.
Overall, it was a very easy build and everything fits just fine except for the mentioned connectors of the front skirts.
Leg Unit:
I must say that the legs don’t feature that many parts. The inner frame looks simple and you don’t get any outstanding gimmicks here. The finished right leg is on the side and you will see the comparison how many parts were used just to build that leg.
I forgot to add these parts in the exploded view.
I still can’t find any angelic purple or violet pen so I used the angelic blue instead to add some minor coloring.
The legs didn’t surprise me with troublesome issues and it was another smooth build here. Everything fits perfectly without any seams. The lack of gimmicks however is kind of a bummer and I was hoping for cool movable parts here. :/
The articulation here in the Leg Unit isn’t bad either so I guess it was just fine having few parts to build it.
I am not sure what exactly the purpose of this flap is, but lifting this gives you an extended range in movement for your feet. You can also move the front part of the feet down.
At least they added thrusters here that can be tilted up and down.
So that’s it for the legs and there were no problems to note.
Upper Body Unit/Shoulder Armor Unit:
Again, the model features very few parts here with a basic inner frame design. The detailing however is awesome and makes up for the lack of movable parts.
The only parts you can move here are these gray female pegs.
Arm Unit:
Even the arms features average parts separation. The inner frame is a bit similar with the GAT series. The manipulators are also fixed and you get a set for posing or display.
I added the detailing and panel lines before applying the decals. It was another smooth build here in the arms and I am amazed that there were no problems starting from the head up to this point.
The movement range is great and you can bend the arms this much.
The flap on the side of the arm is also movable and you can tilt the fixed manipulators to a certain degree.
Side/Back Skirt:
Technically, these fin-like skirts are part of the DRAGOON system. Unlike the Strike Freedom where all beam cannons are attached on its wing, the Providence has most of the DRAGOON weapon system attached on the waist. Anyways, these are the parts to build the back and front skirts.
The side skirts or side beam cannons are the ones in pairs and the single fins are the ones attached on the back.
The kit features effects for these beam cannons and that means they can be removed from their connectors as you see in the image above.
As for movement range, the back and side beam cannons can move this much.
The side skirts or side beam cannons are using a clamp-like mechanism which also adds movement range. The back beam cannons are using a ball-joint mechanism but it will be hindered by the huge backpack.
And if you noticed, the side skirts are shorter and the back ones are longer. I just thought to mention that. :D
And if you are looking for issues here, there are none. But do take extra caution because some of the parts seem to be fragile.
Backpack Unit:
The backpack unit also known as the Large Pod for the DRAGOON system features above average parts separations. Well it’s because of the three beam cannons and two smaller fins or beam cannons again. But do not mind on the parts separation and enjoy that uber detailing made by Devil Arts. :D
After building the backpack and the connector, the shape kind of looked like a turtle shell. O_O
There are no problems or issues here and that’s what matters the most. The two fins are tight when attaching them to their connectors but that’s not much of a big deal.
So in total, you get 11 beam cannons or DRAGOON weapon system for Providence and all of them can be removed for the effects gimmick.
I applied some angelic blue here in the middle but I forgot that the decals will just cover them. I will just remove them again.
Weapons:
Composite Armed Shield:
Not bad for parts separation and I forgot to add this red piece here.
I added some angelic green and blue again for some extra detailing. There are no issues here and it was a smooth build.
The hollow area fits just fine on the left arm.
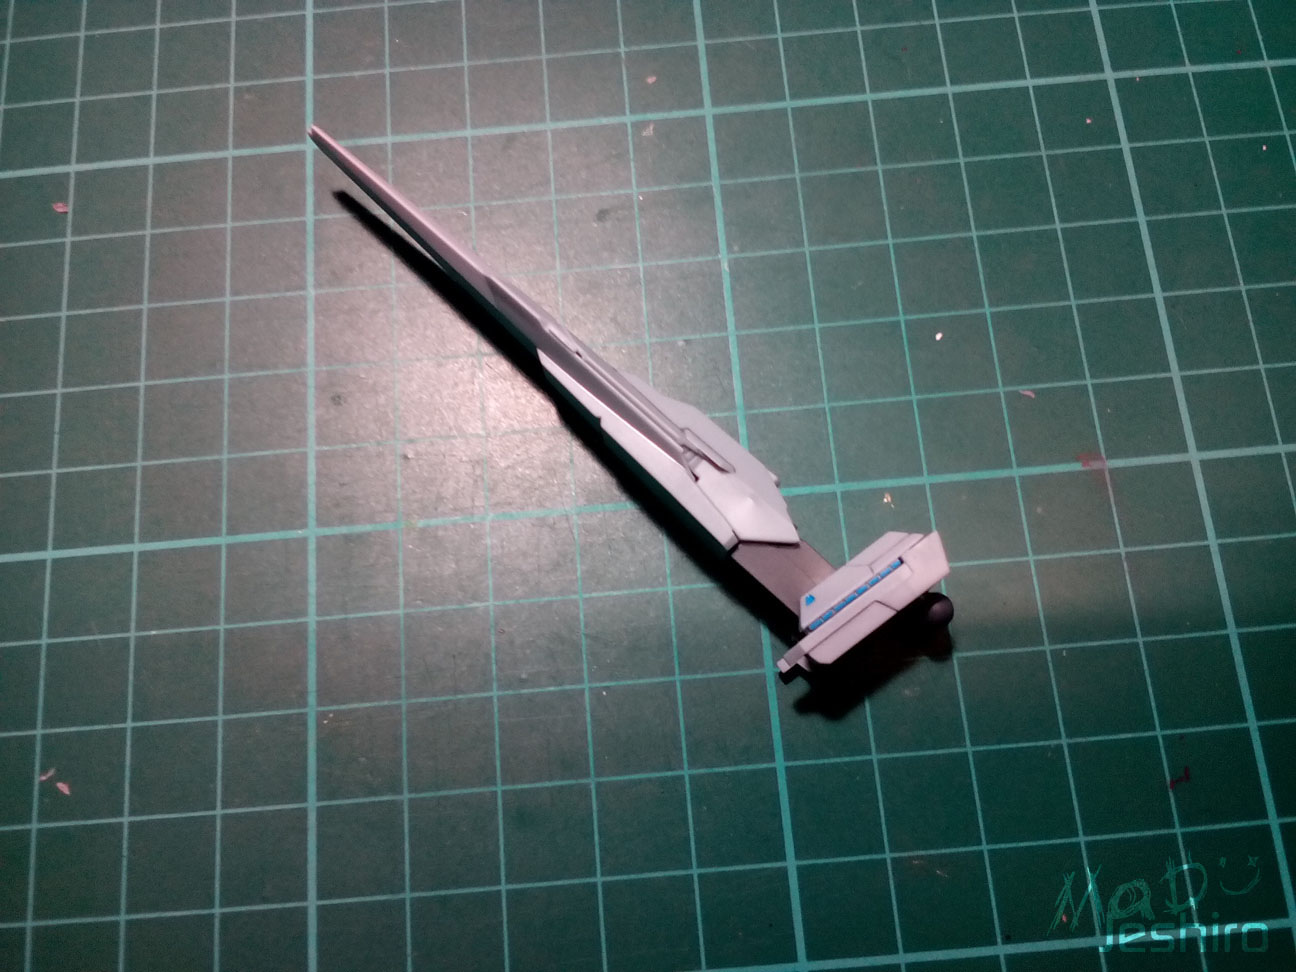
Judicium Beam Rifle:
The rifle features very few parts and it was easy to build.
I thought of applying silver on those oblong detailing on the side but I was worried that my client might touch them by accident and the ink will spread. :/
The weapon doesn’t feature any cool gimmicks but at least you can move the handles.
Decals:
As I mentioned earlier, the waterslide decal sheet included here is great. It features just the right amount of caution seals/marking with enough logos to use. I also noticed that some markings have alternate colors and you can choose between white or gray.
The text written on the markings or seals were also amazing. Even though they didn’t use the word “Gundam”, the design done here is enough to add life on the model. I was also surprised they actually used the correct meaning of the DRAGOON here. (SIDE NOTE: I memorized the meaning of the DRAGOON when I was still editing decals for Strike Freedom ;) )
The quality is just as good as the design. The markings can be removed quickly after dipping it in water for about 5 secs. Usually, it takes 10 seconds for the marking to slide off the backing paper. But this one can be removed with half the time.
Extras:
You get a nice set of fixed manipulators especially when you change posing for your model. You also get spare extra beam cannon here.
Completed Model:
Without the Backpack Unit:
With the Backpack Unit:
Articulation Test:
You can lift the legs this much. It was not that bad, but I wanted it to do a split. LOL
You can lift the arms and the shoulder armor this high
up. But do not force it even further or you might break the blue portion near
the shoulder. It doesn’t have any support on the bottom so there’s a
possibility this might break.
I tried the kneeling pose but it was kind of tough if you
can’t find the correct angle.
Close-up View:
Here are the rest of the shots..
And here are my ratings...
Plastic Quality: 8/10
I will separate my comments here into two. First will be the color and I am not going to complain with it. Surely it was kind of dull in the first look but it was better than BTF’s ZZ Evolve. It gives that matte look which is a good thing for me since I don’t have the skills to paint any model (yet). So yeah, it gives a good plus to the model.
The actual plastic quality isn’t that the same with TT Hongli. During the time building it, the brand called Model Comprehend came to my thoughts because they seem to have the same composition. I am also glad that were no flashes or whatsoever in the parts. Again, I have no complaints here and the rating I gave seems to be just fine.
Assembly: 9/10
This is a very rare occasion where I have encountered a smooth build especially on a bootleg. Of course there will still tight parts or issues I have encountered, but that doesn’t mean I have to overlook the positive sides here in the kit. Most parts have a “smooth build” or you could say parts without the need for adjustments like scraping and sanding. If I were to build the kit on a whole day, I think I can finish it within that period.
There were several parts where they have the tendency to be removed so easily. I had to glue them but that’s not much of a big deal and it does not outweigh the good side in this section. Some were also tight but they were also few to mention. Besides, the loose or tight parts problem in the bootleg industry is common thing so I think the rating I gave is just fine.
Detailing: 9/10
I saw the detailing for Bandai’s own 1/100 MG Providence and it looks good. This Providence of Devil Arts however features more intricate detailing compared to Bandai. Even though each unit (arms, legs, body) features very few parts, the detailing is really good that you will only focus your thoughts there and look last on what the inner frame looks like.
I do not have the skills or tools to add more minor coloring on the parts. But if you could paint those tubes, pistons, and other parts that are hard to reach with silver or any metallic that blends well with the inner frame color, I’m sure this model will stand out even more.
Articulation: 8/10
The movement range is not that bad considering the bulky look of Providence and the only section affected by less movement range is the lower portion because of the hanging beam cannons attached on the side skirt armor. The abdomen is also kind of bulky and the front skirt gets in the way so there are lot of hindrances during movement. This problem is just a very minor degree and the legs can still feature great angles even with its bulky look.
The upper body doesn’t have any big problems when it comes to movement range and I love the upper body armor or shoulder armor having the feat to be tilted upward. In its own way, Providence shares good articulation. I am just not satisfied with the movement I can do on the lower portion. Well, having the ability to kneel is kind of a plus for me so I am giving it an 8.
Gimmicks: 6/10
You saw the inner frame and it doesn’t have any design for possible gimmicks. There were no cockpit hatch here either as I already mentioned earlier. I am adding the DRAGOON system with the feat of attaching beam effects as part of the gimmicks. At least in that manner, this section won’t receive any lower ratings. I already thought of several portions that might count as part of the model’s gimmicks. But I am not sure either if these portions I have in mind are actually counted as gimmicks. I will not mention them and I will wait for your comments guys.
Weapons: 7/10
Why a rating of seven if the only weapons for Providence is the Judicium Beam Rifle and the Composite Armed Shield? I haven’t thought this through but I should have given Strike Freedom a 9 on the weapons section. Yes, the DRAGOONS are part of the models weaponry. And having the gimmick of effects attached on the model shows how much “beam spam” it can do. (LOL)
It could have been nice if Devil Arts provided rods to place the large and small pods.
I am lazy to fix the words but the beam cannons are called Large Pods and Small Pods.
Extras:6/10
You only get a set of fixed manipulators, beam effects for the large and small pods, and the beam effect for the CAS. Devil Arts didn’t include a pedestal/action base that you can use to pose the model and this is a bummer. :/
Patience: 5/10
The rating for Patience section is affected by the Assembly section and also how many parts are there per unit (body, arms, etc). And like I said, the kit features that smooth build with fewer issues to handle. That means you won’t take much time to build it. Of course, if you are a busy person like me, it would take roughly a week to finish the model, or at least 3-4 days if you are going to build 6 hours a day.
Overall: 8/10
I think this rating is just fair considering the both bad and good feats of the kit. It was a nice challenge and it was very fun to build since there were just few issues to handle. I don’t think you can use the parts here as replacement for the Bandai version though, but there’s room for other ideas where you can use the model’s parts for modifying other kits.
If I were to get a question if this model is good when painted. First, be specific if you guys are referring to composition of the plastic. I am not familiar with the results of painted models because they have different paints or because the plastic was different. And second, I think masking some portions and adding minor coloring would be great. The lack of parts separation is the challenge though because it would have been easy to paint them separately and avoid the masking process. :/
For recommendation? I think this kit is just fine for beginners especially for first-timers in the bootleg line. I don’t see any problem as long as you are careful. I don’t like brand wars, but if you want to go for Bandai’s Providence then go. The Providence of Devil Arts is a cheap shortcut with a different touch in detailing/design. Aside from detailing, the price and the quality here for Devil Arts can change one’s decision. I just mentioned MY personal experiences with the kit and I am not forcing you guys to get this kit just because there are lots positive pointers. It is still your decision to make what brand to choose.
Anyways, that is all I can say and I might change or add this if I remember something. I will also add other issues, tips, etc., from other builders.
I would like to apologize if the review is late. I am busy with a lot of things lately and I hope I can follow up the other articles soon. :(
Also, have a look on our Gunpla-related Facebook page
- Click
Here