

Introduction:
I guess the hype finally got back and I am now starting to get itchy with new kits to build again. I can’t tell if my comeback for the review of the Daban WZC HiRM was a good one, but it was nice that I get to continue making reviews. A lot of people are still suggesting that I should I finally step it up and create a YouTube channel. But I don’t want to go to such lengths yet and there are so many things to consider to give a high-quality kit review, and this includes the budgeting.
Unboxing:

Bandai presented us with a very nice art with Barbatos here. One of things I kind of wondered is that they released it starting in its 4th form. Or probably because this form was the considered to be the first one being “complete”. As we remembered in the series when it was first used, the armors were incomplete and it doesn’t have a steady set of weaponry.

This section of the side of the box shows the Inner Frame design along with the gimmicks it can do.

Beside it is the section where the front and rear view is shown.


On the next side of the box, the weapons are featured and what other poses you can do with them.

Plastic bags are placed nicely and they are not pressing the other ones below too tight.


We have 9 plastic bags in total and it’s really odd that the amount of runners inside each bag is not the same with the rest. Some have a single runner and the other ones have three. It’s not much of a big deal because of most them are meant for the inner frame. But I worry about the scratches it will inflict on the surface.

The construction manual is nice and features the same art on the box.

The last page or rear part of the construction manual shows the completed model of Barbatos.

I really like that Bandai added a few English texts to help out the builders. They even included reminders that some of the parts are undergated. Yes, they have undergated parts but I think only a small percentage of the total parts.

I have already mentioned this before in my recent review of Daban HiRM Wing Zero Custom. The pegs, as you can see in the image (A1-3 part) have these notches or canals in the middle of the pegs. They have the “snap lock” system or design (still don’t know the correct term) that makes sure the joints won’t slide out quickly. That means that you shouldn't scrape off or sand the male pegs that have these small lumps because they are needed to make the joints as steady as possible.

Like any other Master Grade manuals, you get the summarized information about the mobile suit, along with the color guide as well.
Please do not blame me if I am surprised or amazed with the gates being thin. The last “newest” kit I have experienced before is the Freedom 2.0 and most of the gates on the parts were still quite the same with the old ones. Well, it is triangular now but still quite thick. I may have built the 00 Qan[t] FS, but majority of the runners there are still the same with the 2010 version.

Second to last page of the manual features the decal guide and I’m going to mess this up real bad. >:)
Runners (Sprue Frames):


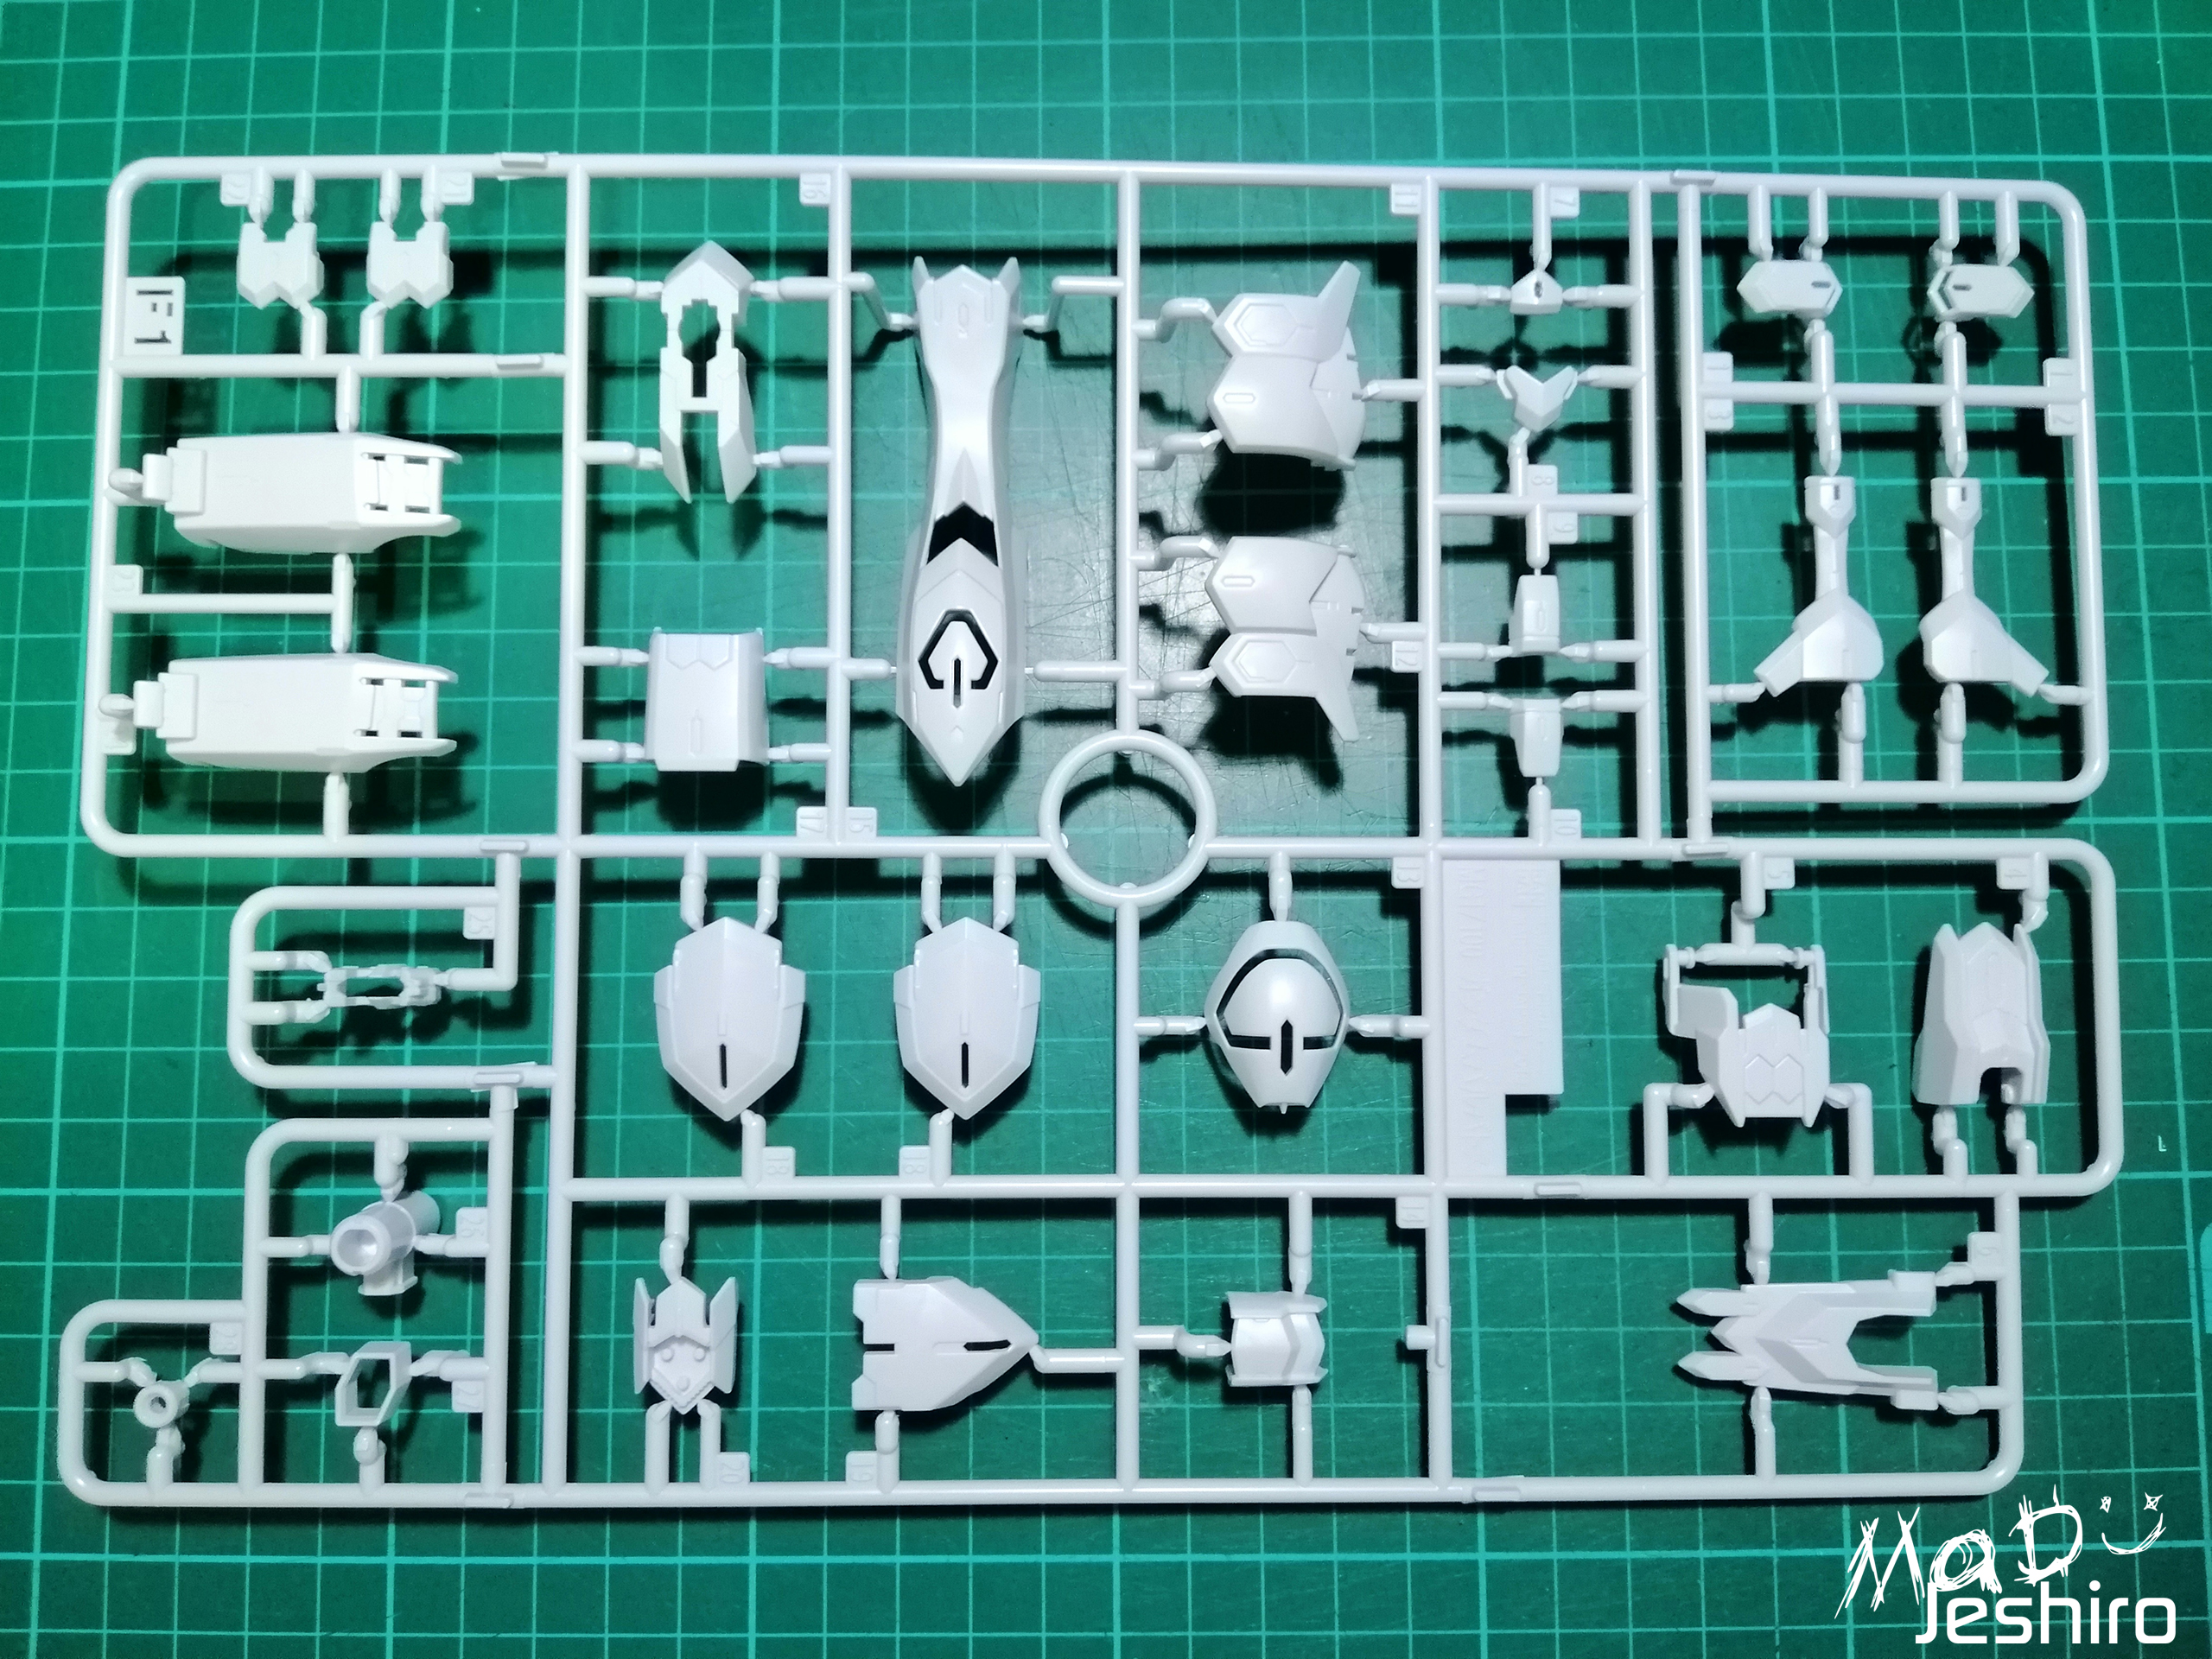


There are 17 runners in total, and I think this is just an average amount. As for the plastic quality, the brown parts that will be used for the Inner Frame is good. It seems soft but in a good way. The gates were easy to cut. The other brown runner (lighter color) that will be used for the Smoothbore Cannon has a chalky feel when I’m trimming the nubs. And this is odd because they are supposed to be the same material. I am not very familiar with the type of plastic they use here but it should have been the same with the Inner Frame parts.
Another thing that I would like to point out here are the gates. They are amazingly thin, well most of them, so the nubs were easy to cut or remove. Sorry if I looked ignorant with this design because it’s been quite some time since I last built a kit past 2016. I am not sure if Bandai made some changes on how thick or big the gates are on their recent kits.

Moving on, Bandai gave us the usual clear stickers and the foil stickers. I will use the foil stickers and resort with waterslide decals for the armor parts.
Body Unit:

The body features above average amount of parts. The separation for each joint is just amazing and that is thanks to Bandai’s engineering/design.


Even though there are a lot of parts for the Inner Frame, the finished model is very compact. Most of these parts are connected using a rectangular-peg slot design instead of the round one. And for me, this kind of made it easy to disassemble the outer armor parts. I also used a gold gundam marker to add some color on the inner frame.


The body can tilt sideways with a decent degree.


You also have a nice movement back and forth to give you a good crunch on the abdomen.


Neck joint is also movable but can only slide front and back.


My favorite part would be the pistons here on the shoulder end (are these called deltoids?). Now you have a ‘butterfly joint’ because of this piston that will extend the arms’ movement range.


Unlike the 1/100 Barbatos, the Master Grade version now features a cockpit
Head Unit:

The head features average amount of parts. It also has the same number of parts like the 1/100 Barbatos; just a few differences in design and proportion.


It was a smooth build but I kind of worry for that red piece. You just need to slid it on top of the peg and that’s about it. There are no locks or other pegs to hold it off. One strong bump or if the whole head falls on the floor, there’s a huge possibility this will pop off. Anyways, the detailing is much more sleek and fierce-looking compared to its 1/100 version.
V-fin of the MG version seems longer compared to the 1/100. I guess it was no surprise considering that the 1/100 IBO kits kind of looked like up-scaled high grades.
There are no other gimmicks here and that is fine with me as long as the armor parts hold firmly together.
Arm Unit:

The arm features average amount of parts. And if I were the one to design it, I would just separate a few more parts here. Those tubes on the wrist would be nice as a separated part that will come in pretty handy for builders who want to paint; less hassle for masking.


Again, it’s another smooth build with no big issues. Of course, this is much better and much more refined compared to its predecessor. There’s a lot of detail here and it looks nice if some panel line accent will be added.

The articulation also looks great. The arms are separated into 2 segments but the elbow guard (blue) is separated. This makes the arm look more mechanical or more jointed when you bend them.

The pistons here are most likely the best highlight of the kit and you can see it on the back of the arm. It will slide out nicely if you bend the arms.

The main peg that will connect to the body features a 360-degree swivel, giving you a nice range for movement.


The manipulators or hands are connected using a rounded male peg. I’m not sure if this is much better compared to ball-jointed peg. Well, you can swivel the wrists back and forth so I guess that’s not much of a problem.

Only the thumb is movable with the usual ball-joint design. And I hope they will do justice for Lupus Rex in the future to have a separate part for the Rex Nails.
Upper Body Unit/ Shoulder Unit:

The shoulder armor however is the only part I think with the least amount of parts. I am not complaining but they [Bandai] should’ve separated a few more parts here.


Because the parts were few, it was a very straightforward build with no problems. There are no movable parts here or any gimmicks so it was just a plain shoulder armor.
Leg Unit:

The leg unit presents you with average amount of parts. I am not disappointed but it was a little few in my own taste. It was enough though in general because most of the tubes are separated, which is a good factor for builders who wanted it painted.


There are no issues but you need to build the inner frame here complete especially with the main peg on the thigh. This is the peg that will connect to the waist. Just follow the manual carefully and you’ll do just fine.
And after finishing all of them,
it was pretty smooth and
fun. I love the detailing and of course, the parts separation added a lot of
movable sections the 1/100 doesn’t have.

Starting off with the rear side of the legs are these white parts that can slide down.

The side or the armor of the calves are also separated and will slide outward once you bend the leg.

This gives you a nice range of movement for Barbatos if you want to try different action poses.

You can move the feet front or back as well.

The feet are separated into two, thus giving you a pretty extensive bend that looks similar to WZC for its Neo Bird transformation.


The round middle part of the inner frame will also give the feet a nice swivel sideways.
Waist Unit:

Finally, Bandai made a lot of improvements for the waist especially for the parts separation of the back skirts. As we can see here in the exploded view, the back skirts both inner frame and armor parts are separated.


Building process is straightforward but you must check the markings carefully in the construction manual. They parts have the “snap lock” design and it would be a mess if you attach the inner frame parts in the wrong position.

The front skirt gives you a satisfying range of movement if you flip it up.

Side skirts give a nice rotation but moving it sideways seems lacking. Not much of a big deal because the model can still perform a nice split if you wanted.

The back skirt can only go up this much. It’s not as great as what I expected but it’s far better than the 1/100 with the fixed position.
Backpack Unit:

The backpack features decent amount of parts due to its gimmicks.


It was a smooth build yet again and there were no problems.

First gimmick here that you will see is the main thruster. It is movable but the angle is not as great as I expected. I think it wasn’t near 90-degrees.


Now the second gimmick is these two pods near the thruster. You can pull the pods out and you will have a piston-connected binder of some sort. Main purpose for this gimmick is for the Smooth-Bore Gun so Barbatos can hold it steadily.


It’s quite articulated so you can probably think of other poses using it.
Armaments:
Sword:

The sword is easy to build with just two pieces.

It’s a very straightforward and nothing else much to notice here aside from the nice detailing.
Smooth-Bore Gun:

This weapon presents above average amount of parts.


I like the color separation here. It was nice that you have at least brown parts mixed here unlike the other weapons with just a single dark gray color. There are no major problems here but I would like to point out that there’s a visible seam each time to you fold the barrel.

Under the main cannon, you also have a small machine gun that can slide forward.


Just like I mentioned earlier, you can fold the barrel, allowing you to attack it on the back of Barbatos for storage.
Mace:

Same like the sword, the mace here gives you the basic how easy it is to build. I also want to point out the two parts for the spikes that look like daggers. Seriously, they can be used as custom weaponry because of their shape.

I don’t mind this in full dark gray color considering it’s a steel material weapon (I think?) in the series. But, it might still look good if there were white parts on the handle.

Well, at least we have a pile bunker gimmick here that can be pulled out.
Full Inner Frame Unit:


Before I head on to the decals, here I will show some of its movement range (no changes I think) especially if all Inner Frame parts are fully assembled.


Starting with the neck joint, you have a good up and down movement.

You can also swivel the head to a full 360-degree. But I am sure if this is still possible once you attach the outer armor.

No changes on the butterfly joints of the shoulder and still show that beautiful piston gimmick.

It still shows very good movement for the arms as well.


I think I can still do a better abdominal crunch. The only reason why I am hesitant is that the peg might break.


It has a nice movement range for the legs giving you that high kick very well. Just pose it carefully and you can balance the whole thing which just 1 leg.
Extras:

You will have a few extra parts here and some of them are just dupes.

You will get these weapon racks that can be attached on the backpack.

The manipulators are not articulated so we will have the usual different changeable ones for action poses. We have the closed fists, the open palms, and the ones currently attached are the grabbing manipulators.

You have the usual connector or adapter for the action base but you still need to buy an action base to perform some of its poses.
Decals:

Of course, I will never use the clear stickers so I had to order some neat waterslide decals for this. I would like to thank GunPla 4 Customs (link here) for helping me fetch this design.
Size Comparison:


Articulation Test:


Moving the arms was quite nerve-wrecking because I don’t want to bend the v-fin. But yes, it’s the same with the movement range from the full inner frame section. The armors didn’t hinder the articulation of the arms.

You get a good bend on the abdomen too.

No problems swiveling the waist here.


Just move the side skirts away, and you can still perform that amazing high kick.


This is not the kneeling pose that it should be doing base from the series but I just had to try it. It’s not that perfect compared to the other mobile suits with good articulation, but it’s not that bad either.


I think this is the correct kneeling pose for the model. My apologies if I can’t align the legs well that’s why it’s leaning towards the right.
Finished Model:


With Weapons:


Close-Up Shots:


Action Pose Shots:


I don’t have the action base used in the construction manual so copying the poses was hard to replicate. But the action poses that I always do is just to show more of its articulation.
Building Report:

I guess it’s time to change my stat card and I would like to thank some of my friends and colleagues that helped me get the idea (Anthrenz, Gilbert Sapnu, Jeff Manares, Joel Bitonio, Arnel Arroyo). So yeah, base on the image, I will no longer use points to rank the kit or the model’s feats. I will use letter rankings starting from Rank S as the highest and the Rank E as the lowest. I also changed some of the stats like the “Patience Meter” and replaced it with “Difficulty” which is much more understandable I think. I will no longer add a final rating and I will just probably mention a couple of notes at the end.
If you guys have any suggestions on what to add here, just post a comment.
Plastic Quality: Rank S
To be honest, I was going to make this an A-Rank because of the bad plastic quality from the runner I mentioned meant for the Smooth-Bore Gun, but the plastic quality of all the runners are just too good. It’s not as sleek as the other kits but I like it because there were no flashes, dimples or any other melted parts. Edges of the parts were fine and precise.
Detailing: S-Rank
Even though it’s almost the same when it comes to parts separation with the 1/100 variant, you can’t deny how good-looking it is now thanks to those panel lines. The chrome pistons also added color to the plain brown Inner Frame which is nice. Add some decals and probably some paintjob and this will come as a very handsome model.
Articulation: S-Rank
Even though there are some poses I can’t perform, there’s no denying how good the articulation is. Bandai did a really nice job giving this a Master Grade treatment. I am starting to wonder the possibilities too if they put the model in the RG line.
Armaments: B-Rank
I think it was already obvious for some of the builders/collectors that Bandai will make the rest of the add-ons to be P-Bandai
Proportion: A-Rank
I don’t have the 1/100 version yet so I just based the rank from other sites and blogs especially dalong.net (it’s in Korean but they’re very active). And yes, the difference is quite noticeable. This MG version is taller and gives that bulkier look. The body isn’t chubby-looking and it shows a slender form where you can see most of the bared Inner Frame sections. This goes as well to the head and arms that looks slender compared to the 1/100.
Gimmicks: B-Rank
I think I overdid my rank here and it should have been at least a C-Rank. Then I realized that it’s really far better compared to its 1/100 predecessor. I will take the pistons in the inner frame as part of the gimmicks and I love it.
Extras: D-Rank
Yeah, it’s low because I only have the extra manipulators and the peg for the crotch if you want it on an action base. And that’s the problem; there isn’t one. You have to buy it! It wouldn’t hurt much if Bandai added at least a small action base to perform those action poses in the manual. -_-
Difficulty: D-Rank
For me this is most likely an E-Rank. It was very easy to build and I’m sure you can finish this quickly. I just had to raise it to D-Rank because I wanted to build it a little slow. Majority of the gates are thin so cleaning the surfaces weren’t much of a hassle. But you must also carefully look at the markings in the construction manual to avoid misplaced parts.
-- END OF REPORT --
This is the first time I have changed the entire stat card and I hope it goes well. The bright side is that I can probably overlay the stats of other kits to compare it with them. Let’s say I will review the 1/100 Barbatos, I can add the stats with a different color and opacity to compare their stats. Also, regarding this kit’s S-ranks; I am not being biased here. Many of my colleagues know that I love the Barbatos MS and the IBO series but that is not the reason why I gave this a lot of high marks. Bandai just simply did this justice and it was close to perfect. I would probably buy a Barbatos 4th Form if this model gets the Perfect Grade treatment.
Anyways, it’s a really nice kit that you should try. Even if you’re not an IBO fan, you will be amazed how smooth and fun it is. I could say that this is also a beginner-friendly kit; not bad as a first MG.