

Introduction:
After a few days of rest from Exia R3, I started the Avalanche Exia quickly because our group kind of gave a hint that there will be another build-off. I was excited because pure straight-builds were suggested and I wanted to join. Unfortunately, it was changed and the possible schedule for our build-off was postponed. Still, I will continue the model and review it. And yes, after a long tiring month, I managed to finish the Avalanche Exia. I got this kit from Mang Bert’s Hobby Supplies (CLICK HERE) and you can check his shop in the link. I got addicted with Ragnarok Online (again) so I didn’t spend too much time in finishing the article.
Before I got this kit, I was actually torn between Daban Model, Dragon Momoko and this one, Hobby Star. All of them looked great in my opinion but I need to put some certain factors in priority. The first one is the budget of course. Having seen Dragon Momoko’s detailing it was superb as always. But like we already know, DM is already in their “dead end” so the prices for their kits kept on building up. I wanted the Daban Model because their price is not that bad. But that comes with the second factor; freebies. Only DM and HS give you that awesome Avalanche Blade and Daban Model doesn’t have that. I can’t remember if Daban features an action base but DM and HS was the one with the lead for best feats. Like I said, DM ‘s price is now starting to level with Bandai, so that gives me Hobby Star.
I know a lot of certain builders would think that I should’ve save up more for DM. But the bad news is that I am already finished with my work so my funds will be tightened up to free up more possible reviews in the future. So yeah, I will give all the information about the issues and share my experiences with this kit.
Some of my images here are blurry and please do understand that my hand shakes a lot. My cellphone is not that bad, but it’s not the best ideal camera for making reviews. Please do ignore the typos that you might notice in this review. And as for my mistakes if the information about the model itself like what manga it was released, armaments, and other stuff from the Gundam universe, please do correct me on that.
So let’s start. :3
Unboxing:


This is not your typical box from any other models you may have encountered. This is also my first time seeing a cube-like box instead of the usual flat and wide rectangular ones. The design was kind of bland but not that bad since they [HS] are still trying to be on the safe side from Bandai’s radar. You will just see these markings that resemble the forehead sensor, the eyes, and the chest part. The box is quite sturdy so I don’t think it will be damaged from shipping.


There are 9 plastic bags inside, and 12 if you will also count the pack for the GN Drive motor, foil stickers, and button cells (batteries). I still hate what they did in their packaging because there are more than 3 runners per bag. Most bags have 4 runners and these could lead to parts being removed out from the frames. This could also lead to scratches on the surfaces. I can handle that because I can sand them away, but I just don’t like the extra unnecessary workload. Only the runners from the weapons (coated in silver) are packed alone.

You get free waterslide decals here and the blue strips are also packed inside. Bad news – there are no free LED system for the model.

Their manual is quite plain and simple with only a few black lines on the front.

The last page doesn’t feature any of the finish model’s appearance and you will see the part of the decals guide.

No features or other striking images that will be enjoyed here in the manual. All of them are printed in black.
Now let’s head to the runners.
Runners (Sprue Frames):


You have 33 runners or frames here and that’s quite a lot of parts to handle. I tried to count all of the parts and you got a total of 746 pieces of parts. These not include the motor, led wirings, and wire connectors.
The plastic quality is nice and the blue is richer compared to Exia 4-1. Well it is good, but not great. I have taken a photo of this and you will see the comparison later in the Completed Model section. There were several imperfections as well and that can’t be helped from a bootleg brand. Some of the parts have a fingerprint-like marking if looked closely. It can be erased with lighter fluid and I didn’t try sanding it because I might just ruin it.
Flashes are noticeable here and there especially on the edges. But there were no large dimples or incomplete molds (looks like melted parts) in each part. Edges are not as sharp compared to Bandai but the panel lines were great because the “cavities” or canals looked deep. I checked some of the parts, there were few panel lines that are not molded perfectly so I doubt the ink will flow straight there. But the rest are fine and this is good for adding extra details. I also want to point out that the red parts seem pale and not as vibrant as the blue parts. Well, as long as the parts are not greatly damaged, I don’t mind if the colors are not that accurate.
Good news mixed with some bad; most parts are undergated. Yes, you don’t need to worry too much in cleaning the nubs because some areas are not that visible. Unless you are really meticulous when it comes to cleaning, then you will need to use more than just your side cutters. I also mentioned “bad” because not all undergated parts are great. Sometimes, these gates are placed in a very wrong area or spot. Some of them were near the male pegs and some of these gates are placed on the edge of an “etched” surface. And these are quite troublesome to clean.
GN Drive:

I got a lot of suggestion from friends and other colleagues to start quickly with the GN Drive. I think it was the best idea because you can check it quickly if the motor, wires, and LED are working properly.
Anyways, here are the parts for the GN Drive. You have two LED’s here; one on the front (GN Condenser) and one inside the GN Drive on the back.

Same with what I did in Exia 4-1, I didn’t include the H16 part to cover the wires. I also noticed that the wires here are shorter compared to the wires in Exia 4-1. I am not sure if this is an isolated case, but the problem is that I can’t fit the wires properly because they are not long enough; maybe 2 to 3 cm short.

What I did is connect the wires directly without that white connector and slammed it with blutac. I had some trouble lighting it up, but after a few messy tweaks, it is now working without any problems. I also noticed that sound from its spinning is much stronger than Exia 4-1. I don’t know if this is from the motor itself or the battery is just really good. O_O
Head Unit:

No changes made here in the head unit and you still get the same parts that of a normal Exia.


The issues here are the same with the Exia 4-1. Those yellow parts for the cheeks (Q1-4) are quite loose so I had to put some thin glue to keep them from moving. Other than that, the rest of the parts were fine with minor tight fittings.
I had another issue here but it was an isolated case. Maybe it’s not very visible here in the top view but you will notice a white stress mark near the right side tip of the v-fin. I got this when I removed the runners out of their plastic bags. I think this was already bent a bit during the time it was packed. The bend is not very noticeable so I will not try any hot water solutions here and just let it like that.
Body Unit:

I think it features almost the same amount of parts here in the Body Unit.


Issues are not much of a big deal. Just a few tight fittings here and there; rest are all good.
The only change made here are these events in front of the chest. Another thing I noticed that there are no paths or canals for the wires through the neck joint. But the moldings of the Inner Frame here in the arms and chest already have some. And as far as I know, the Avalanche Exia was released first before the Exia 4-1. My personal guess is that Hobby Star might have planned the normal Exia but had to start releasing the Avalanche version. I don’t know but it seems like they want to keep up with Daban and Momoko’s Avalanche Exia. Almost the same like the marketing strategy made by Daban years ago in their Strike Freedom ver MB and released it EARLY without the Wings of Light effects. Probable reason is that Dragon Momoko’s own version is already out in the market. Anyways, I could be wrong though.


Okay for the articulation, it was good, and it features decent movement range. You can tilt front and back for a few degrees here.


You can also tilt the upper body sideways.

This section of the body just near the neck can also move up a bit, giving you good movement range for posing.

As usual, the male pegs for the arms can be pulled outward to give you that wide arm movement.

The two vents on the chest can be opened to show the GN Condenser. No issues here.

These yellow fins can be folded back which is good if you want to store it and avoid them getting snapped in two.
So that’s it for the body. I’m not sure but is it just me or it looks more bulky in compared to the normal Exia? Detailing is great and all, but like I said earlier, some of the panel lines are not that deep and precise. So I don’t think putting some ink here would be a good idea. But if you can tweak it a bit, then go for it. Part’s separation is not that bad so it can still be a good model for painting ideas.
Waist Unit:

The Waist Unit features above average amount of parts. And that is no surprise considering the added armor here on the back skirts.


Okay let’s start with the issues. Try to remove the flashes from YF9 and YF10 in order to attach the Q1-14 and Q1-25 properly. There are quite a lot of tight fittings here especially when attaching the Inner Frame parts. The clamps however have an opposite issue. They are not loose but they can be removed easily. You might want to put something or fix this to make it a little sturdy especially if you want to carry the Avalanche Blade here. Other than these problems, it’s all good.
The detailing looks great but there are a couple of seams here and there. You might want to clean that up if you have the necessary materials and skills. But the under-gate treatment helped this so much to keep the model as clean as possible.
As for the movable parts, you can lift the front skirts this much without any probs. Of course, this can change once you attach the body.

The back skirts also feature great movement capable and can be lifted up to this angle.

As for the gimmicks, you can fold this outward and open these claw-like clamps that can be used to hold some of the model’s armaments.
Arm Unit:

Parts separation here in the Arm Unit is the same with their normal Exia. The blue parts (right side) can be attached after finishing it.


There are no major issues in the main arm unit. But as for the forearm attachment, there were several fitting issues. The YE-13 and YE-10 were hard to attach together. Same goes with parts YC7 and YC8, but make sure you attach these two carefully as they are prone to stress marks. Other than these issues, you’re all good.
The construction manual lets you use two of these clear green parts on the forearm. I thought it was just a mistake but it was actually possible to place 2 clear green parts. Just sand one of them to avoid possible seams.

Movement range here is not that bad, but it’s not the best I have seen in an MG arm. The round sections near the elbow hits the biceps so the movement range is decreased. The good news however that is even with the forearm attachment is in place, the angle featured here is still the same; no movement range reduced.
Upper Body Unit (Shoulder Armor):

The amount of parts featured here is above average because of the extra thrusters (GN Condensers according to wiki). And detailing looks great. There’s a lot of panel lines, etched sections, and raised surfaces.

Quick coffee break before building…
Okay, let’s start with the issues first. The tight fittings here were many. You might want to trim the pegs a bit or sand them to fit them in properly. Take note of YC-19 before attaching to YD-9. These two parts have really bad fittings, so you might want to take some adjustments on their pegs.
The YB1-12 and YB1-10 parts (right shoulder), YB1-13 and YB1-11 were very hard to attach together. The male pegs don’t fit smoothly into their corresponding female pegs. You might want to fix this.
Another same problem are the YA11 and YA8 parts, and then the YA9 and YA10 parts. All of these need some proper tweaking to fit the pegs smoothly.


Once you covered all of these problems, you now have a quite muscular-looking shoulder for Exia.

Articulation is pretty good. These white parts can slide outward.

The male pegs for the thrusters are also movable.

And as for the thrusters themselves, they are divided into two sections where you can reveal or hide that yellow thrusters (GN Condensers).

Attach these thrusters and you have much bulkier shoulder armor for Exia. Because of the round male pegs earlier on the shoulders, you can rotate these thrusters freely.
Leg Unit:

I figured I should also add all the parts for the Dash Unit, but it seems it was quite a mistake as I almost ran out of space on my cutting mat. I think this is a wake-up call that I should get a new cutting mat for future projects. :v
Anyways, here are the parts to build the legs including the Dash Unit part attachments. Well, most of the part; I forgot to include YC12 and YE7 in the exploded view. :/


These parts were quite troublesome. The gates here were badly placed so it’s a little tricky to trim these nubs.

Fortunately, I managed to get through with them without any big problems.
Let’s start with the issues first before moving to the articulation. Okay, so you have a lot of things to check out here. First would be the YB1-3 part. Be sure to attach LEG-1 section to this part first before moving to LEG-2 section on the construction manual.
W1 parts (red) where hard to attach on the Inner Frame parts. This is for the feet. Third issue would be the YE3 and YE4 parts. These are for the claws on the tip of the Dash Unit equipment. Take caution when fitting them as they are quite prone to stress marks. Fourth issue is the YD7 + YD34 and YD29 + YD6 parts. All of them are hard to fit together.
Additional info that you may want to take a look is Section 12. What you need is PC23 but it says YE23.
Most of the gray parts have tight fittings but not as a big deal compared to the other issues I mentioned above. The round parts on the ankle guards are quite loose though.


So yeah, you have a busy work here in the Leg Unit. But all of that will pay off once you get to see the finished model. I used the extra parts from my Exia 4-1 to convert the Left Leg to its Normal form so you can see the comparison between the two. The Leg with the Avalanche parts looked really bulky and you can’t see the knee unless the thruster is lifted upward.


Here’s another comparison with the Leg and the Leg with the Dash Unit parts attached. That Dash Unit equipment really added a lot in terms of size and this will surely eat up some shelf space.

Moving on to their articulation, the thruster on the back of the leg features good range and can be lifted this much.


Not the same as the pegs on the shoulder armor, the thruster attachments on the knee are connected to a flat rectangular peg.

The angle you can do here is great but it could’ve been more awesome if the pegs were rounded so you can rotate them sideways.

Same with the shoulder armor, they are divided into two sections where you can reveal the yellow thrusters.

Now let’s move on to the Dash Unit parts.


Starting off with these gray parts that can be attached on the calves, they have a good movement range here, thus the ability to move them on the back of the legs.

The rear part can reveal that hidden yellow thruster as well.

These parts (foot rest?) are also articulated so you can have a decent poses with the feet.


Half of its body can be separated like a mechanical arm and the range of movement featured here is quite good. You can move them up and down as seen in the image.

The tip of the Dash part is also articulated and you can lift it up.

Let’s not forget these fully articulated claws. I am good with their tight movement as it will help me hold various stuffs like some of Exia’s weapons.


The bottom part is also articulated and you can pull it outward. It also features an articulated claw-like clamp that can hold other stuff as well.

As you can see, the gimmicks done here were awesome. I not sure if Daban and DM also have the same features. I noticed in Bandai’s version of the Avalanche Exia that the Dash parts for the legs are not fully articulated. Unlike here in Hobby Star, there are a lot of movable parts. I’m not saying that Bandai’s model is bad. There are many builders who like the simplicity created by Bandai because it’s more realistic and up-close to the original design. That is why, if I have a decent amount of budget, I also want to review Bandai’s Avalanche Exia. :D
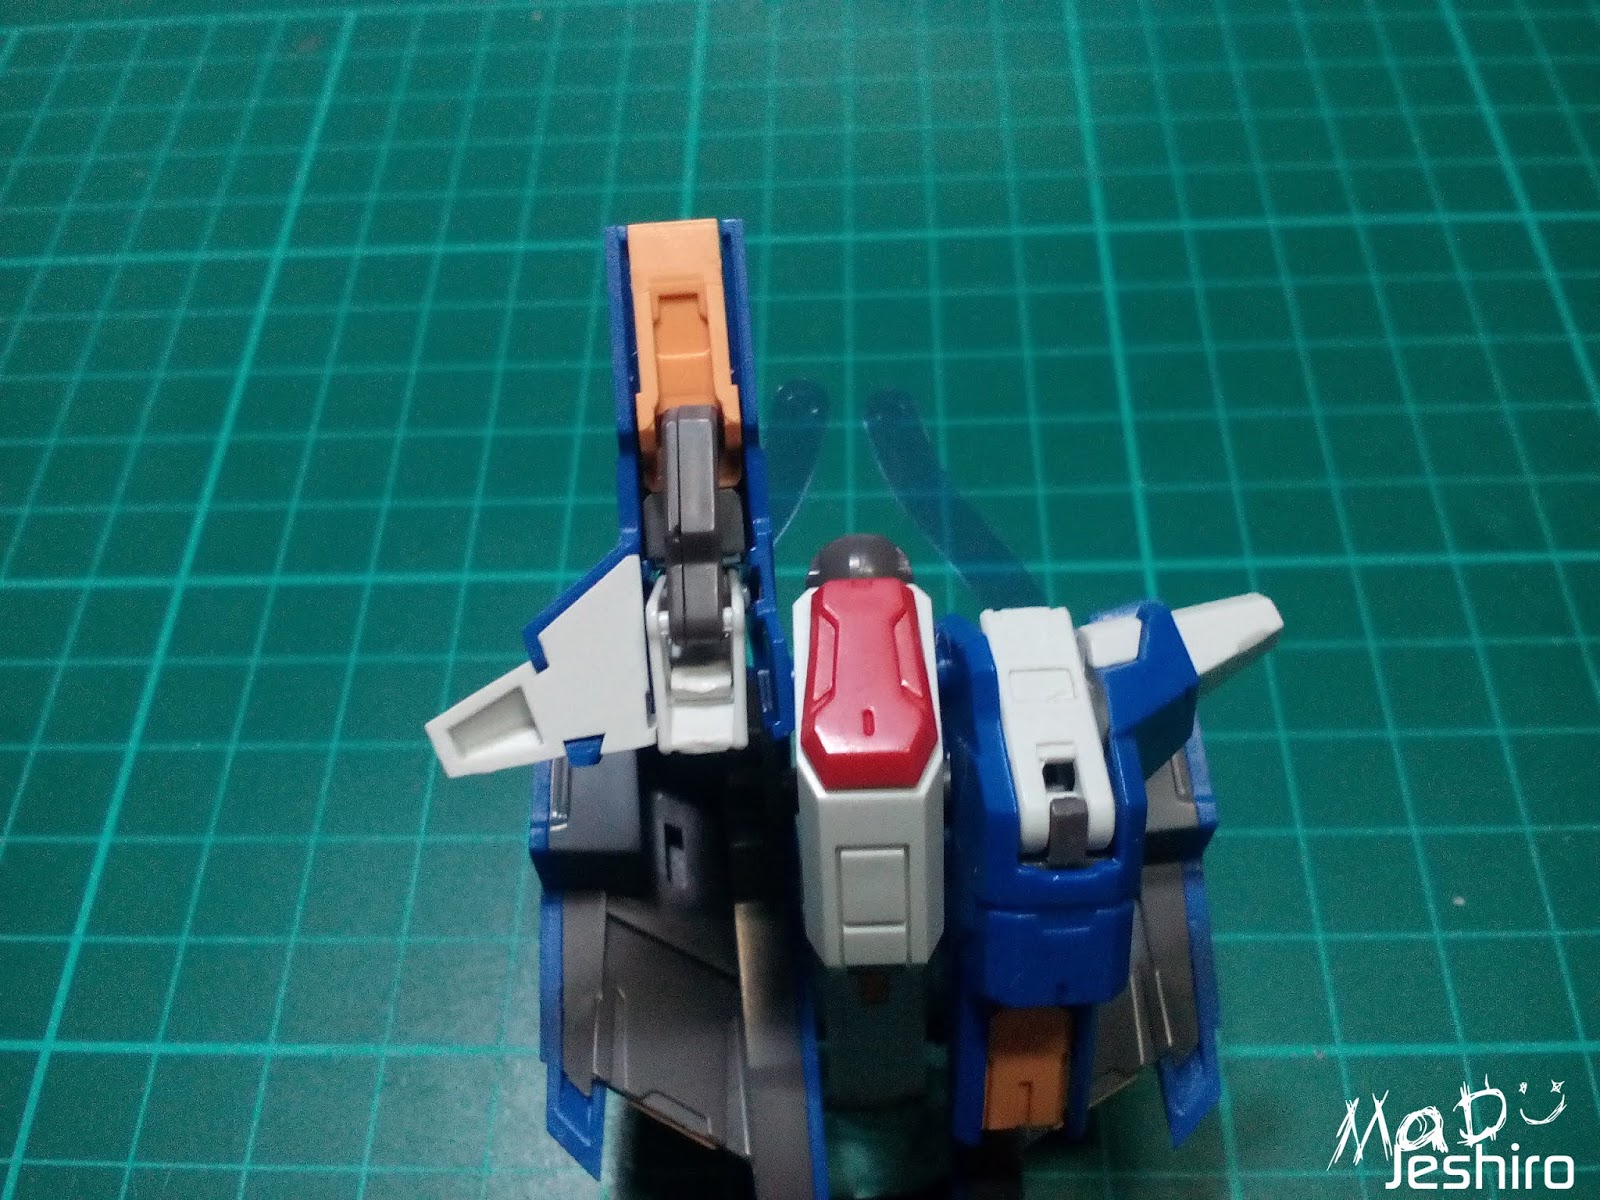
Backpack Unit:

We’re finally moving on to the part of its body. It features below average amount of parts.


There are no fitting issues here in my opinion. For others, they might need to look at the YC28 parts as they are quite easy to remove from the PC sockets.
So that covers the issues, let’s move to the gimmicks. The backpack unit is quite articulated because of the PC sockets. And take note that its only purpose is to hold the beam sabers and the GN Blades. So it’s quite nice that you can move some of its sections.

You can move this part down with no problems.

The tip that holds the beam sabers are also articulated and can be folded down to a certain angle. The GN Blade racks at the back are also movable to a smaller degree.
There’s an issue here as well and I will mention that in the GN Blade’s section.
Armaments:
GN Sword:

The weapon features average amount of parts but the detailing looks good and makes up for the lack of extra pieces.


There are no problems fitting each part, but I do have a problem with that shield-like part. The PC part inside moves very smoothly, so it tends to wobble a lot when placed on the arm. Not a big deal as long as the manipulator holds the handle firmly.


There are no problems folding the GN Sword from Rifle Mode to Sword Mode.

The handle is movable and this will help you attach the manipulators carefully in place.
Avalanche Blade:

First of all, I am not sure if this is the correct name for the weapon because it’s not mentioned in wikia. Although, there are several pictures that this weapon is part of its original design.
Okay, so the part featured here are below average. These parts also didn’t receive the undergate treatment so sanding them was kind of a pain. Well not because of the extra work but because the gates were quite big, so it also produced big nubs that are really painful to see. I don’t mind gates connected to the visible surfaces of the model as long as they are small or thin.

There were no fitting issues here and everything went well. The only possible issue is that this weapon is so heavy that the arms will not be able to hold it steadily.

The Avalanche Blade is divided into two and you have handles for each section. The handles are also movable.


Using this clamp-like connector, you will be able to attach the two weapons together.

It’s like a huge boomerang and the model needs to have tight polycaps so the arms will not fall down.
GN Short Blade:

I will consider this as average when it comes to the amount of parts.

There are no problems or issues here. Well, just the irritating visible nubmark on the edge of the blade.

You will get two of them and you can attach them on the backpack.

Now the issue I mentioned earlier with the Backpack Unit is that the sword doesn't fit tightly onto these racks. They would fall off from minor budges or bumps. I had to use some blutac to keep them in place temporarily.

You can also put this in the designated slot of the Avalanche Blade. This will give several action poses now that you have two handles to use.

If it’s not much of a hassle, you can also put the weapon on the hip’s connector.
GN Long Blade:

Amount of parts are the same with the Shot Blade.

Of course, the only change in this weaponry is its length. All of the other gimmicks that you can do with it is also the same with the Short Blade. You can put them on the backpack or attach one of them on the hip’s connectors.
GN Shield:

The parts featured here are below average. But the detailing is good so it’s kind of a balanced deal.

No fitting issues here as well.


You have this connector and attach it on the back. This will allow you to place it on Exia’s forearm.

The shield also features a single gimmick where you can slide these blue parts sideways and reveal these green sections. Well, these green sections are actually foil stickers. You can use some paint and change the color here if you want.
GN Beam Sabers:

And let’s not forget these weapons for Exia.


You get four of them and they are attached on the shoulders and backpack.
Action Base:

The parts here are the same with the other Metal Build action bases I have experienced. It shows decent amount of parts.


This type of action base gives you several locking mechanisms that will hold your model in place.
Decals:

The brand of decals included here I think is still DaLin.

The quality is not the best but it’s not that bad either.
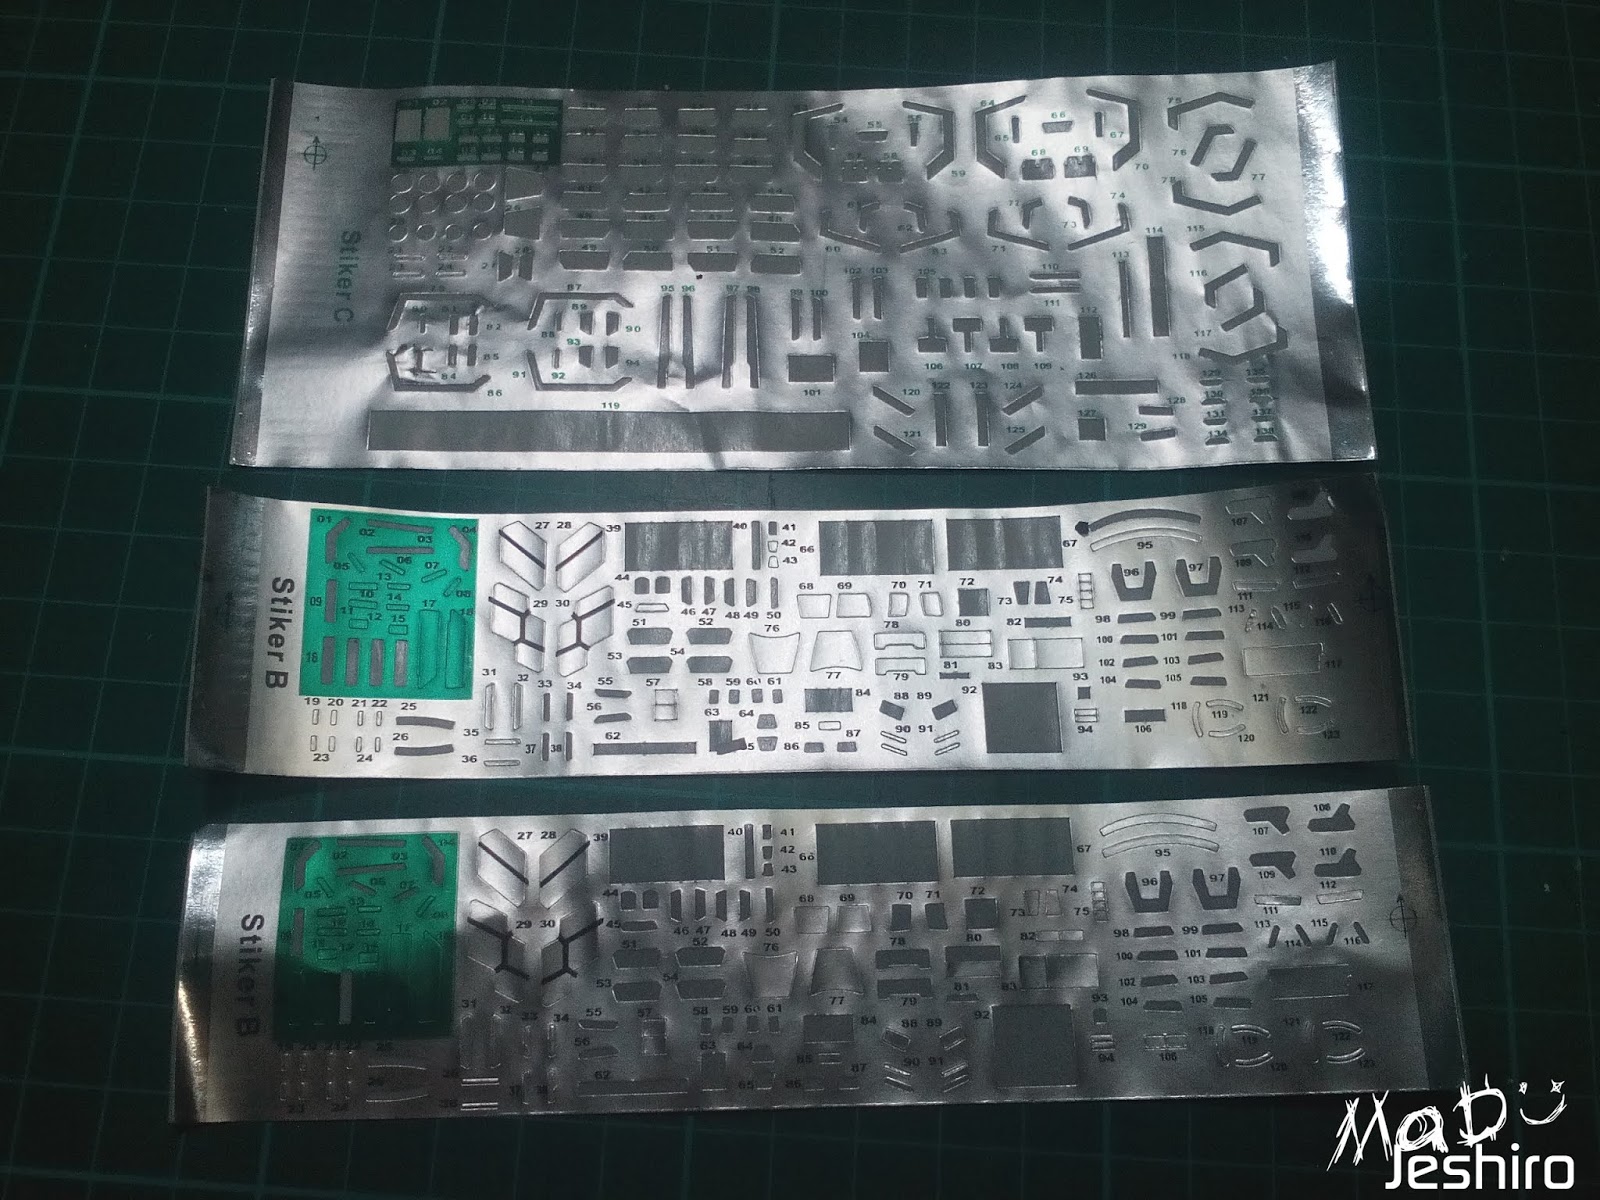
I wanted to add more details in my model so I use the foil stickers – a lot of them.

A few markings left and that’s it. XD
Extras:

Okay let’s head for the leftovers or you could say extra parts included in our kit. You get a good set of fixed manipulators here for some action poses.


You also have the beam saber effects.
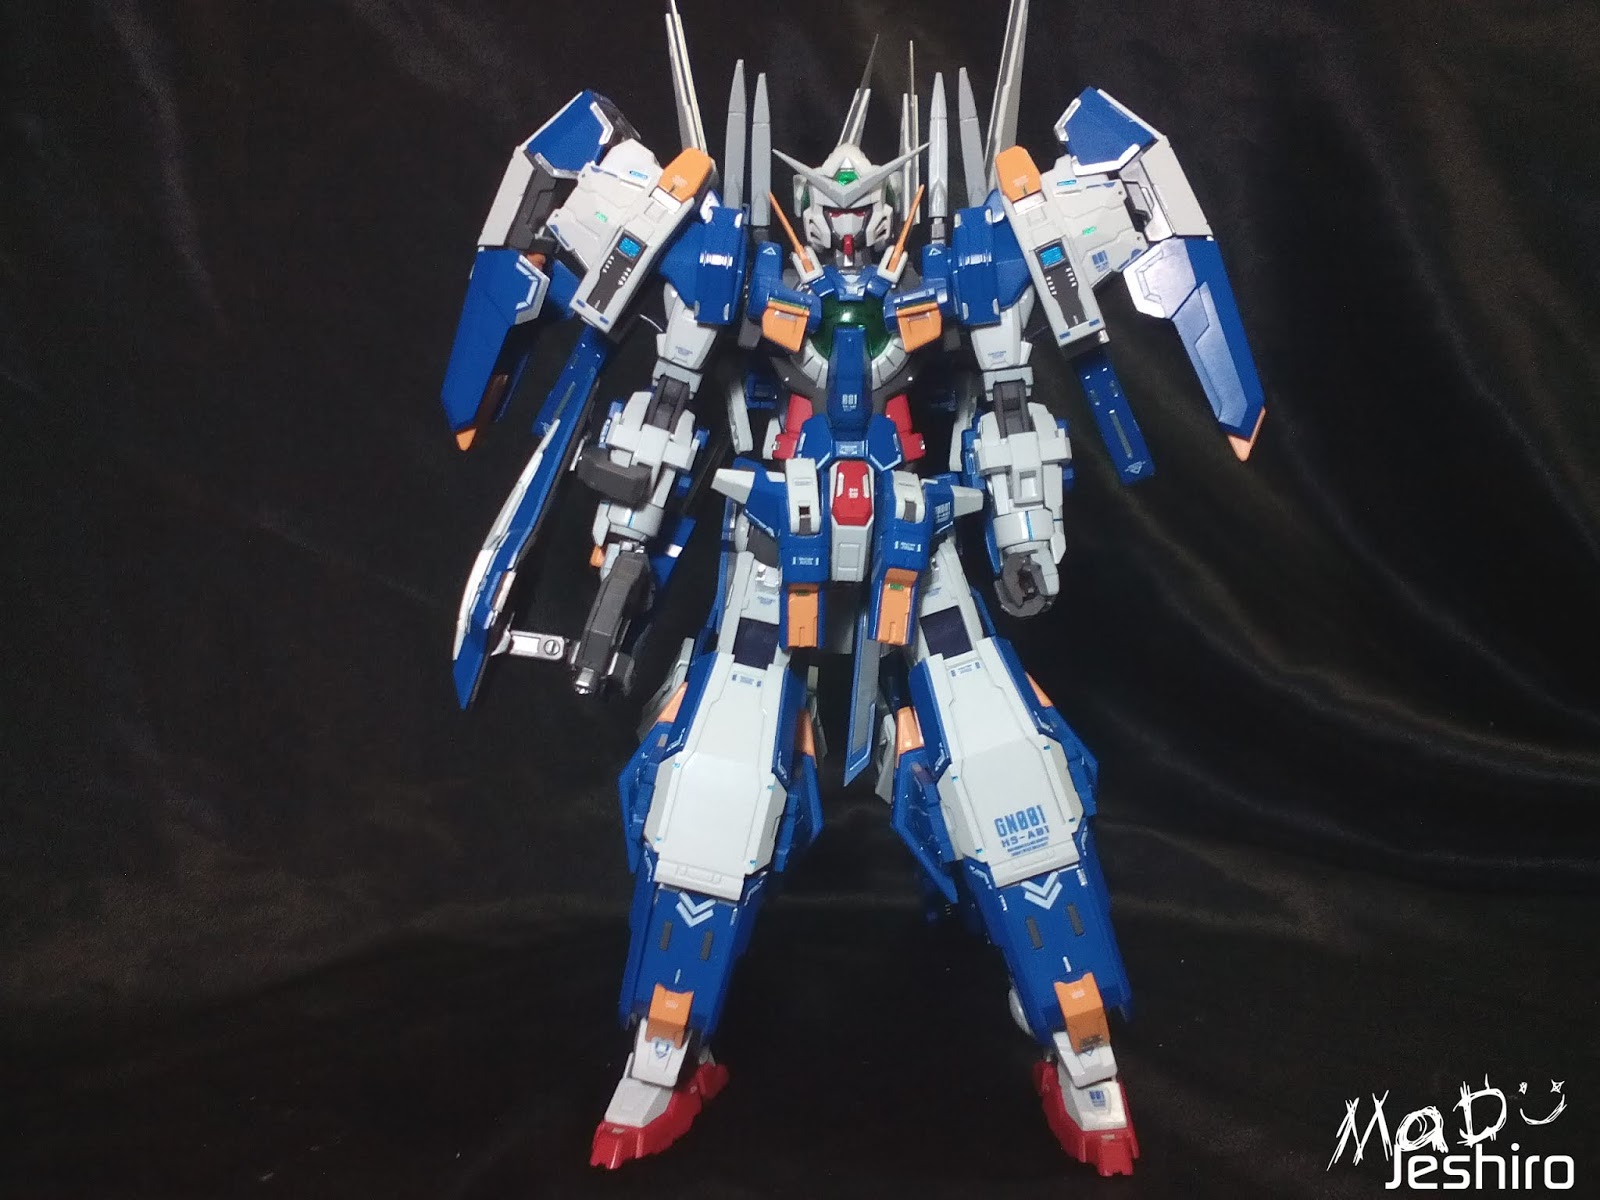
Completed Model:
Avalanche Exia:


Avalanche Exia Dash:


Close-up Shots:


Size Comparison:

Here’s a little size comparison with a 1/144 Entry Grade 00 Gundam and my 1/100 FM Gundam Barbatos Lupus Rex.

I also included the Exia R3 (4-1 Hobby Star). Maybe it’s not very noticeable here, but there’s a huge difference in their colors. Avalanche Exia seemed it had a richer color and with a little tinge of purple while the Exia 4-1 have a lighter blue on the parts.
Articulation Test:


Even with the bulky Shoulder Armor Unit, the arms can still give a decent movement range.

This is as far as I can get when giving a high kick pose.


In all seriousness, I never thought that this model could actually do this kneeling pose. I think it’s the help of the knee thrusters or knee guards here that helped this model to have a perfectly straight body while doing this kind of pose.
If you remember my review for Exia 4-1 of Hobby Star, the body is slightly tilted during the kneeling pose. For me it was still a decent and passable kneel.
Action Pose Shots:


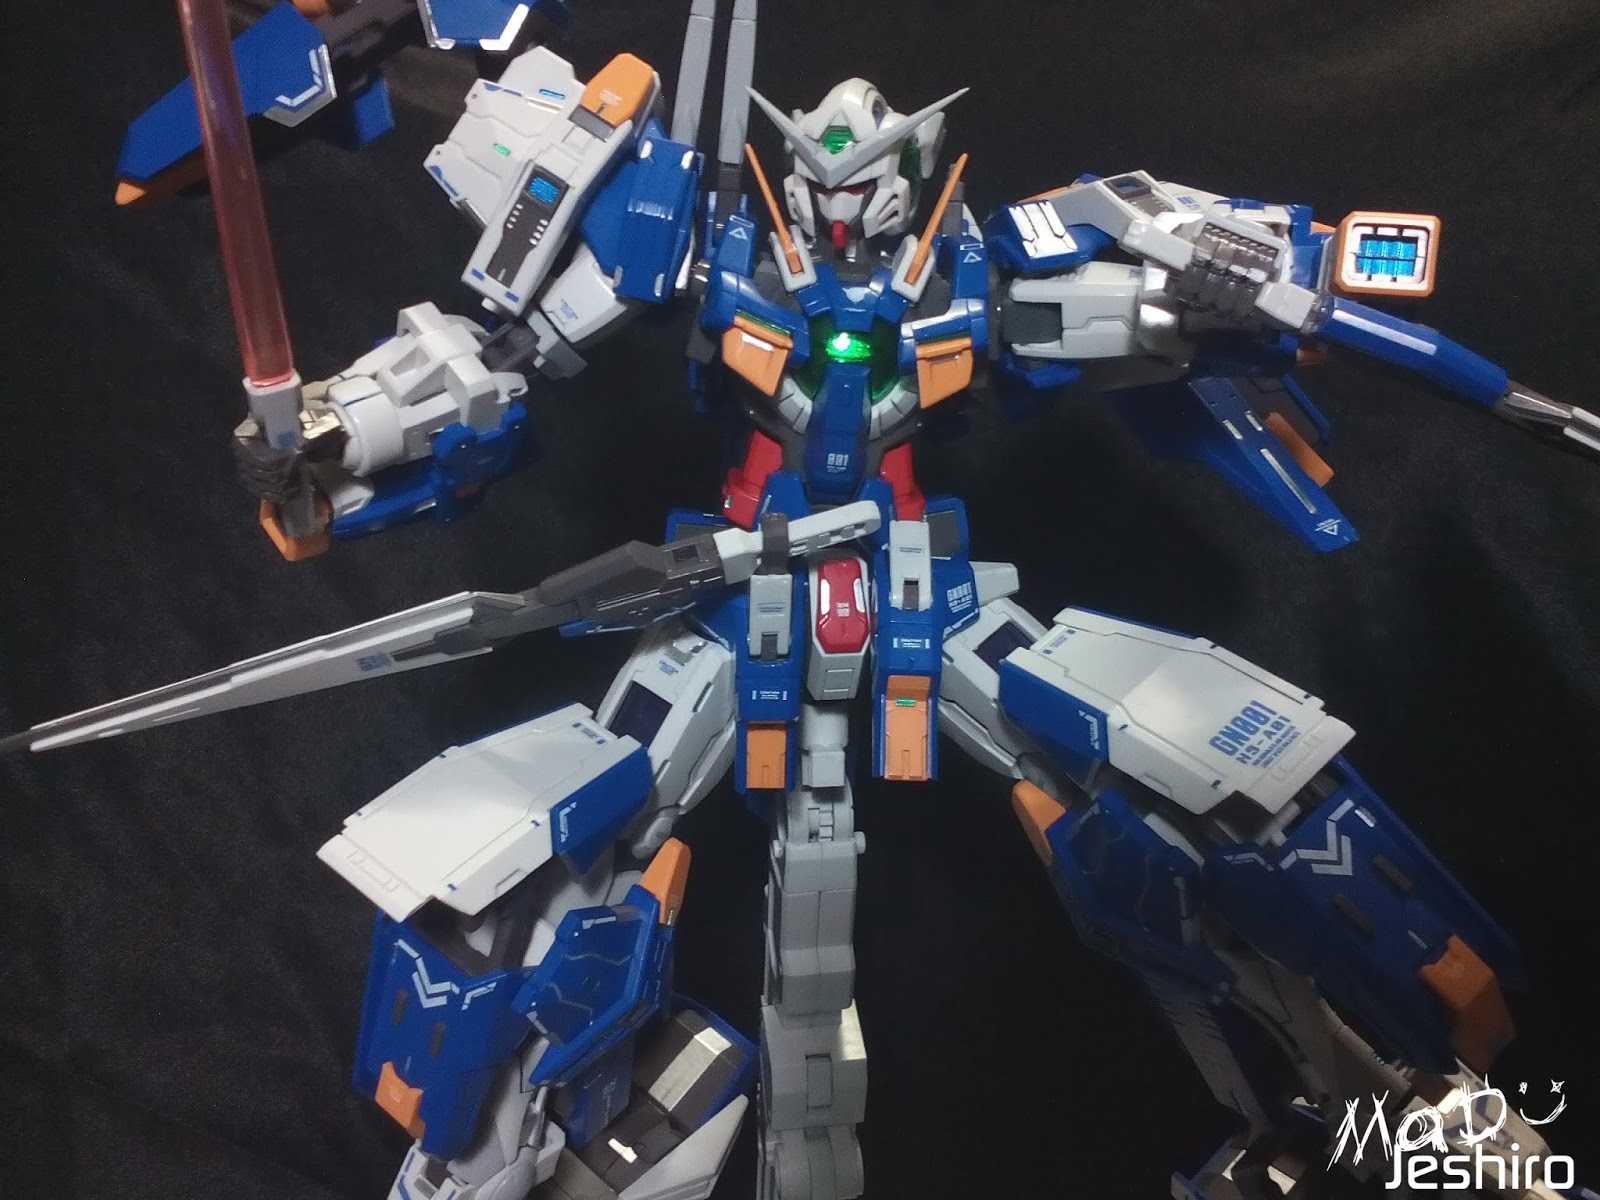


I don’t want to ruin the decals by getting it hit with the weapons so I had to limit some of my movement and decided to change the angles of my shots instead. I also can’t pose it properly using the Avalanche Blade because it was absurdly heavy. Or maybe the polycaps are not just tight enough to hold the arm steadily. I found a way to use the Avalanche Blade and that is to use the secondary claw under the Dash Unit.
Okay it's time for my ratings..

Plastic Quality: 7/10
It’s still good for a bootleg model but there are tons of flashes or “imperfections” so I will just give this rating. I would go for a higher level but that is like Bandai’s level. Edges are not as sharp as Bandai’s and some of them even have rounded edges. But the panel lines are not that shallow and they are quite deep, making it easy for me to add some extra detail using the pens.
When I cut the gates or removed the nubs, the feeling was that the plastic is not “chalky”. It was kind of soft and reminded me of the plastic from Dragon Momoko. For me, this is good because it doesn’t much create ugly nub marks when trimming them with a hobby knife. Other plastics have this powdery and chalky feel when you cut it even if the knife is new. I didn’t encounter that kind of problem here.
Plus, it was a good move for them to put in into the undergated treatment so cleaning it off wasn’t much of a mess. Of course, this was meant for the straight-builders. Even if the parts are undergated, builders that need to paint them have to clean this thoroughly. Some of the gates were placed badly on some of the parts as well. I don’t like these gates, though undergated, near the male pegs. Trimming them carefully adds extra pressure that I don’t hit the pegs. Some of the gates were also placed on a notched section. That is really bad since it can ruin the design of the notched area. In terms of overall quality of the plastic, it’s a solid 8 for me. I just had to reduce a point because of the gate placement.
Assembly: 7/10
I am already used to bootlegs with issues of their parts being too loose or too tight. But even with a decent amount of experience from knock-off brands, I am still irritated if some of the parts have this kind of problem. Few of the parts here in the kit needed some glue and I don’t want to use glue or any adhesive as much as possible. Fittings were quite bad and I need to use a lot of force by pinning a part down in the middle of my hands or on the table. That is risky but I don’t have a mini vise to use.
The struggle was there and I need to trim or scrape a few female pegs to fit things up smoothly. I like challenges but not this kind of challenges but it kind of makes the whole building experience a stressful one instead of a fun one. Some of the parts are starting to get loose especially with the polycaps and that is a bad sign already. I won’t be able to hold the Avalanche Blade in the future using the arms. Still, it was good but I might suggest going for the Bandai one to avoid all of these problems.
Detailing: 8/10
On the other hand, the detailing is neat and good. Lots of notched surfaces, raised and etched areas, and these rounded engravings that can be good for extra detailing if you want to paint them. Part separation is decent as well so it’s quite colorful even without the paintjob. But if you are down to it and eyeing for some recolor to make this model much better than it already is, then go for it.
I will add my comment for the decals and foil stickers here as well. I am not a big fan of foil stickers and there were so many of it given for the model, like 3 strips of them (yet I used all the indicated areas from the manual >_>). Sure this can add a lot of extra color and detail but if the quality is questionable, then all of these will just go to waste or ruin the model. Fortunately, the foil stickers were passable or I could say of average quality. It was very tedious that I need to use the very tip of the hobby knife to make sure I won’t reduce too much of the sticky residue underneath each marking.
As for the waterslide decals, it was good and I didn’t experience that part where the marking sticks back to my fingers or the tissue paper. The white markings are not very thick though, so the color of the blue parts adds these very tiny specks. It means that there are holes on the white markings. But as long as these markings don’t get removed from a sweaty skin, I’m fine with it.
Articulation: 9/10
A lot of movable parts and I am amazed that I can still make decent movement even with its bulky look. The GN Condensers or the thruster parts attached to the shoulders and knee have very good articulation. Legs don’t have any problems when stretching it with the Dash Unit attached. Arms can still do a good selection of angles when trying some action poses.
The Dash Unit amazed me a lot because it is divided into a lot of sections. Plus the model can kneel because of the Avalanche armor parts and I like it (LOL).
Gimmicks: 8/10
As for the gimmicks, there were a lot of movable parts so I will count that in this section as well. The movable parts where you get to reveal the GN Condensers (yellow thrusters I think) were pretty cool. You get to attach beam saber effects as well onto the GN Claw which is nice for action poses. The extra clamps under the Dash Unit also serves as an extra handle that can lift half of the Avalanche Blades.
The LED gimmick where you have a functional button is awesome. I got addicted with it and pressed it often until the batteries were drained (>w<). The only problem with the LED system is that all the wires that connect to the green board inside are quite short. I had to remove the white connector so it can attach to the pins. If I were to follow the exact position indicated in the manual, the wires won’t be able to connect at all. A little disappointment on my end that they [Hobby Star] didn’t include a working LED for the Head Unit. But even with these problems, it was a good addition to the model as long as they are fixed.
Armaments: 8/10
There are so many to use and that means a lot of possible action poses for each one of them. Unfortunately, I only took a single action pose and just changed the angles and camera view. But yeah, it’s really nice that you get to have a lot of weapons. There’s no question behind it since these weapons are actually part of its list. It means that these weapons are not “Extras”. Even the GN Shield is not considered as an extra because it’s also part of the list (from wiki).
The only weapon I think considered as an “extra” here is the Avalanche Blade. It was mentioned in the in the wiki that it’s part of the original weapon plan, yet it is not listed in the Standard Armaments. It wasn’t even mentioned as an optional weapon. On Bandai’s version I didn’t see the Avalanche Blade as well but we might see a possible idea for them to put this in their P-Bandai list.
Extras: 7/10
Aside from the mentioned Avalanche Blade, I will also count the Action Base as part of the extras. The detailing is decent but not that great. The main factor probably here in the Extras Section is the GN Drive motor and LED. It was a cool feature to add a functional switch. Unlike the common black-casing LED’s we see from other models, you don’t need to remove them out to turn the switch ON. You may need to remove the entire cap at the end to change the button cells/batteries though. :/
I also like that they still add the waterslide decals that adds a lot of detailing factor for a model. I appreciate their idea of giving foil stickers that is quite similar to Bandai’s RG, but if they want to up their game, they should’ve added of them as a separate part instead.
Patience Level: 7/10
It took me quite a decent amount of time in building this model not because of the delays I’ve had but because of the amount of parts I need to clean thoroughly. The parts are undergated but I still need to clean them to make sure I won’t experience any huge seams, falling parts, or ugly chipped sections. The tight fittings also added a lot of stress on my end because I don’t want to scrape or trim pegs as I build each unit.
Overall Rating: 8/10
I may have experienced some bad ends on this model but it was still a good experience and I like the outcome even if it’s just a straightly built model without any paint. If you guys are running a little low on your budget, they you can either take DM, Daban Model or this one, Hobby Star. But you should decide what to pick since not all of them have this or that. For example, Daban Model doesn’t have the Avalanche Blade and Hobby Star have the LED gimmick for the GN Drive. If you’re fine missing one of them, then the last thing you will now consider is the price. Dragon Momoko’s price is starting spike up through the months so you might want to pick Daban or HS.
If you’re planning to paint the model, I think it’s a good idea to avoid the foil stickers and just do some masking techniques here. For modifications, I don’t know if you can still add a few things because there’s a lot of stuff already attached to Exia. Maybe a few more on the back instead like additional large GN thrusters, a different weapon or a few more parts added on the flat surface of the model’s Dash Unit.
For recommendations, I don’t think this is a good starting kit if you guys want to enter the MG line. But if you’re confident to handle the issues I mentioned above then go for this kit. But if you have doubts about the outcome, then just save up and get the P-Bandai Avalanche Exia Dash. Of course, going with this option will assure you good fittings. But you may still need to work on the nubs the parts might still produce.
So that’s it for my review and I think I covered most of the major parts here. If I ever missed a part of if you guys have questions, just leave a comment below and I will try to reply as fast as possible ^_^” (what do you mean FAST, Jeck? You’re soaking yourself in Ragnarok! D: ). And yes, I am really sorry that my review is late. Thank you guys for reading my review of Avalanche Exia Dash from Hobby Star.