

Review 012: MG 1/100 Gundam Astray Red Frame Kai (Daban Model)

This is one of the old kits from Daban Model and I have
my hopes up when it comes to its plastic quality. Well... I was a bit wrong
about it and I encountered several issues while building.
This kit is not mine and I was just asked by my friend, who is also the same client, to build it for him. Fortunately, he didn't mind the damages as long as the articulation of the whole unit is good.
The Astray Red Frame was one of the mobile suits I really like because of its color, simplicity of the design, and especially the weapons.
I think I was being confident just because I love this model, thus I ended up with big errors. It's a lesson learned for me.
So again, I am not a professional gunpla builder. All of the comments I have written are just based from my experience and current information/knowledge I already know so far.
If there are any wrong terminologies used, please do mention it. :)
Unboxing:

No other odd issues here. Everything is copied and only the major parts from Bandai are removed.
After opening the box, I saw that the runners are jam-packed
again in one plastic bag. Another lame move by Daban and can damage parts
during shipping, etc.
There were 4 runners in the plastic bags. Some of the runners were small but the others were the large ones and I can see that the parts' sharp edges tends to scratch the other parts. :/
Do check them well so you can replace the broken or missing parts as early as possible.
There were 4 runners in the plastic bags. Some of the runners were small but the others were the large ones and I can see that the parts' sharp edges tends to scratch the other parts. :/
Do check them well so you can replace the broken or missing parts as early as possible.

There are 29 runners in this kit and I'm expecting lots of parts for the Tactical Arms IIL. The next images will be the runners included in the kit and I will add some comments if there are any issues afterwards.
Runners:
|
|
|


|
|
|


|
|
|


|
|
|


|
|
|


|
|
|


|
|
|


Please do note that the black runners/parts are of bad quality. After checking these runners, it seems their quality isn't that good back then. The plastic quality is just a few points higher than TT Hongli.
Put your attention for the meantime here in the Runner H (8th picture with encircled part). The encircled part is really fragile. Mine broke in half during assembly and I will show the image later where you will use this part.
I thought this runner is the same with the Polycaps because it was quite soft. I can bend its runner, so I thought the female peg's hole will expand once you placed in the male pegs. I was wrong and I will try to be more careful if my client asked me to work on his ABF.
The katana is coated in silver (not sure if that was chrome) so the nub marks will be visible here.
They have 2 runners for the sword guard. I will use the
gold-plated ones of course even though the nub marks are quite bared.
The Polycaps are not that good but not that bad either. Do minimize the posing because it felt like they will get loose quickly.
Same as Bandai, the kit includes dry transfers, clear
stickers and your usual foil sticker. I might use the clear stickers for this kit.
There's a pack of nuts and screws as well.
There's a pack of nuts and screws as well.
Head Unit:

Simple but with good parts separation - I love the head of the Astray Red Frame Kai compared to Astray Blu Frame 2nd R. Although I hate the molding and the detail isn't very "crisp" as Bandai.

Simple but with good parts separation - I love the head of the Astray Red Frame Kai compared to Astray Blu Frame 2nd R. Although I hate the molding and the detail isn't very "crisp" as Bandai.
The V-fin is very loose, so you might want to apply some
glue or any adhesive you prefer for this issue.
So that's the only snap fitting issues here in the head unit and everything is good on the rest.
 |
 |
 |
So that's the only snap fitting issues here in the head unit and everything is good on the rest.

Instead of using the crappy foil sticker, I used my metallic
green Uni-ball Signo pen and painted the back of this clear green part. I love the outcome because you can see the engraved lines. If that was a foil sticker, I don't think it will look that nice.
I also used the same pen for the eye sensors.
I also used the same pen for the eye sensors.
Body Unit:
There's that encircled part again from Runner H. Sorry for the bad quality of the image though.
Okay, so there's good parts separation here, credits to Bandai.
 |
| Encircled part is H1 |
There's that encircled part again from Runner H. Sorry for the bad quality of the image though.
Okay, so there's good parts separation here, credits to Bandai.
I added some minor detailing using metallic green again
and I will use this green pen for the whole kit.


There are lots of tight parts for the body and I had to trim/sand some of those pieces.


There are lots of tight parts for the body and I had to trim/sand some of those pieces.
 |
| Encircled part is the broken H1 |
So yeah, this is the broken part.
And because of what happened, I can no longer do that Flight Form and possibly the other signature forms for ARF. :(
Please do be very careful and trim the male peg before attaching this part. I would suggest to scrape the H1 part as well. Do not sand/trim them to the point it's quite loose. Just enough not to break the part would be good.
Arm Unit:

The inner frame for the Astray Gundams are different when compared to the other model kits. The design is like a skeleton with few armors on it. This means I have to clean the parts very well because some sections of the inner frame are visible.
For the arms, the articulation is great IMHO. The wrist can be bent inward too, giving you that nice range when posing. There are no major snap fitting issues here and everything fits just fine. Although, the thumb seems to pop off a from time to time. I will apply some blutac on it.


I added some minor detailing here using Uniball Signo metallic green. I bled the pen on a smooth card and then I used a toothpick as brush to add those greens on the arms.
Shoulder Armor Unit:
 |
| Few parts and very simple |
Very straightforward and no other gimmicks here. No major snap fitting issues but I see this seam line on left shoulder. I check the inner frame again and everything fits just fine, so I can't trace where I got this issue.


Waist Unit:


I think that one of the gimmicks for the waist is that
you can tilt those side skirts because of its ball-joint mechanism. Of course,
credits goes to Bandai for this engineering.


This white part (B6) on the back skirt is a bit loose and tends to pop off from F6 part when I try to move it.

I added some green here again.
I forgot to add some panel lining so I took some time finishing the head and added more metallic green detailing.


Leg Unit:

Very nice parts separation here on the leg unit. The detailing is nice because of the part separation made by Bandai. :)

Very nice parts separation here on the leg unit. The detailing is nice because of the part separation made by Bandai. :)
You can bend the legs up to this angle and tilt the foot
upward like so as you see in the image.
 |
 |
 |
Some tight parts but it's not that much of a big deal and everything is good. I didn't encountered any issues during building here.


So far so good and all I need now are the weapons and to apply the decals.
My usual coffee break while lining up the parts for my "exploded view". :)
 |
| Coffee break! :) |
Weapons:
Tactical Arms II L:
I forgot that there 4 of those parts (encircled), and I only noticed it during assembly. This is so far the only single weapon unit I've encountered with lots of pieces - 88 in total.
Well there were no issues and the polycaps used here are tight, which is good.
 |
| Encircled supposed to have 4 pieces here |
I forgot that there 4 of those parts (encircled), and I only noticed it during assembly. This is so far the only single weapon unit I've encountered with lots of pieces - 88 in total.
Well there were no issues and the polycaps used here are tight, which is good.


Gerbera Straight and Tiger Pierce:
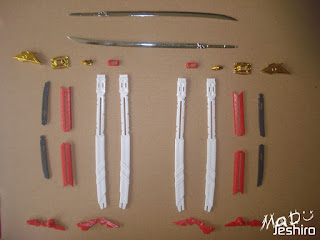

No other issues here except for that visible nub marks because they are coated in gold and silver.


I will add some metallic green here for some extra detailing.
Testing it out. >___<


Base Stand:

Well the base stand wasn't meant to hold the model. It was actually designed to hold the Tactical Arms. After all, it's really heavy and the model will surely have lots of problem holding it without this base stand.

The size resembles that for HG 1/144 and it has the same shape like Qan[t] I think.
Decals:
The dry transfer decals are of very good quality and surpassed my expectation. :)
The quality of the clear sticker is also good, so I will be using both. Although I will check if the white clear sticker is nice on the black part on TA IIL.
As you see in the image, I didn't used that clear sticker. I used 3 separate seals from the dry transfer sheet and copied the design from the clear sticker. I'm missing that caution line but I think it's fine. It's not as accurate as the one on the clear sticker sheet, but I do love the outcome.
Completed Model:
 |
| Replacing the clear sticker with dry transfers |
The dry transfer decals are of very good quality and surpassed my expectation. :)
The quality of the clear sticker is also good, so I will be using both. Although I will check if the white clear sticker is nice on the black part on TA IIL.
As you see in the image, I didn't used that clear sticker. I used 3 separate seals from the dry transfer sheet and copied the design from the clear sticker. I'm missing that caution line but I think it's fine. It's not as accurate as the one on the clear sticker sheet, but I do love the outcome.
Completed Model:
Sorry I was in a rush when I took the photos. I could have taken a few shots with ARF standing straight and the TA on the back. And the background isn't that good. >_>
I can't remember why I had to rush on this section knowing it's one of my fave kits.
I can't remember why I had to rush on this section knowing it's one of my fave kits.
 |
 |
 |
I forgot to mention that the white clear sticker is
bad so I had to remove both of them from the Tactical Arms. I forgot to strip
it off when I took these shots below.


Even with the errors I have made when I was building it, I still love the Astray Red Frame. I hope I can get one for myself and make sure I don't repeat the same mistakes again. I will apply my sanding skills too and try to get a nice clean build. :)

Here's my rating for this kit. I'm going to return my commentary for the Weapons since a few colleagues suggested that it should separated from the Gimmicks and/or Extras.
Plastic Quality: 6/10
I love ARF but I was a bit disappointed with the quality of the plastic. The reason might be that Daban Model's kits during this period when they released ARF wasn't that good. Or you could say they haven't improved their quality during the old days. Detailing isn't as sharp as it should be. It felt like another TTH when I was building the kit. No offense and this was just my opinions.
Snap Fitting: 6.5/10
My rating would have been 7 if not for the issues I've encountered. I could have given it an 8 or 9 too if that encircled piece from Runner H didn't broke. It was my mistake though. But even if I had avoided the issue of breaking it by accident, it won't jump over the fact that the snap fitting quality of this kit isn't that satisfactory. Knowing Daban Model, they were at least 80-90% closest to Bandai when it comes to snap fitting. >_>
Articulation: 8/10
Nice articulation though that makes up for the issues of this kit. Sorry I don't have any other images to show you regarding the range of articulation. But I assure you, during the time I was posing it, the articulation is nice.
Gimmicks: 6/10
There is something lacking when it comes to gimmicks this kit can offer. Piston on the leg part, movable hatch for the cockpit; these are just common and I wan't a bit more. There should have been more movable parts for the inner frame to compliment its skeletal look. If I missed something please do comment.
Weapons: 8/10
The signature weapon, Gerbera Straight, is really cool especially for different posing. The tactical arms is also good because of the forms it can do. Bad thing is that only the sword and bow form are accessible for my side.
Anyways, the Tactical Arms II L is more than just a weapon. It can also become a Flight pack and 2 other back pack designs. It was a good thing Bandai engineered and designed the weapon to be assembled into various forms.
Extras: 6/10
It was nice thought that they, Bandai, included a base stand for the heavy TA II. And Daban copied it of course. I remember tha time I built 00 Seven Swords and I don't have any tool to hold the GN Buster Sword.
There's also a small figurine of Lowe in the kit.. very small though. :v
Overall Rating: 7/10
I will not recommend getting this kit if you want to go into straightbuild or if you can't fix some of the issues I've encountered. But if you can handle the issues and planning to paint the model then go.
But do switch for Bandai for a better detailing/molding. I might plan on getting the Bandai one too someday.
For beginners, if you have tried building other bootleg MG kits, then the challenge won't be as hard. Still, do not rely on your skills. You may want to learn on your own, but having a few tips and advice from other builders won't hurt. Believe me, I know this because I have been there a lot and I am proud I am still asking for tips from them. :)
I am thankful, if any of you have spared some time reading my review. Share your comments if I have errors.
Also, have a look on our Gunpla-related Facebook page - Click Here
Subscribe to:
Posts (Atom)