
Introduction:
After a long time of waiting and just focusing on my personal life, I returned and started with the HiRM Wing Zero Custom of Daban, continued with Daban HiRM Barbatos too. And then I decided to expand my territory and enter YouTube. What I didn’t expect is that there are a lot of people who still wanted me to do these written reviews. Of course, they like and appreciate the video reviews, but they said that this form of review is much more entertaining and informative; complete. So yeah, I will return even though I already decided to stop. I’m coming home. XD
This review is kind of rough and messy because I tried preparing the materials not only for my small YouTube channel but also the pictures for making a written review again. With that, I am sorry if some of the images or information is incomplete.
Anyways, like I already mentioned in the videos for Heavy-arms, I bought the kit because of the fear that it will become after a few months. Supernova is getting more into the Zoids series and it’s been a while since they reissued some of their old kits. It was cheap so I bought one. I’m sure they still have a lot of stocks, but getting it quickly would be a safer decision than waiting for it to become expensive. Of course, that also reduced my funds for a new phone, which is a bummer.
If you see any typos in this article, just ignore them. I prefer typing continuously so I can share the ideas I know while they’re still fresh.
Also, I would like to invite the readers to support my channel. Click HERE. :)
Unboxing:

Starting with the box, It was still nice that they [Supernova] are keeping the usual finished model in front. I noticed though that they didn’t include the term “IGEL Unit” on it. This can be a problem for beginners or for those who are not familiar with the difference of those two.

The other side has the fancy silhouette of the model and it looks awesome. Another thing to point is that they never used the word “Gundam” just to be safe from Bandai’s thick lawsuit. But even though they’re not using the name, doesn’t mean it’s an original. If you have the money, go for the P-Bandai version. Whatever floats your boat. :3


Side images or features are not that enticing because it’s not featuring a lot. But the images are more like “what you see is what you get” kind of format. It’s already simple and easy to understand that you will get the IGEL Unit parts, but Supernova should have made some effort and featured those add-ons than just copy-pasting the same images.

Box is quite hefty, thanks to the extra brown box inside, which is a good thing to protect the runners. I hope Bandai should also make something like this to protect the contents inside. Some couriers are or shipping services are not very good with handling or packaging. They will just think that it’s a “kiddy toy” where you can shove and throw inside the truck. :/
Apologies if I didn’t took a better picture for the size comparison. I just took a screenshot from my recording. :v
Runners/Contents:
After a long time of waiting and just focusing on my personal life, I returned and started with the HiRM Wing Zero Custom of Daban, continued with Daban HiRM Barbatos too. And then I decided to expand my territory and enter YouTube. What I didn’t expect is that there are a lot of people who still wanted me to do these written reviews. Of course, they like and appreciate the video reviews, but they said that this form of review is much more entertaining and informative; complete. So yeah, I will return even though I already decided to stop. I’m coming home. XD
This review is kind of rough and messy because I tried preparing the materials not only for my small YouTube channel but also the pictures for making a written review again. With that, I am sorry if some of the images or information is incomplete.
Anyways, like I already mentioned in the videos for Heavy-arms, I bought the kit because of the fear that it will become after a few months. Supernova is getting more into the Zoids series and it’s been a while since they reissued some of their old kits. It was cheap so I bought one. I’m sure they still have a lot of stocks, but getting it quickly would be a safer decision than waiting for it to become expensive. Of course, that also reduced my funds for a new phone, which is a bummer.
If you see any typos in this article, just ignore them. I prefer typing continuously so I can share the ideas I know while they’re still fresh.
Also, I would like to invite the readers to support my channel. Click HERE. :)
Unboxing:
Starting with the box, It was still nice that they [Supernova] are keeping the usual finished model in front. I noticed though that they didn’t include the term “IGEL Unit” on it. This can be a problem for beginners or for those who are not familiar with the difference of those two.
The other side has the fancy silhouette of the model and it looks awesome. Another thing to point is that they never used the word “Gundam” just to be safe from Bandai’s thick lawsuit. But even though they’re not using the name, doesn’t mean it’s an original. If you have the money, go for the P-Bandai version. Whatever floats your boat. :3
Side images or features are not that enticing because it’s not featuring a lot. But the images are more like “what you see is what you get” kind of format. It’s already simple and easy to understand that you will get the IGEL Unit parts, but Supernova should have made some effort and featured those add-ons than just copy-pasting the same images.
Box is quite hefty, thanks to the extra brown box inside, which is a good thing to protect the runners. I hope Bandai should also make something like this to protect the contents inside. Some couriers are or shipping services are not very good with handling or packaging. They will just think that it’s a “kiddy toy” where you can shove and throw inside the truck. :/
Apologies if I didn’t took a better picture for the size comparison. I just took a screenshot from my recording. :v
Runners/Contents:


There are 14 plastic bags inside the box and there are 31 runners in total which is kind of compared to the usual 20+ (be sure to check them). Of course, this is just a normal thing for some of the bootleg kits. And only few Bandai kits have more than 30 runners. One of the main runners for the chest and shoulder covers has a duplicate. And you can use that one to give it a plain dark blue color. But that looks like a deactivated look. The positive side is that you can paint that runner with a different color, if and only if you’re planning to paint the whole model.
Plastic quality is good in my opinion. The flashes are not that many, but sanding is still need to smoothen the surfaces. Plus, most of the parts are undergated like Supernova always does with their kits. This is really good to avoid those irritating nub marks. You still need to clean them though, because some sections or angle are visible and they can be an eyesore.


The construction manual is the same with the box presentation and there’s nothing fancy here.

The illustrations are your usual black and white. I will mention an issue with this later on the Arm Unit section.

Second-to-last page is your featured model.
I also forgot to take a picture of a free support base. This shop called Hobbywang that we always check sometimes gives them for free. You can just check them in Google. It's the action base that you use for figma figures.
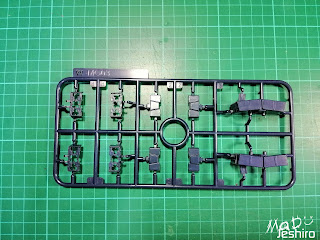
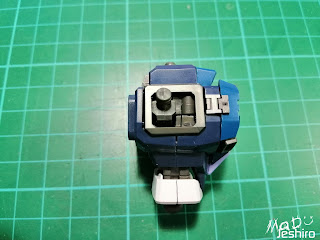
Head Unit:

Parts separation is good but not that surprising. Heavyarms has a very simple color scheme. Use markers if you want to add some extra detailing.


It looks really good and it would be nice with some white caution markings and probably some silver detailing.
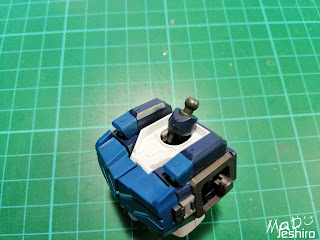
As for the issues, the I2 and I3 parts on the back of the head are very loose. I applied some blue tack instead to keep them in place. The antennas H8 and H9 are hard to attach on the sides of the head. And this is really worrisome because you might end up breaking or bending the antenna rods. Other than these 2 things, everything is fine. I also used a Uniball Signo angelic green on the eyes, and it’s surprisingly the same color of the green parts for the chest, shoulder and skirt missile pods.
Body Unit:

It’s got a decent amount of parts and it’s nice they have the cockpit gimmick here. Unfortunately there’s no pilot included. Be sure to avoid losing those two tiny parts beside the inner frame abdomen frame.


It looks really simple but it has the charm that makes you want to buy Heavy-arms.
Before we head down to the articulation and gimmicks, let’s start with the issues. Inner frame pegs are quite tight. If they are not movable or articulated, then you can trim/scrape the female pegs a bit to fit them perfectly. Be sure to check the pegs of M10 and I4. As for the outer armor parts, they fit just fine, but for some odd reason, I have a very slight seam on the right side. It’s not going to be noticeable once you attach the arm anyways.


Now for its movement range, the lower abdomen can slightly swivel. It doesn’t feature a very good twist.

The main pegs for the arms have the usual butterfly joint, so you can pull them outward for that extended arm movement. This is where you’ll notice the seam just below the armpit.
Plastic quality is good in my opinion. The flashes are not that many, but sanding is still need to smoothen the surfaces. Plus, most of the parts are undergated like Supernova always does with their kits. This is really good to avoid those irritating nub marks. You still need to clean them though, because some sections or angle are visible and they can be an eyesore.
The construction manual is the same with the box presentation and there’s nothing fancy here.
The illustrations are your usual black and white. I will mention an issue with this later on the Arm Unit section.
Second-to-last page is your featured model.
I also forgot to take a picture of a free support base. This shop called Hobbywang that we always check sometimes gives them for free. You can just check them in Google. It's the action base that you use for figma figures.
Head Unit:
Parts separation is good but not that surprising. Heavyarms has a very simple color scheme. Use markers if you want to add some extra detailing.
It looks really good and it would be nice with some white caution markings and probably some silver detailing.
As for the issues, the I2 and I3 parts on the back of the head are very loose. I applied some blue tack instead to keep them in place. The antennas H8 and H9 are hard to attach on the sides of the head. And this is really worrisome because you might end up breaking or bending the antenna rods. Other than these 2 things, everything is fine. I also used a Uniball Signo angelic green on the eyes, and it’s surprisingly the same color of the green parts for the chest, shoulder and skirt missile pods.
Body Unit:

It looks really simple but it has the charm that makes you want to buy Heavy-arms.
Before we head down to the articulation and gimmicks, let’s start with the issues. Inner frame pegs are quite tight. If they are not movable or articulated, then you can trim/scrape the female pegs a bit to fit them perfectly. Be sure to check the pegs of M10 and I4. As for the outer armor parts, they fit just fine, but for some odd reason, I have a very slight seam on the right side. It’s not going to be noticeable once you attach the arm anyways.
Now for its movement range, the lower abdomen can slightly swivel. It doesn’t feature a very good twist.
The main pegs for the arms have the usual butterfly joint, so you can pull them outward for that extended arm movement. This is where you’ll notice the seam just below the armpit.
You can lift this peg up but I doubt you can do this after attaching the bulky shoulders armors.


We have the iconic chest Gatling guns. It’s nice that you have 2 different kinds of color here. And you also have the cockpit hatch gimmick.
Neck joint also features a nice bend backwards.
Upper Body Unit (Shoulder Armor):

Here are the parts for your shoulder armor, with the exception of those two parts that will be built into a gray spike. You can use this to replace that yellow spike on top, which I will mention later.


Detailing here is nice, and I love that they added a few etched surfaces. They even have this gray part on top for that nice armored look.

There were no MAJOR fitting issues to be honest. However, there were 2 minor issues I found here that is not that of a big problem. First is that spike that I mentioned earlier. If you want to attach the IGEL Unit add-ons, you will need to attach that gray spike. How come this is a big problem? Well you see… you need to disassemble the whole shoulder armor again in order to remove this spike and replace it with the yellow one. Why not the yellow? The design is very different and the IGEL Unit connector can’t be clipped onto it. Supernova should’ve made the extra spike yellow because it adds some nice colors to the overall blue theme.


The second issue is not on the fitting itself but can lead you to that if not noticed. The illustration or drawing on the manual for parts I19 and I20 are wrong. There’s a small square clamp or hook of sort on the parts I mentioned. The construction manual is pointing out that these square hooks should face the spike. But the correct position is that these hooks should be facing the opposite and you will connect the blue cover (H20 and H19?) on that. You’ll figure it out.
But yeah, those are the two annoying things here in the shoulder armor.

Also, I tested some markers and pens which one I should use on the missile heads. Others said silver but my pen for that already dried out. I wanted the red but it looks dark, so I ordered a Gundam Marker GM16 – the metallic red.

As for its articulation and gimmicks, starting on the front side, you have the pods that can be opened up. Do take some extra caution when opening these hatches. I saw some builders before that forcefully opened them and the C clamp broke.

The back side can rotate so you can show the other missiles.

The main arm connectors here can swivel but it’s not that good. It seems the movement range in my opinion is limited. So I am not sure if you can do that acrobatic crucified pose that Trowa did before landing on the ground. :v
Overall, it’s a smooth build.
Arm Unit:

The arms of the “Wing boys” aren’t that complicated. And here you have an average amount of parts.


There are no issues here, but caution is needed when attaching the pegs, especially on those black parts for the elbow. They seemed fragile.

The arms can bend nicely but I am not sure if this is possible if the hefty Gatling guns are attached.

Wrist can bend a bit as well.

We don’t have articulated manipulators here. So you just need to replace the fixed ones with open-palm, “grabby” hands, etc.
Waist Unit:

Here are the parts for the Waist Unit and it has good parts separation.


Even though Heavyarms is just a mobile suit with flat surfaces, it’s nice that Supernova added some panel lines and etched parts to remove that plain look. The height is already over the top, so why not get along with it and added new details. Of course, if you want to stick with the original look, you can always go for the P-Bandai.
There are no big issues here. The polycap part for the legs didn’t cracked and I’m glad about that. It’s not really a big deal because you will not pivot the body very much, but the ball joint keeps sliding out of the socket after twisting or pivoting. And then I checked the polycap and it’s not really a socket. It’s more like a tube-like polycap, so it’s not locking the ball joint of the body. :(

You have a nice range of movement for the front skirts though. You can lift it up this much.

Even the back skirts also boast good movement.

The side skirts have the same level of articulation too. I am not sure if you can lift this up after the body is attached.

For the gimmicks and part of articulated areas, you have the missiles on the side skirts.
And of course, the missile pods on the front skirts too.
Leg Unit:

Okay, so here we have the parts for the leg. This is the left leg and I already built the right one to check the issues. It features good amount of parts, thanks to the missile pod. You also have those gray parts that add color separation and detail on the white parts.


Supernova really helped a lot to make it more detailed. And I think it suits just fine for Heavyarms’ theme being a heavy assault suit. Those gray parts and extra armor blended well.
I didn’t encounter huge problems here. The typical tight pegs in the inner frame are common. The gray detailing parts like J03-3 and J03-4 are a bit easy to remove, and it’s your call if you want to add some super glue or maybe any reusable adhesives.

Movement range is nice but it will be reduced a bit once you attach the IGEL Unit add-ons.

The ankle guard is a bit big, so the movement on the joints is not that good.

It has a decent, but not very impressive if you swivel the feet.

It has a good toe bend though. It would work well for charging or jumping poses.

And of course, you have the gimmicks of the missile pods. A few people didn’t like that I painted it red. For me? I don’t care. It adds extra color. Everyone saying that I should paint it silver or leave it be, because it’s true to the original design.
Like what? Supernova already made the design over the top! Why not go further? If you want it to look like the same with the anime series, then get your own kit and do it yourself. If someone keeps bothering you to do something on your kit because they think it’s cool, but you don’t really want to, would you do it? I’m doing this review to help others learn the issues. I don’t want someone dictating me how should I make myself happy with the kit I bought. If don’t know what color to use, I ask. If didn’t, that means I made up a decision. :v
Sorry about that…
Well, yeah, that’s it about the legs. Moving on.
Backpack Unit:

It features a lot of parts here because of the extended, movable binders.
We have the iconic chest Gatling guns. It’s nice that you have 2 different kinds of color here. And you also have the cockpit hatch gimmick.
Neck joint also features a nice bend backwards.
Upper Body Unit (Shoulder Armor):
Here are the parts for your shoulder armor, with the exception of those two parts that will be built into a gray spike. You can use this to replace that yellow spike on top, which I will mention later.
Detailing here is nice, and I love that they added a few etched surfaces. They even have this gray part on top for that nice armored look.
There were no MAJOR fitting issues to be honest. However, there were 2 minor issues I found here that is not that of a big problem. First is that spike that I mentioned earlier. If you want to attach the IGEL Unit add-ons, you will need to attach that gray spike. How come this is a big problem? Well you see… you need to disassemble the whole shoulder armor again in order to remove this spike and replace it with the yellow one. Why not the yellow? The design is very different and the IGEL Unit connector can’t be clipped onto it. Supernova should’ve made the extra spike yellow because it adds some nice colors to the overall blue theme.
The second issue is not on the fitting itself but can lead you to that if not noticed. The illustration or drawing on the manual for parts I19 and I20 are wrong. There’s a small square clamp or hook of sort on the parts I mentioned. The construction manual is pointing out that these square hooks should face the spike. But the correct position is that these hooks should be facing the opposite and you will connect the blue cover (H20 and H19?) on that. You’ll figure it out.
But yeah, those are the two annoying things here in the shoulder armor.
Also, I tested some markers and pens which one I should use on the missile heads. Others said silver but my pen for that already dried out. I wanted the red but it looks dark, so I ordered a Gundam Marker GM16 – the metallic red.
As for its articulation and gimmicks, starting on the front side, you have the pods that can be opened up. Do take some extra caution when opening these hatches. I saw some builders before that forcefully opened them and the C clamp broke.
The main arm connectors here can swivel but it’s not that good. It seems the movement range in my opinion is limited. So I am not sure if you can do that acrobatic crucified pose that Trowa did before landing on the ground. :v
Overall, it’s a smooth build.
Arm Unit:
The arms of the “Wing boys” aren’t that complicated. And here you have an average amount of parts.
There are no issues here, but caution is needed when attaching the pegs, especially on those black parts for the elbow. They seemed fragile.
The arms can bend nicely but I am not sure if this is possible if the hefty Gatling guns are attached.
Wrist can bend a bit as well.
We don’t have articulated manipulators here. So you just need to replace the fixed ones with open-palm, “grabby” hands, etc.
Waist Unit:
Here are the parts for the Waist Unit and it has good parts separation.
Even though Heavyarms is just a mobile suit with flat surfaces, it’s nice that Supernova added some panel lines and etched parts to remove that plain look. The height is already over the top, so why not get along with it and added new details. Of course, if you want to stick with the original look, you can always go for the P-Bandai.
There are no big issues here. The polycap part for the legs didn’t cracked and I’m glad about that. It’s not really a big deal because you will not pivot the body very much, but the ball joint keeps sliding out of the socket after twisting or pivoting. And then I checked the polycap and it’s not really a socket. It’s more like a tube-like polycap, so it’s not locking the ball joint of the body. :(
You have a nice range of movement for the front skirts though. You can lift it up this much.
Even the back skirts also boast good movement.
The side skirts have the same level of articulation too. I am not sure if you can lift this up after the body is attached.
For the gimmicks and part of articulated areas, you have the missiles on the side skirts.
And of course, the missile pods on the front skirts too.
Leg Unit:
Okay, so here we have the parts for the leg. This is the left leg and I already built the right one to check the issues. It features good amount of parts, thanks to the missile pod. You also have those gray parts that add color separation and detail on the white parts.
Supernova really helped a lot to make it more detailed. And I think it suits just fine for Heavyarms’ theme being a heavy assault suit. Those gray parts and extra armor blended well.
I didn’t encounter huge problems here. The typical tight pegs in the inner frame are common. The gray detailing parts like J03-3 and J03-4 are a bit easy to remove, and it’s your call if you want to add some super glue or maybe any reusable adhesives.
Movement range is nice but it will be reduced a bit once you attach the IGEL Unit add-ons.
The ankle guard is a bit big, so the movement on the joints is not that good.
It has a decent, but not very impressive if you swivel the feet.
It has a good toe bend though. It would work well for charging or jumping poses.
And of course, you have the gimmicks of the missile pods. A few people didn’t like that I painted it red. For me? I don’t care. It adds extra color. Everyone saying that I should paint it silver or leave it be, because it’s true to the original design.
Like what? Supernova already made the design over the top! Why not go further? If you want it to look like the same with the anime series, then get your own kit and do it yourself. If someone keeps bothering you to do something on your kit because they think it’s cool, but you don’t really want to, would you do it? I’m doing this review to help others learn the issues. I don’t want someone dictating me how should I make myself happy with the kit I bought. If don’t know what color to use, I ask. If didn’t, that means I made up a decision. :v
Sorry about that…
Well, yeah, that’s it about the legs. Moving on.
Backpack Unit:
It features a lot of parts here because of the extended, movable binders.


It looks simple, but you can’t hide those fancy etched and raised surfaces. This would be nice if painted.
As for the issues, you have the J03-21 and J03-13 parts, and also the K9 parts. These are your connectors and joints for the binders. They are really tight. Sanding is needed to avoid breaking them if you twist or rotate the joints. But do not over-sand or else they will be too loose to handle the weight of the Gatling guns.


The binders or you could say mechanical arms; they are quite articulated. Each joint are using round male pegs so you can twist them to full 360 degree.

The end of the binder has a connector where you can attach the Gatling guns if not in use.
Armaments:
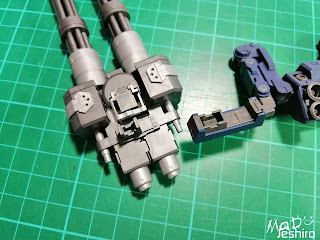
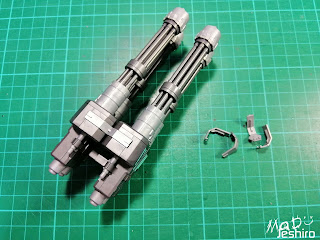
Double Gatling Guns:

And here are your parts for its primary weaponry. It features good parts separation, but the single color theme is making it plain. Would be nice if Supernova used darker gray parts on some sections.

Overall, it looks great and I didn’t encounter any fitting issues here.

The handle is the only articulated part, and you might need a tool or something to pull it out.


You also have this connector that has 2 purposes. In the picture, the right side is your connector for the backpack and the left side (with a rectangular peg) is your connector on the forearms.
IGEL Armaments:
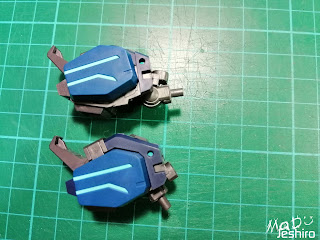
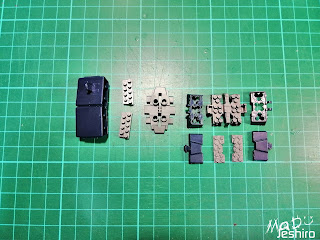
Large Missile Pod (Shoulder):

Here are the parts for the huge missile pod on the shoulder. Cleaning the hatches is the only hassle I encountered here.

Unfortunately, I forgot to take a picture of the finished part. So I am using one of my shots as an example instead. So yeah, the articulated section and gimmicks are hidden missiles. The hatches on the sides are a bit tricky to open though. If you watched my YouTube video, I used tweezers to open them.
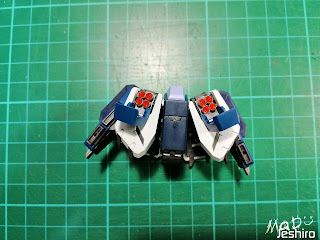
Leg Missile Pod (Calf):
And here are your parts for the missiles pods on the calf. Take note that you will need to use a different part for the main missile pod. The missile pod for the regular Heavarms doesn’t have pegs on the side. The ones from “Y” Runner (I think) have pegs to attach the IGEL armament.

There are no issues here and everything was a smooth build. And you might have noticed; “where are the covers?”


That’s right. Supernova didn’t created covers or extra hatches for them. Same with the issue with the yellow spike on the shoulder, you will need to remove it from the regular missile pod and attach it on the other variant. It’s not really hard to remove the covers, but I’m sure you’ll agree that a duplicate would’ve been nice.

So yeah, we now have additional missiles to feature here after opening the pods.

Now to apply that red color again.
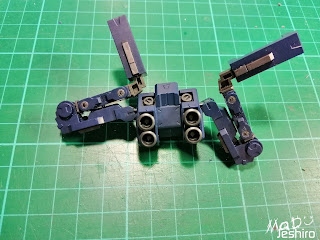
Continuous Tracks/Chain Tracks (Lower Leg):

I don’t what it’s called in the wiki so I just used the common term for it. Anyways, these are all the parts to build the chain tracks. It’s attached behind the leg.
The only issues here are the pegs of the Y4 and Y5 parts. They’re a bit tight, and it can add some stress on the pegs if not sanded a bit.
Other than that, it’s already good. Color is plain and there are no extra detailing added here. But you can add some paint on the raised or etched surfaces if needed. I will just add decals here instead. :v

Because of the round pegs, you will be able to twist the joints nicely.


Not really a big issue, but you have the same trouble from the shoulder spikes and leg missile pods. In order to attach these chain track add-ons, you must remove these gray parts on the side of the ankle. They should’ve design it as a cover instead of removing it. I’m a lazy person and this is also a red flag for getting “black holed”.
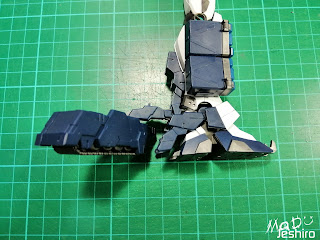

Once attached, you can swivel the chain tracks left and right.
Extras:
Moving now to the other freebies for the model…


First we have the full-face clown mask and I painted it really badly, because I don’t have a Uniball Pen. I used the Gundam Marker but I can’t avoid painter over the edges. Erasing was quite tedious too.

Same goes for the half-face clown mask.

You also have the usual set of fixed manipulators for different action poses.

We have the yellow spike and the parts attached on the side of the ankles. You can still use them if you’re going to build the regular Heavyarms Custom

The kit also has the connectors that you can attach on the back or the crotch. Unfortunately, they were bad. They can’t handle the weight of the mode. Besides, Heavyarms looks better on the ground rather than in mid-air.

We got these support connectors to lock the two Double Gatling guns together.

There were some extra pieces of the gray parts here too; handy if you lose the other ones.

And lastly, the missile pods from earlier.
Decals:


You have a nice sheet of waterslide decals. The quality of the stock WSD is good, but it’s better to apply some topcoat to protect them (I didn’t apply some topcoat XD ). The Delpi Decal sheet is not included. I just bought it for some extra markings.
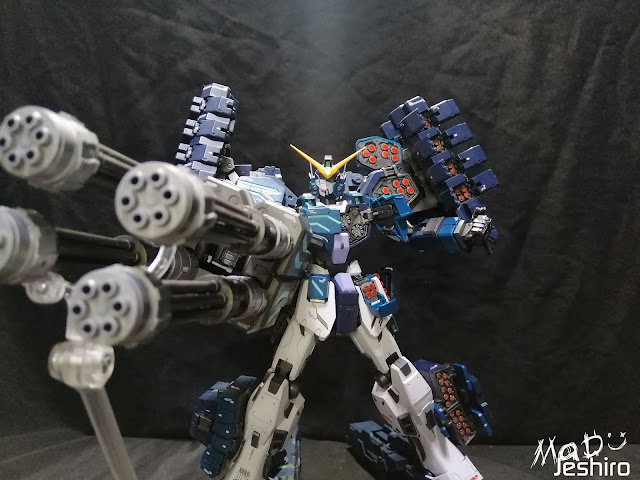
Finished Model:


I had to pull down the chain tracks as a support for the heavy upper body.

Here’s a quick size comparison with the Heavy Arms ver EW. This is the TTH Brand, but even if that’s the case, it’s still going to be the same size if you buy the Bandai one. Now you have an idea if you will get the original design or the taller one.
Close-up Shots:


Final Articulation Check:


Because of the blocky parts, their articulation for the arms are kind of reduced.


Legs features decent movement. The kneeling pose was really hard to do because of the design.

New issues appeared and I mentioned this in my video review. Some parts started falling or getting easy to remove. The legs’ main joint, as you see in the picture, can’t handle the weight. So there’s a tendency that it will be removed during movement. Do not glue this because it will affect your articulation.
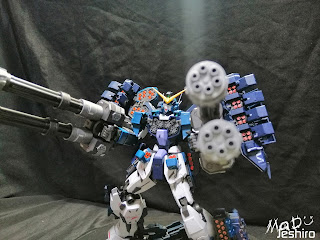
Sample Action Poses:


Conclusion:

I am not going to do the review for each of its category and just summarize my opinions about it. Overall, it looks great, and that is no question from Supernova and all of their models. Painting the model would also bring out those raised and etched surfaces that I mentioned earlier. I still do love the orange/red version more than this one though. And I hope they will re-issue that in the future. Also, I am glad they don’t have that whole sheet of foil stickers like when they first released the green Altron. They finally learned from that mistake.
As for the gimmicks, articulation etc., you have a lot. And those are the common characteristics of Heavyarms. The model would definitely stand out if all the missile pods are opened up. As for the extras, most of them are useless, and I am a bit disappointed they no longer include the special action base. You will just have to get one separately. I made the articulation Rank B because it's for the overall movement once you attach the IGEL Unit. But if the IGEL Armaments are removed, it's a Rank A.
I think this is a not a bad kit for beginners or those who want to try a 3rd-party brand. The issues I have encountered are not that bad. Of course, caution is still a very important thing to do and avoid breaking a peg or two. I forgot to explain the Difficulty rank as well. The higher the rank for this section, the easier it is to build. So I had to make it a Rank B not because it's hard to build but because of the falling parts after the final assembly.
So yeah, that’s all about this kit. It’s possible that some of these issues are just isolated cases and I might have missed other issues as well. I got a little rusty when I stopped writing these articles. I won’t be able to write or make another review for the next few months. That means I will be late on reviewing the Dynames (if this is true) or never at all. I really, really need to save up and get a new phone because this is the only tool I use for recording videos. Thank you guys for reading and I hope you check my YouTube channel as well. It’s still small, but I would appreciate your help by subscribing. You can check it HERE.