

Introduction:
I was excited and I was really glad I finally got the Strike Freedom ver MB of Daban Model. As some of my readers might recall, I mentioned that I want to get this kit for review purposes and of course for my personal collection. But it took me a lot of time and problems to fix, thus getting it after nearly a year. I started with the kit this last October 2017 and finished the kit on the first week of January 2018. The expected time to finish the model was extended because my usual client asked for another request to build his 2 Gunpla kits. I couldn’t say no to the offer knowing that it will give me new articles for my blog.
Anyways, during the time I was scraping for information about this kit, I received a lot of negative feedbacks and most of them are saying that I should go for Dragon Momoko. I guess they were right with some of the pointers they mentioned but that doesn’t mean Daban’s own Strike Freedom can’t stand out on its own. Each kit has their merits that make them unique and this is good to give builders the choice to pick the best for them.
Just ignore my typos again and be sure to comment any other issues or problems for this kit. It would have been nice if I got the Dragon Momoko for comparison but the one I built isn’t mine. And if there are wrong terminologies used here, please do correct me on that.
UPDATE (2018-01-30): Wing of Light Option Set Review - CLICK HERE
Unboxing:


When I first saw this box inside Neo Hobs, I was surprised that it was huge probably around the same size of MG Ex-S Gundam’s box. Of course there were still unconfirmed rumors about the “Wings of Light” add-on and I expected it to be there considering the size of the box. Turns out that Daban Model will release the WoL as a separate purchase item.

Now after getting the kit, I started to check the contents. The whole box is filled up with lots of plastic bags. The contents still shakes a bit inside but I doubt all of them will fit in a regular Master Grade box (SEED kits).


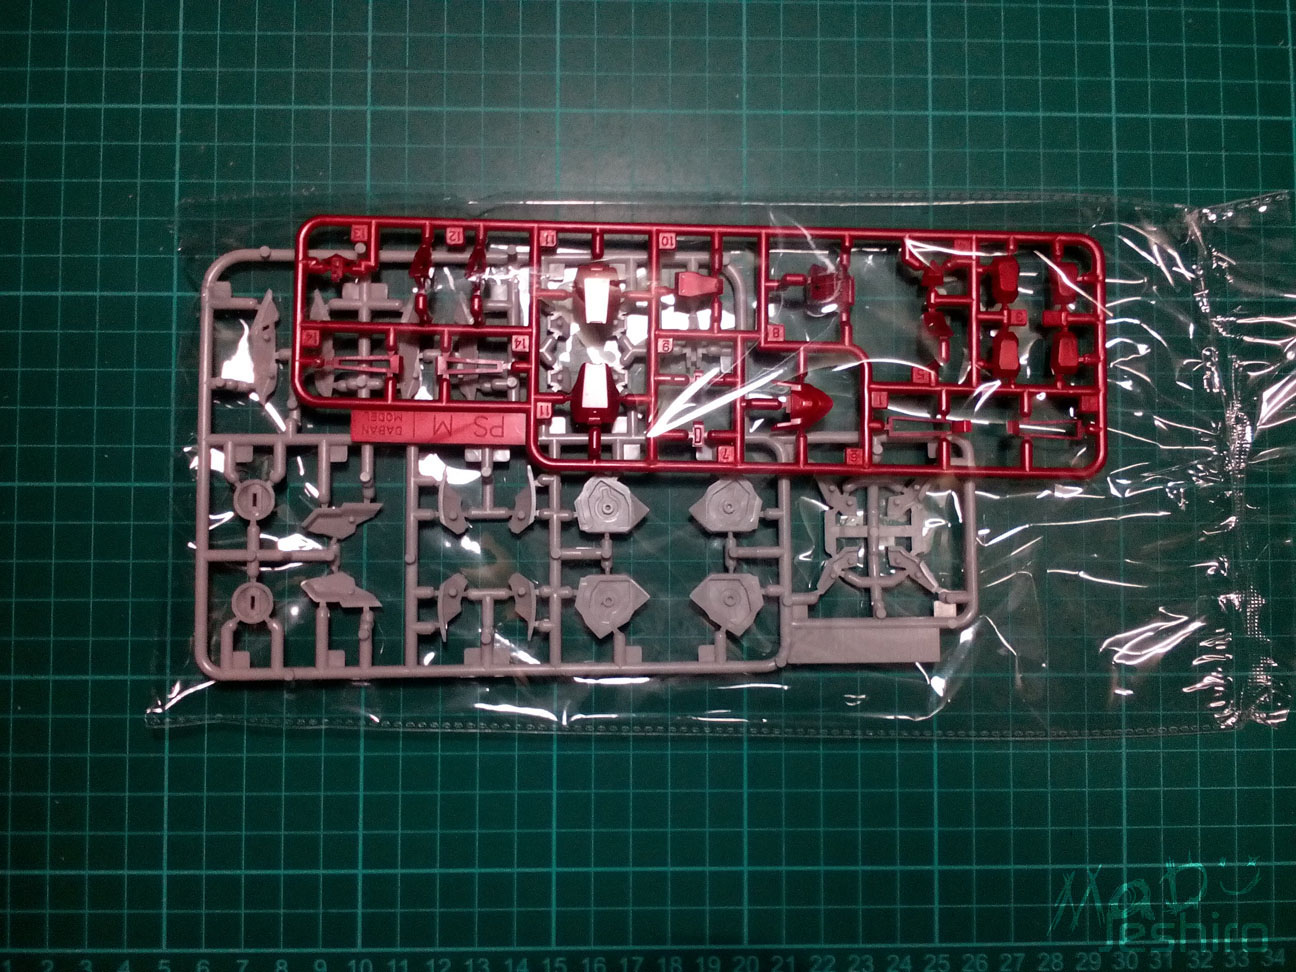


There are 18 plastic bags inside if I were to count the small plastic where styrene rods are packed. This was very uncommon for Daban Model to place a single sprue frame inside a plastic bag and all of them are the gold-plated parts. The rest of the plastic bags contain two sprue frames at max. There was a plastic bag with three frames because the polycaps were also packed inside.

The construction manual shares the same finished model from the box art. They should have at least removed the word “Fighter” and left it with its model number plus the name.

The last page or rear side of the construction manual is a bit plain but shares the basic info about the mobile suit.

It was a bit disappointing that they released the construction manual with some nice color on the front page but the rest of the images inside are all black and white. Compared to Dragon Momoko, their construction manuals are very pleasing with lots of images of the model’s action poses or gimmicks.


So here is the list of the sprue frames for the model. There are 29 frames in total and it will be 30 if you will count Sprue Frame T which is the pedestal for the model.
Sprue Frames:


You get a nice sheet of waterslide decals and small sheet of foil markings. It was lame of Daban Model to use foil stickers for the beam rifles which I will discuss later. Another bad factor is the word “fighter” on the pedestal.

I almost forgot to add that you have the effects for the beam shield as well.
Even though they have a nice gold coating, the only main problem I can point out here are the gates. They are placed on surfaces that will become visible once you trim them. Daban Model didn’t even tried to put it in the undergate treatment and that sucks. I guess Dragon Momoko’s decision for not using the gold plating on the yellow parts may seem to be a better choice than Daban.
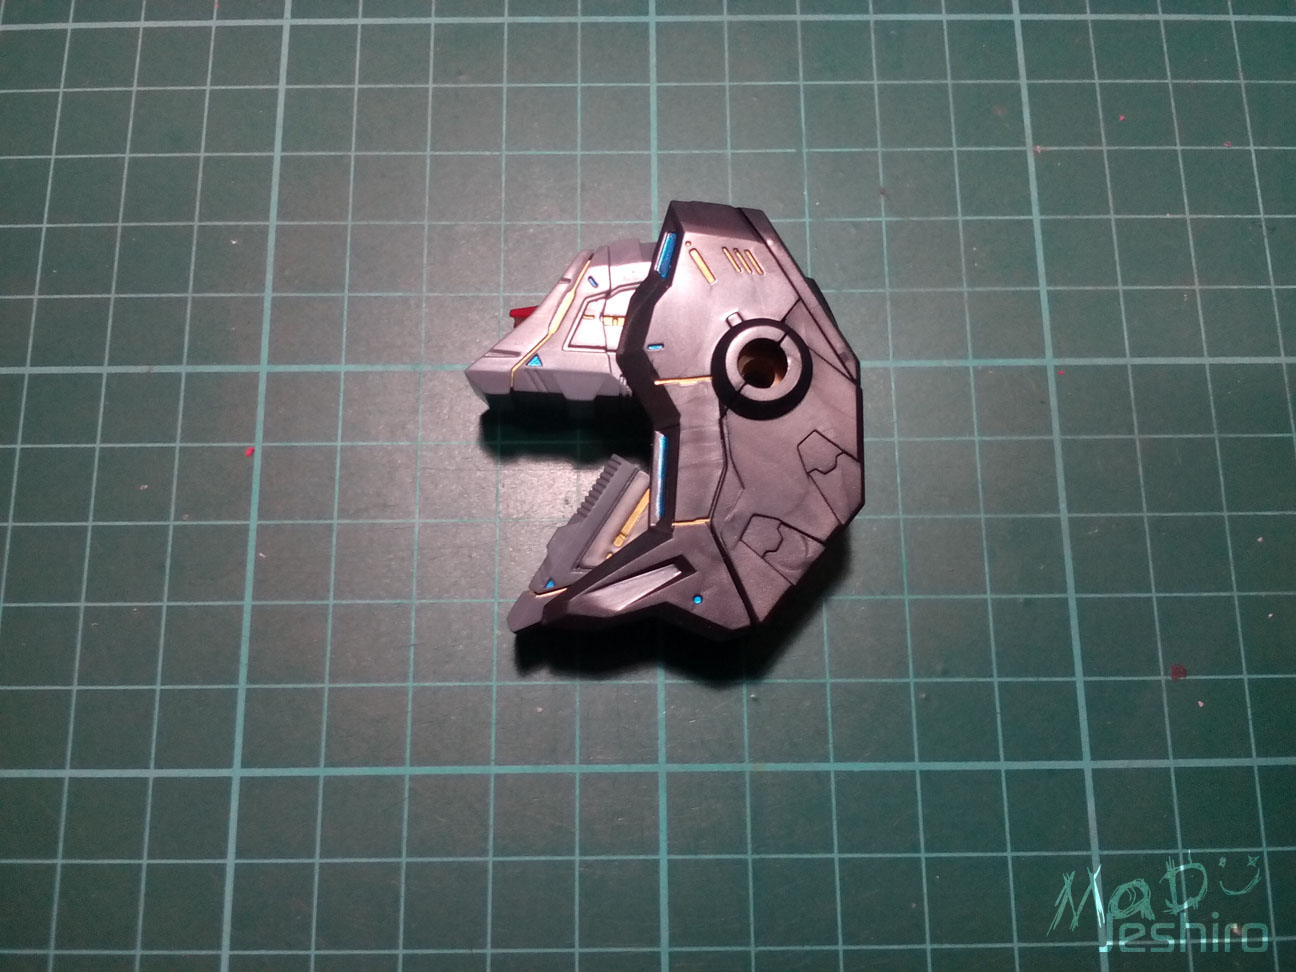
Head Unit:

Now it’s time to start with the head and you have lots of parts here. Dragon Momoko gives you 19 pieces for their Head Unit and there are only 18 here for Daban Model. But the good factor about Daban Model is that they have separate parts for the CIWS (Close In Weapon System). They also make good use of the gray parts to add more detailing and being accurate to the original.


The bad side however are the gray parts just beside the face mask. They are just attached via slot pegs so there’s a tendency they will fall off. Unlike Dragon Momoko, They have put them in a single part to avoid such problems.
Both brands doesn’t have separate parts to add the gray color on the cheeks but Daban Model included foil stickers to compensate for this matter. I don’t like the foil stickers so I will leave the Head Unit as it is.
During the Unboxing phase, the left side of the gold v-fin is slightly bent. The reason might be from the packaging in the factory. I managed to bend it again almost near its original position.

The biggest issue I have encountered here is this seam line on the side of the head. I asked for some advice but I only got a few answers that didn’t help me at all.

I tried trimming out the inner frame parts that might be hindering its fitting. And after a few trials, I removed the seam line. It’s not that perfect but it was far better than having a huge seam before. And about that gold line you may have noticed, I was already running out of options before I trimmed the inner frame so I added some gold on the pegs inside.

Coffee break! :D
Body Unit:

The body features lots of parts. Although both brands (Dragon Momoko) have at least 50+ parts in their Body Unit, each have their own respective positive factors.


There were several tight parts in the inner frame probably because of the gold plating that made the female pegs narrower. There were some tight fittings in V19 and V20 and you might want to check that out.
Overall, it was still a good build and the detailing here is great. Dragon Momoko is also great in their design but Daban Model put some nice treat to create separate gray parts for abdomen. Dragon Momoko added nice separate gray parts under the vents of the chest, while Daban added more gray and gold parts to the body.

You also need to add some extra gold by using the foil stickers. I stick to my usual pen and added some metallic blue instead.
Arm Unit:

The Arm Unit features above average amount of parts. Of course you get more parts to build the beam shield generator parts.

I have mentioned this before in Dragon Momoko’s Strike Freedom and I think Daban Model is repeating the same mistake they had before. Please check out this image for the wrist. Make sure that the E1 gold part is placed correctly to avoid damages. It was also very tight here and I had to sand the sides a bit to fit them in.
Aside from the mentioned issue, the other problems here were just tight fittings probably from the gold plated pegs. The nub marks especially on the elbows were already unavoidable so the only thing you can do now is find the closest gold paint to cover them up.


Overall it was still a good build for me and I enjoyed its detailing because of the added extra parts. Dragon Momoko’s Beam Shield Generators are just plain white and doesn’t have any gray and dark gray parts on the sides. The base parts of their shield generators are also gray but Daban Model replaced it with a gold-plated one.

The movement range is also great and you can bend the arms this much.

You can also rotate half of the arms like so to add few more angles when posing.
Shoulder Unit (Upper Body):

There were more parts featured here as well and you get separated parts to reveal the gold sections.

Tight fittings mostly from the white parts were the only problem here.

Same with the usual Metal Build model, you get to move the sides of the Shoulder Armor. Daban Also used gold plated parts here while Dragon Momoko simply used gray parts.
Waist Unit:

The waist for Strike Freedom features good amount of parts and a lot of them were gold plated. There were also gray parts added as well.

I kind of overlooked this one and forgot to add this piece on the exploded view section. It’s a piece for the crotch (G34).


I added some metallic blue again on some of those carved surfaces.


It looks really good because of the gold parts. But just like any bootleg brand there are still problems. In here, the K5 and K4 parts for back skirts fits well, but the front skirt parts K34 and K33 are slightly loose. You may want to check these out if there’s a possible treatment.


You can lift the front skirt this much and move it sideways too if you look at the image.

The back skirts have a higher angle and can be lifted up to this degree.

Same with the original model, Daban Model features the gimmick where you can slide the back skirts and rotate the connectors for the rail guns. This will open up new pegs where you can attach the rifles.
Leg Unit:

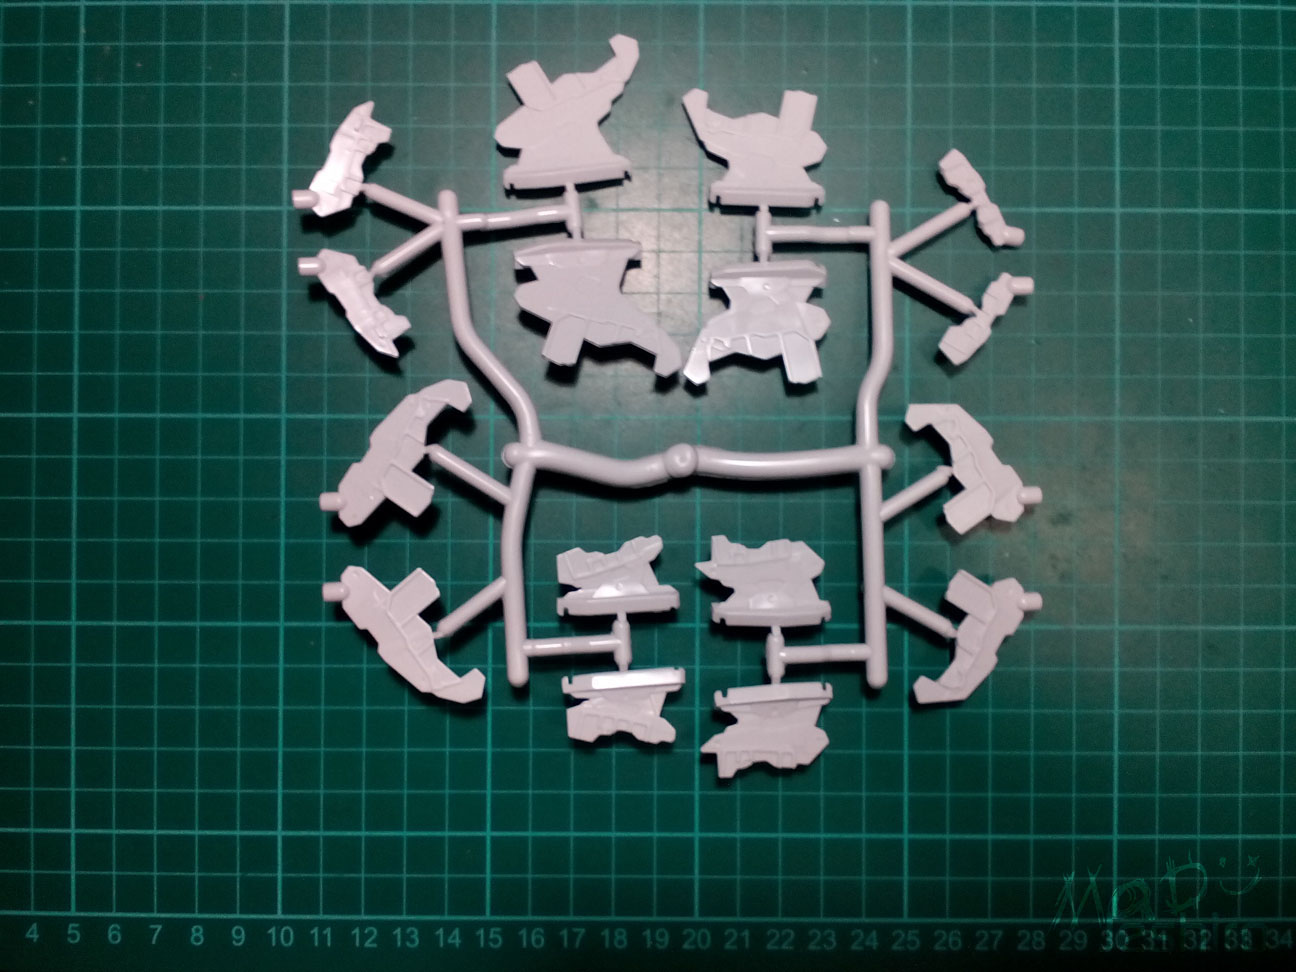
We now move to the parts for the Leg Unit and I was like “Wow!” after placing all the parts on my cutting mat. There were more parts here compared to Dragon Momoko and that’s because of the extra gold-plated parts.

Let’s start off with the problems again of the model. Back when I was building DM’s Strike Freedom, I got stuck with a very irritating problem from its PC parts. It was a socket-like part to connect the feet.
I’m saying this because the same problem is still here in Daban Model’s Strike Freedom. You can look at the image for the parts that were really tight. I tried assembling these parts first before moving on the others but it was a bad move. And please take note of the size of each PC parts and size of the ball-joint tip (H11 part). The upper part is smaller (PC15) and the lower part is larger (PC16). Anyways, just try to figure something out to fit them perfectly because they are really tight.

As always I had some several fitting issues with the inner frame but nothing serious to deal with. I can say that it was a still a good build. I had no problem attaching all the outer armor parts. Because of the extra gold parts, there was no need for me to use the same gold pen again to add some detailing. If you guys have read my review for Dragon Momoko’s Strike Freed, I used a gold Uniball Signo pen just to copy the same gold detailing and parts separation of the original.

Articulation is great and you can move just about the same parts just like the original. You can bend the legs this much and I posed both legs where the feet are positioned in two different angles.


The flaps on the back of the legs are movable as well.

Another coffee break while getting ready for the next part..
Wing Unit:

Both left and right sides of the wings are the same so I already built the right side and placed all the parts here for the left side. More parts are featured here in Daban’s side compared to Dragon Momoko. Daban Model also decided to add those gray parts for the vents. You also have extra gold parts for the detailing instead of using foil stickers like Dragon Momoko did.

Please check this red piece (M1) because it seems fragile. Mine got a few stress marks so careful handling is needed.

There are no fitting issues here and everything went well. Same with the usual model, the shoulder-like section (where the vents are placed) gives you the small one and the other back side is the larger one.


I thought of adding some gold on some of the panel lines and engraved surfaces. And yes, I added some metallic blue again just because I want to. :P


So here’s the front side or smaller section of the wing. You can stretch them out enough to attach the beam cannons (DRAGOONS) or attach the Wings of Light.

You can also move these shoulder-like sections of the wings to a decent degree.


And then here are the rear side of the wings. Same with the front side, you get to stretch them open to a good angle.

As for their shoulder-like thrusters, they have a wider movement range compared to the front side. This is a good reminder if you are confused between the front and the rear.

Here are the connectors for the wings. There are no fitting issues here but the nub marks were really unavoidable. Fortunately, I don’t think they will be noticed once the DRAGOONS or the WoL is attached.

The male pegs can be pivoted to a good degree.

And here are the front and rear wings finally attached. The one on the left is the front view and the right one is the rear view.

The wings can be rotated smoothly without any problems.
Backpack Unit:

Here are the parts to build the main backpack unit of Strike Freedom. It features decent amount of parts. DM and Daban Model share almost the same amount of parts, but they have different colors for their part separation. The gray thrusters for DM have extra black parts on the side. However, the same part for Daban Model features it in a light gray color.

My usual 3pm break~


Just a few tight pegs were encountered here but it was still a good build. There is a seamline on the bottom section even though all pegs are already fit perfectly. I am not sure what’s causing the seam. It’s not much of a big deal for me but I just thought I need to show this to you guys.
There are two thrusters attached on the back and both parts can be moved up or down. The lower section can be pulled down to this extent.

You can also lift it upward but there’s a just a few degrees added.

The larger thrusters can be moved upwards as well.


The whole wing including the main backpack unit has some decent weight in it so I don’t think Strike Freedom can stand on its own with this attached on its back. Sorry for the blurry images. :/
Armaments:
Beam Cannons (DRAGOON System):

The only difference here between DM and Daban is that Daban managed to get a nice design on putting the vents as gray parts.


There were no snap fitting problems here and everything was smooth. Even though Daban made good use of the ideas to create the closest thing to the original, they didn’t offer the builders any extras like Dragon Momoko did. As you guys recall, there are effect parts included for the DRAGOONS. You also have an alternate clear blue tip that looks really cool. Not sure if those tips can fit on the Daban version.


They are locked in tight if you try to attach all the beam cannons. The good side is that the gold plated parts are sturdy so the clamps that will hold them don’t break off easily.
Beam Rifle:

The second iconic weapon of the Strike Freedom are the two beam rifles.* Here are the parts to build the two weapons. If you noticed, there are no extra parts for that blue line on top. It’s because Daban designed it to go for foil stickers which is really lame. -_-


Overall it was a good build and the only minor issue I have experienced here is the right beam rifle. The white part that covers the whole rifle tends to get removed. I found out that it doesn’t have any pegs or any slots to attach on. I also avoided the blue foil stickers and decided to go with my metallic blue.

Now for the gimmick of these two rifles. Here’s the image of the two rifles before they are combined.

And now here’s what they look like when combined to form a long-range beam rifle. The mechanics is pretty much similar to Buster Gundam’s main weaponry.
Railguns:

The third distinguishable weapons of the Strike Freedom are the railguns that also acts as side skirts and holster for the Beam Sabers. These are the parts to build a single railgun and you can see the finished railgun on the right side. There were more parts added here compared to the railguns of DM’s SF.


The only fitting issue I encountered here are K26 and K25. These are the white parts that hold the two sections of the railgun. I’m guessing that the gold plated parts (not the male pegs) are the reason for the minor seam visible here.

Moving on, I didn’t encounter any problems either after folding them out. I used my gold pen here for some extra detailing.*
Beam Saber:

You have the usual beam sabers that can be pegged on the side skirts. There were some slight fitting problem when try to combine them.
Beam Shield:

The beam shield generators are the ones attached on the arms. That’s the thing that emits the beam shields. And these are the beam shield effects included in the kit.

You have some decent parts that will serve as locks to combine all the parts.

There were no issues here but it was really dumb of Daban Model to claim that the beam shield is attached like this (check construction manual image). Seriously, they want the builders to do that for Strike Freedom? -_-


Just remove the beam shield generator and take out this red piece.

You may need to trim the beam shield’s main peg a bit to make it fit nicely. This is way better than the suggestion in the construction manual.
Pedestal/Action Base:

Here are the parts to build the action base.

It was a nice idea of Daban Model to add some embossed text so you know what piece is attached on them.

There were few tight fittings but not much of a big deal.
The only thing that bothers me is that word “fighter”. I might try to remove it once I get to print my custom waterslide decals.


Not sure if you noticed earlier, I added some metallic blue on them to make it less bland.
Extras:


Same with Dragon Momoko, you also have 5 different fixed manipulators that can be used for action poses.

The kit also includes parts for the action base where the clear rods are attached.
Decals:

The quality is good but not the best one of Daban Model. There were some occasions where the markings are removed accidentally even though I have already dried them up. Not sure if it’s because of my sweaty hands. LOL
Still, you may want to use some mark setter and mark softer just to be on the safe side.
Completed Model:


With the Backpack Unit:


Close-Up View:


Movement Test:


Rest of the Shots:


And here is my rating chart,,

Plastic Quality: 8/10
As a start a lot of colleagues said I should do a comparison for both bootleg brands. Unfortunately, I don’t have the Strike Freedom of DM so I will just stick with the notes I have for that kit. Or you can just open a new tab and check out my review for Dragon Momoko’s Strike Freedom.
A lot say that the plastic quality of this kit is fair or at least below decent. I am not sure why they think it as that because it was good for my side. If they were thinking about the gold-plated frames, well it can’t be helped if Daban Model made it that way and the gold-plating doesn’t much count when it comes to quality. For me, the plastic was nice and all outer armor parts have a nice glossy finish. Although, the gray parts doesn’t look like they are near the glossy metallic look. The parts with the gold plating were also durable and it’s not as fragile as Dragon Momoko’s. The gates were not that big so the nubs produced can be cleaned nicely. There were no traces of flashes as well and that counts a lot to avoid scratches when sanding the parts. Against Dragon Momoko, both have their best for this kit so I am giving it the same 8 rating.
Assembly: 7/10
There were more fitting issues here than I expected. I know that there will be snap fittings because it’s a bootleg, but I thought Daban Model already fixed this back when I built the Wing Gundam Proto Zero. Or the reason is the gold-plated parts and the pegs are now really tight because of it. There were no problems fitting the parts that don’t have any gold-plated parts in it so that’s the only probably cause. You may need to sand the male pegs with the gold-plated parts just to fit them well. Several parts have small seam lines as well even though I have already pinned them hard to fit in. I don’t want to force it any further because the stress marks will show up and the worst case would be the breakage of the pegs.
Well I can’t really say what brand has the least snap fitting issues. Both are bootlegs and both have a lot those problems through the years. But I am giving this a 7 because it seems there were more snap fitting issues here than DM. And the bothersome thing is that you may need to fix them up by sanding or scraping the surface.
Detailing: 8/10
No, I didn’t jump on this without thinking it through (LOL). I checked out some images of the original Metal Build in the net and Daban Model did try to put the accuracy of the detailing as close as possible. Dragon Momoko’s model looks nice but they didn’t put into consideration the detailing from the original MB. For example are the body parts that are just plain white. Daban Model made sure they have placed enough parts to copy the features of the original Strike Freedom.
Of course there were several negative things to mention here. The foil stickers were bad and it was actually lame they figured to use stickers for the blue parts of the rifle. There were still body parts that need the gold stickers too. But even with those issues, Daban Model looks really great.
And once you have finished the final assembly, the nub marks are not much noticeable especially if you have any gold pen to fix that (I used the Artline 900XF to cover the nub marks). Seriously, the only way to notice the nub marks (if already covered with any gold) is if you will look at the model up-close. But if it’s place on decently high shelf and covered in glass, the viewer may even think it’s the original. Of course you still need to fix hat “fighter” on the pedestal. xD
Articulation: 9/10
The movement range here is just the same with the original (based on the images I saw) and there are no problems doing extreme poses as long as you move away the rail guns correctly. The inner frame helped a lot to give it the feature of holding the combined beam rifles without too much problem. If you also checked the imaged earlier, this model can do a split bit I’m sure Dragon Momoko’s model can do the same. Just do not force moving these joints to the limit.
Gimmicks: 5/10
I was not familiar with the features of the Metal Build models back then so I thought the bootleg brands have done something to cover it up. Turns out that they just copied the original without any additional feats. But if I were to think carefully for any gimmicks, I guess the clear rods to attach the beam cannons (DRAGOONS) would count. :v
Weapons: 6/10
Weapons are the same but I am giving it a lower rating compared to Dragon Momoko. The only reason I did this is because Dragon Momoko featured their model with cool effect parts for the beam cannons (DRAGOONS) and Daban Model didn’t even bothered adding some. :/
Extras: 4/10
Both Dragon Momoko and Daban Model have featured their own set of fixed manipulators, but Dragon Momoko did a great job with the extra items included. They will give you a simple WoL, not fancy but enough for the model. You get mechanical arms or rods as well for the beam cannons and that’s way better than the clear rods you need to bend manually. Not to mention those alternate tips for the DRAGOONS and their beam effect parts. Daban Model didn’t bring any of those to their kit. I know they are copying anything from Bandai to the closest point, but it never hurts to add something like DM did to please the customers. :/
Patience: 5/10
My rating here is just fair even though you have a lot of parts to clean up. The nubs weren’t too big to cut or sand so it’s still easy if you set it for a whole week of building. And I am not telling you guys to stop working for this. Always put family and your work into priority. :3
Overall Rating: 8/10
It was a nice experience to finally get to build Daban Model’s Strike Freedom ver MB. The issues were manageable and I had fun especially that it’s one of my favorite mobile suits. It was also a good practice kit for me for going back in the progressive sanding. I would recommend this kit only for those who have already built a lot of bootleg brands. I don’t think it’s a good idea for a beginner to start out here. But yes, it’s a good kit I’d definitely recommended to builders who don’t mind touching knock-offs. Of course I’d recommend the kit because the Dragon Momoko SF is already becoming a rare kit. I bet the price would spike up after some time. But I will be honest, if Dragon Momoko was still active, I’d recommend going for their Strike Freedom because it’s far easier to build. And you don’t need to worry about the inner frame if you want to paint it up. Plus, you get a lot of freebies and I also recall that the Daban Model Wings of Light is compatible with the Dragon Momoko SF. I may have given them both overall rating of 8, but I do like DM.
Then why did I decide to go for Daban Model you say? Well I do have the budget to go for Dragon Momoko back then but I still don’t have a review for this kit. I thought my client and friend will take the Daban Model so I will end up with DM but it was the other way around.
And since there are now few Dragon Momoko SF kits out there, you guys are left with this kit. This is still a good kit if you want to repaint it again because of the nice parts separation. But you will have to deal with the gold-plated parts if you want to include them in your painting plans. If you can find any Dragon Momoko SF with the WoL included, I suggest taking it. If you don’t mind with the usual problems among gold-plated parts, then Daban Model is your bet.
I hope the issues I have mentioned in this article will help you plan your things out if you get the kit. I already have the Wings of Light and I will put it in a separate article. Just ask something in the comments section because I may have missed some notes. XD
* - corrected some sentences. Will update after some time.
Sir Mad ano po yung brand na ginamit nyong 2 pang lining na metallic gold at blue??
ReplyDeleteUni yung brand..
DeleteUni-ball Signo yung nakalagay sa pen.
Ano ang pang erase sa sobrang panel line? HIndi matutunaw if nilagyan ng topcoat? (zurc?)
DeleteNakow sir, wala na ako alam pagdating sa ganyan lalo na if related sa mga paints O_O
DeletePero ang gamit ko lagi kahit hindi yung pen na yan ay yung lighter fluid.
sir mad magkano ung ganyan?? meron kaya nyan sa national bookstore??
ReplyDeleteYep meron xD
DeleteSa NBS ko talaga binibili yung ganyan..
Plan ko maghanap ng angelic Yellow pra sa barbatos lupus rex ko.. not sure if yan ang next review ko or yung Freedom 2.0 (Bandai)
gusto ko nga rin kulayan ung lupus rex ko ng gold ung mga yellow parts nya eh tsaka para makulayan ko na din ung kamay nya, magkano sa NBS yan??
ReplyDeleteIf gagamit ka metallic, mas suggested na magtopcoat ka.. sabagay ganun din naman kahit angelic colors (yung mukhang matte)
Deletenasa 100+ if metallic, and 60-70+ if angelic colors.
Hi how many Q runner did you get in the package? I only got one but the manual says "x2" even though it's crossed.
ReplyDeleteI also get 1 " Q runner " but my strike freedom is seems complete to me.
DeleteMine is just 1.. that is the runner with the v-fin if im not mistaken
DeleteSolid ba yung wings pag inangat? Di ba sya madaling bumaba?
ReplyDeletePasensya na po sa late na reply.. :/
DeleteOkay naman and hindi po siya bumabagsak agad.
Pero kung ilalagay niyo na po yung WoL, need na po nung clear na stand na may support pra sa ilalim ng wings
Sir pano ginawa nyong solusyon sa ball joint sa may paa??salamat po!
ReplyDeleteKapag ikakabit mo na yung balljoint dun sa paa umuusog sya diba? Ginawa ko naglagay ako ng pampasikip dun sa gilid ng socket, blutac, runners, etc.
Deletetapos sinusubukan ko ipush yung balljoint ng paa dun sa socket ng leg pero hindi slowly. kung dahan-dahan kasi iniisip ko baka magkaroon ng bitak sa gilid and mas mamroblema ako.
Try niyo lang din po diskarterhan sir.
Sir san po kayo nag trim para maayos ung seam line sa ulo?
ReplyDeleteSa inner frame mismo. Yung gold plated parts. Sa tingin ko kaya nagkaroon ng seam dahil di na sya fit masyado. Kumapal dahil sa gold plating ng plastic. Sand mo yung sides. Trial and error lang din ginawa ko.
Deletesir meron kang digital copy nung manual?
ReplyDeleteWala. pero nasa akin pa yung hard copy
DeleteSir baka po pwede makakopya ng decals guide po ni daban strike freedom
ReplyDeleteWala po talaga decals guide ang construction manual ni Daban. Tinignan ko na lang mga images sa internet for refences kung saan sila ilalagay.
Deletesir pano yung sa shield? anong peg yung nag coconnect dun sa physical shield tska red part para ma sandwich sa gitna yung beam shield effect?
ReplyDeleteSa manual po andun. Check nyo po yung part na M2 and I5 tapos yung I41 and I21
Deletethanks siiirrr punet manual ko dun sa part na yun haha sorry sa hassle
DeleteHi what u use for blue color liner at white part?
ReplyDeleteAlso, can use Artline 900XF for the dagoon gold liner? the color pretty similar with the gold at joint right?
DeleteFor the metallic blue, I used a pen from the Uni brand called Signo. (Uniball Signo)
DeleteI don't recommend using the 900XF. I have used that pen before on my Strike Freedom FBM and on the supposed to be gold parts of Sinanju. But after a few years, the dust stick on them and the shiny gold faded away. Try using a Gundam marker for the gold instead.
uniball signo gel type 0.5mm? the gold part i think gundam marker color is abit more dull compare to this gold.. haha
DeleteDo you have a shareable copy of the assembly guide for this? I lost mine recently....
ReplyDeletePm me here Facebook.com/Jeshiro.Uson
Deletenag trim po ba kayo sa leg part yung sakin kasi ang hirap i-bukaka ang sikip?
ReplyDeleteat sa inner part ng head anu pong part yung kailangan i trim para sumara sya ng tuluyan?
Yung inner frame na gold plated sa ulo, yung mga sides lang. I-sand mo bahagya hanggang mag fit. Kumapal kasi yung parts dahil sa gold plating eh.
DeleteSa legs hindi na ako nag trim kasi ayaw ko rin maging loose after ng ilang taon.
This comment has been removed by the author.
DeleteSalamat po nasara ko din sa wakas ang head unit. Ano po ginamit nyo sa decals tubig lang po ba o gumamit kayo ng mark softer o setter?
ReplyDeleteTubig lang. Wala pa ako setter kasi nung time na yan. Pero kung meron ka, gamitin mo na.
DeleteMaingat din naman kasinako sa decals pero bumili ako ng setter last year
Salamat po ulit. Nakalimutan ko lang po itanong, masisira kaya yung gold kapag nag clear top coat ako para i-seal yung decal, diko na kasi makalas baka maputol pa pag pinuwersa ko. Balak ko po sana kalasin para sana ma-isaisa ko yung parts na may decal at yun lang i-totopcoat ko?
ReplyDeletenakow . never ako nag top coat and wala na ako experience sa ganyan.
DeleteMaganda ask ka na sa iba.
also. plan ko na rin lumipat sa YT. ito yung channel ko https://www.youtube.com/channel/UC35CnqfsFxQHo9DzcogZFRA
Sir anu po gnmit nyo to cover sa nub marks sa plated na frame?
ReplyDeleteYung uniball signo ata ginamit ko dyan. Kaso hindi sya kaparehas masyado ng tone.
DeleteEwan ko lang kung gundam marker
METALBUILD(METAL FRAME) or METALBUILD DESIGN(Plastic Frame) lang po ba to sir? Planning to buy this KIT po sana sir.
ReplyDeleteDesign lang po, NOT the frame. Pero may binebenta na rin now na metal inner frame as package/bundle deal kasama nung kit.
Delete