Introduction:
Being able to cross out the kits I want one by one is a huge achievement already. Even though I still have a long list to complete, getting all the Gundam 00V Senki models was a huge goal I managed to acquire. I was really glad I already got Exia R3, Avalanche Exia, 00 XN Raiser, 00 Seven Swords, and 00 Qan[t] Full Saber this year. Two of these kits, Exia 4-in-1 and the Avalanche Exia are the only kits I have that are not made by Bandai. These two are from Hobby Star brand. Of course, a lot of builders might think that I should have gone for the pure Bandai set, but there are a lot of freebies and gimmicks on other 3rd party or bootleg brands I want to get. Besides, I am curious what made this kit so outstanding compared to Bandai. I received a couple of suggestions (me asking what brand for Exia I should get) and most of the comments vouch for Hobby Star. But yeah, I can finally start a new set again. Unfortunately, the job I have now is getting stressful and I more worried about my health than the money I can get. I will try to find a good job to support my hobby and my personal needs.
I know that there’s the option for Dragon Momoko and Daban. One of the primary reasons I had pick HS from their suggestions is the price. I already decided to take a rest from my job so my funding will be cut again. Dragon Momoko is good but it’s now considered as a “dying” brand and its price keeps on rising. Daban Model on the other hand, is still manageable, but the gimmicks of having to light your model pushed my decision back to Hobby Star.
So yes, I want to review the kit because of these suggestions and I also want this model for my collection. I am not sure if I can still grab the Astraea or Avalanche Astraea (both from Hobby Star) this coming October. This is GBWC’s usual month and I want to check other kits with a good price in the venue. I’m still aiming for that Gundam Double X and it’s already been ages since I put this model in my wishlist.
Please do correct me if I have wrong terminologies or I gave wrong information about the MS or the model itself. However, don’t mind my grammar or any typos. Don’t be shy to ask questions if I have forgotten to mention an issue here in the kit you might have encountered.
Unboxing:
I remembered Hobby Star’s try Burning Gundam and they have a decent box art. But here, it’s just a plain black background with a large blue techy design on the middle. You will also notice the eyes, forehead and chest parts of the Exia as well. There are no previews whatsoever as to what the model will look like after you finish building. There are no previews as well to the gimmicks that the model has to offer. Well, it can’t be helped because it’s a possibility they are trying to lay low as well from Bandai’s radar by keeping their products as simple as possible. ( I kind of doubt they can hide for a long time though >_> )
The box is quite huge in terms of length and I forgot to compare it to the other Master Grade boxes that I have here. I think it’s just okay considering the fact that you will have extra parts here to form all variants of Gundam Exia.
Starting my coffee break here with the construction manual.
It’s really plain and there are no pictures here of the model. The front page doesn’t even have the Exia and you will just see this “1-4 LED” on the bottom right of the page. The last page doesn’t have any cool things. You just have the guide for the decals.
No fancy stuff as well inside the booklet. But I did notice a nice effort from Hobby Star though.
You have the guide how to install the LED. It’s also colored in pink which is nice so you won’t get confused with the wires. There were a couple of issues here that I will also mention from each part later. The manual doesn’t have any English texts so it’s a bit confusing from the start which variant or version should I use. As you may have noticed with my album image, I have decided to mix the design of my Exia. But it was a little troublesome along the way, and it’s the construction manual’s fault! (LOL)
PS- all instructions with the LED installation and parts are always for the first Exia and not for R2 or R3.
Anyways, you have 10 sardine-packed plastic bags inside the box and this is only for the runners/sprue frames. You have 14 if I will include the small packs for the LED, battery, GN drive engine, and foil stickers. One of the runners however doesn’t have any plastic bags. This is the runner for the cloak if you’re aiming for the Exia Repair.
Yes, I mentioned “sardine-packed” because the average amount of runners inside 1 bag is at least 3. And this is a big no-no. There are a lot of possible problems or issues you can encounter with this kind of packaging. Some of the parts will have scratched surfaces. Some of the pegs can either get stress marks or worst, getting broken in half. Few rare cases also include the parts are already cut off from the runners and better wish that they are still inside the plastic bag. If you ever buy this kit, be sure to check the plastic bags thoroughly.
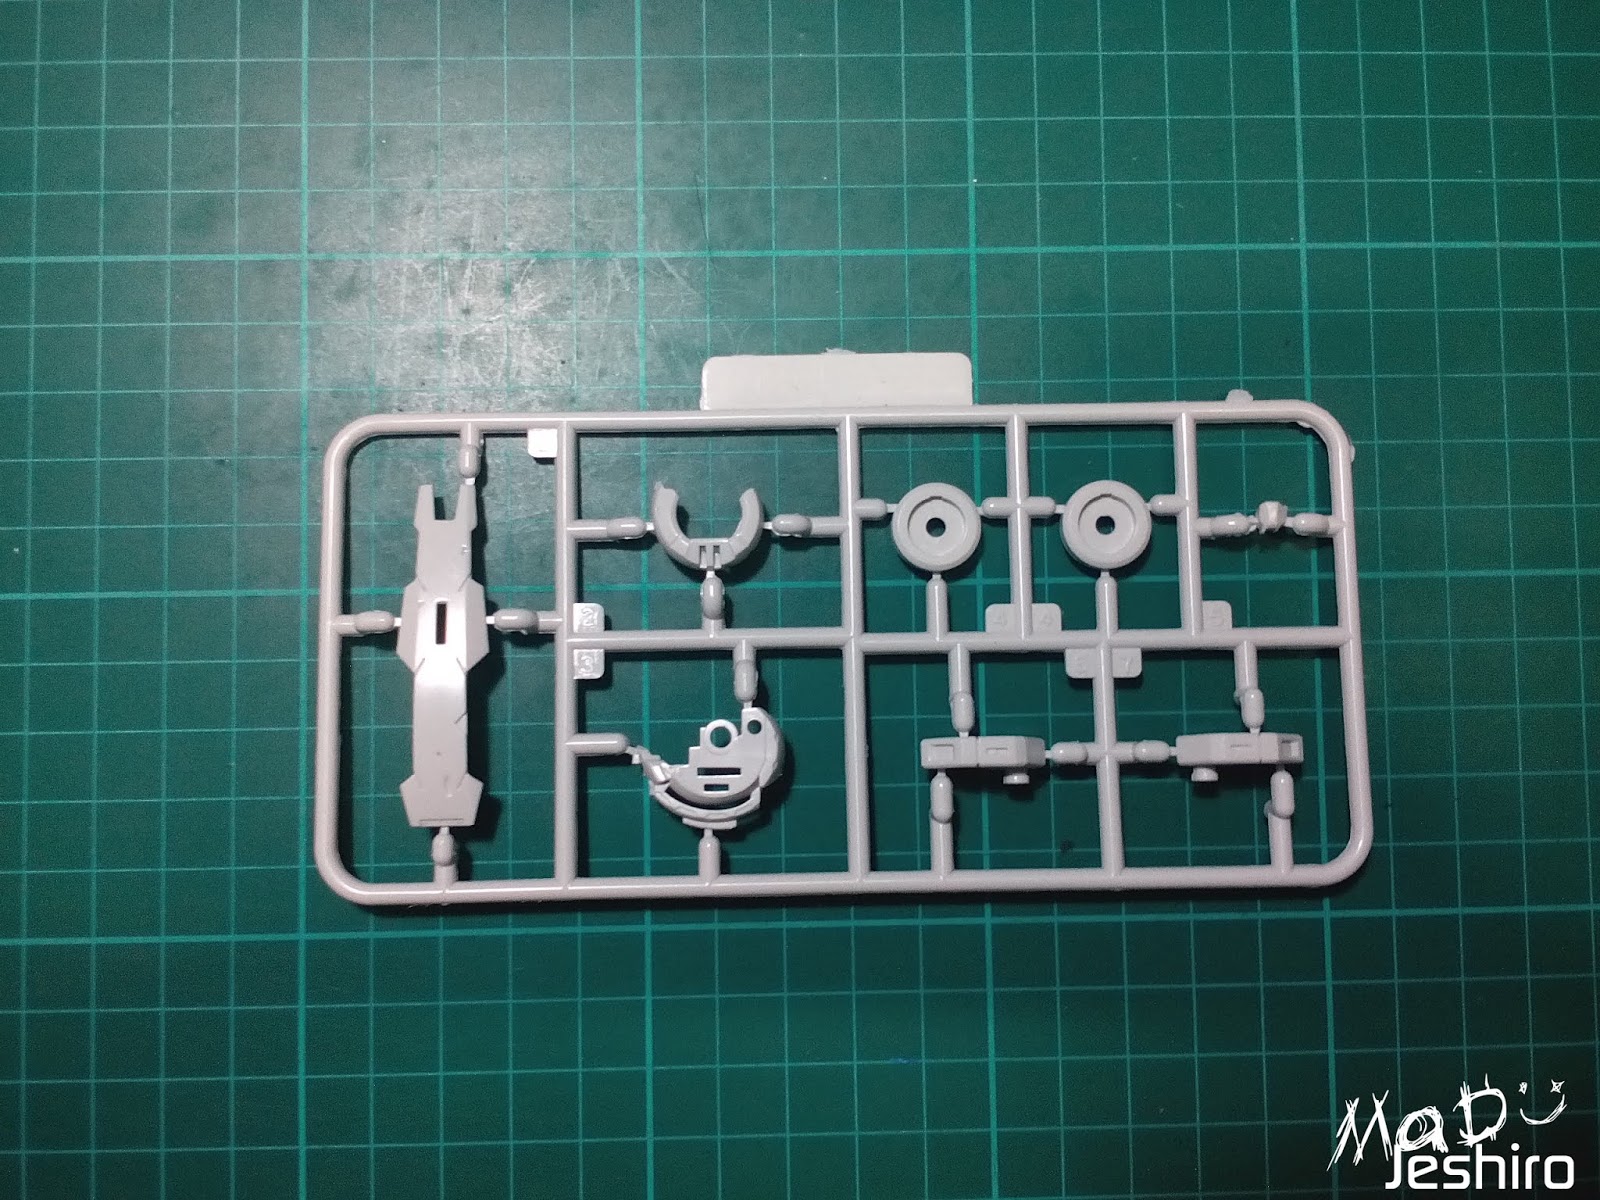
Runners (Sprue Frames):
Now here are the runners inside the box.
There are 27 runners in total and only Runner C has a duplicate.
My apologies if I didn’t took some pictures with the wirings and LED out of their packs. I was a little cautious and I don’t want any accidents. Of course, I need to open each pack and make sure that each of these wirings is working perfectly. After that, I put them back inside the plastic packs again.
The LED wires for the legs are shorter and the long LED wires are meant for the arms. The reason why it is longer is that they must pass through the body and into the waist unit. All of these wires will meet together under the waist. The normal size LED wire with no duplicate is for the head. :)
As for the issues of the runners, there were several scratches but not that much of a big deal. Just a few light sanding treatments and I can erase them. The quality of the plastic however is a different matter. Some of the runners, especially the white and gray ones, have this glossy and smooth texture. While the other colored runners, though still retaining that smooth feeling, kind of give this matte vibe that doesn’t match well with the glossiness of the white parts.
My mechanical pencil’s lead just slides off so I will cancel my plan of doing panel lines here. I don’t have a Tamiya Panel Line Accent Color and the mecha pencil is the only thing I use for panel lines. :v
Anyways, good news for the snap builders/straight builders is that some of the runners here are undergated. I would like to mention the detailing done on the clear green parts. I noticed that they are not the same with the fonts used in Bandai’s version. Try checking the font “Digital Sans” because it was a little similar to that. No big problems actually. I just want to mention it. >__<
The decal is also a product of DaLin’s. Its quality is “so-so” or you could say average. I bought another sheet for Exia but the color is a little different. It has this bluish green color while the sheet included inside the box has a small tinge of purple.
You also have the pedestal or the base.
GN Drive:
In the construction manual, you start off with the GN Drive. Side question guys – Is the GN condenser the ones on the forearms, calves and in front of the chest? O_O
I think it was a good idea to build the GN Drive as soon as possible to make sure that the motor is working.
About the issues? There were several and most of them is how to position the wirings properly. It was nerve-wreaking that you must place them without accidentally pinning them down with the gray parts. I was scared that I might sever the wires each time I close the gray parts of the GN Drive. I had to use some blutac to hold the wires.
Minor tips I can give is that always make sure that the black wire is connected in the middle. If the motor is not spinning or the LED is not lighting up, try switching the position of the red and yellow wires. Be sure to test the light each time you progress in building. I had an accident where the GN Drive rolled off from my table and fell on the floor. The LED is not lighting up so I was really worried. A friend of mine suggested that you start checking if batteries are still aligned or placed properly. Next is checking the pins if they were pulled out of the connector accidentally during a hard bump.
By the way, I didn’t use the H16 part that supposed to be the lid for the wires (check picture). I noticed that it is just consuming more space and sometimes the LED is just blinking (not steady).
Action Base:
I figured that it would be best if I finish the action base. I will be able to test the LED quickly if there’s a problem.
There were no problems with the parts here except for a few flashes here and there. The main wires were easy to understand because they always follow the same pattern of red-black-red-black. Of course, it looked easy but there were lots of issues. D:
My apologies if I don’t have any pictures to show. I am not in a hurry but I just kind of forgot to take some pictures. First, is that the tin parts for the battery case (I don’t know what to call them) were very hard to place inside. I had to use the tip of a screwdriver to push them in. (PS. I did a lot of chipping, trimming, and cutting to fit some of the parts). Another issue is that the manual is a very good liar (LOL). In the construction manual, it says you need AA batteries. I checked the case and it also says AA, but the size is meant for AAA.
Some of the pins inside the connector are not aligned or not inserted properly. They are not glued so you can use a tweezer to push the wires further in and correct their positions to avoid lighting problems in the future.
After you find your way to place the switch and all the other things inside the battery case, the other issue is that the wires move a lot. I tried some blue tac and some tape but they still move a bit. I decided to chip away some of the parts to give some extra space for these wires as you can see in the picture. The main cover is also hard to place not because of tight pegs but because of the bad position of the wires. They are glued together in a flat format right? I had to roll them in carefully. I also chipped the corner of the main cover (see picture) because the wires doesn’t bend well.
And finally, the last issue is not from the kit itself. XD
I asked for a friend’s help to replace the design because the text is not complete. My friend decided to use a decal to cover the whole surface. The only problem is that the first plan or sketch was not erased and you will notice that on the back of the colored Exia. But it’s not a big deal anymore so I decided to just go with it.
The stand doesn’t have any issues. Just a few large nubs that you need to clean. It’s quite same with the other Metal Build version action bases.
Articulation of the stand is nice where you can pick a lot of angles for action poses.
Same with the other MB actio bases I have encountered, there is a lock here to keep the peg from moving.
You can also extend the stand to a certain height. You also have a lock here to keep it steady.
The support stand below the main body also features a locking mechanism making sure your model doesn't shake.
I like this kind of action base but the male peg on the top doesn't seem to be sturdy enough to hold large models like the Sazabi or FA-78 Gundam [Thunderbolt]. It's quite small in my opinion. But if the position of the peg is pointing upward like in the picture, then the weight can be supported by the stand.
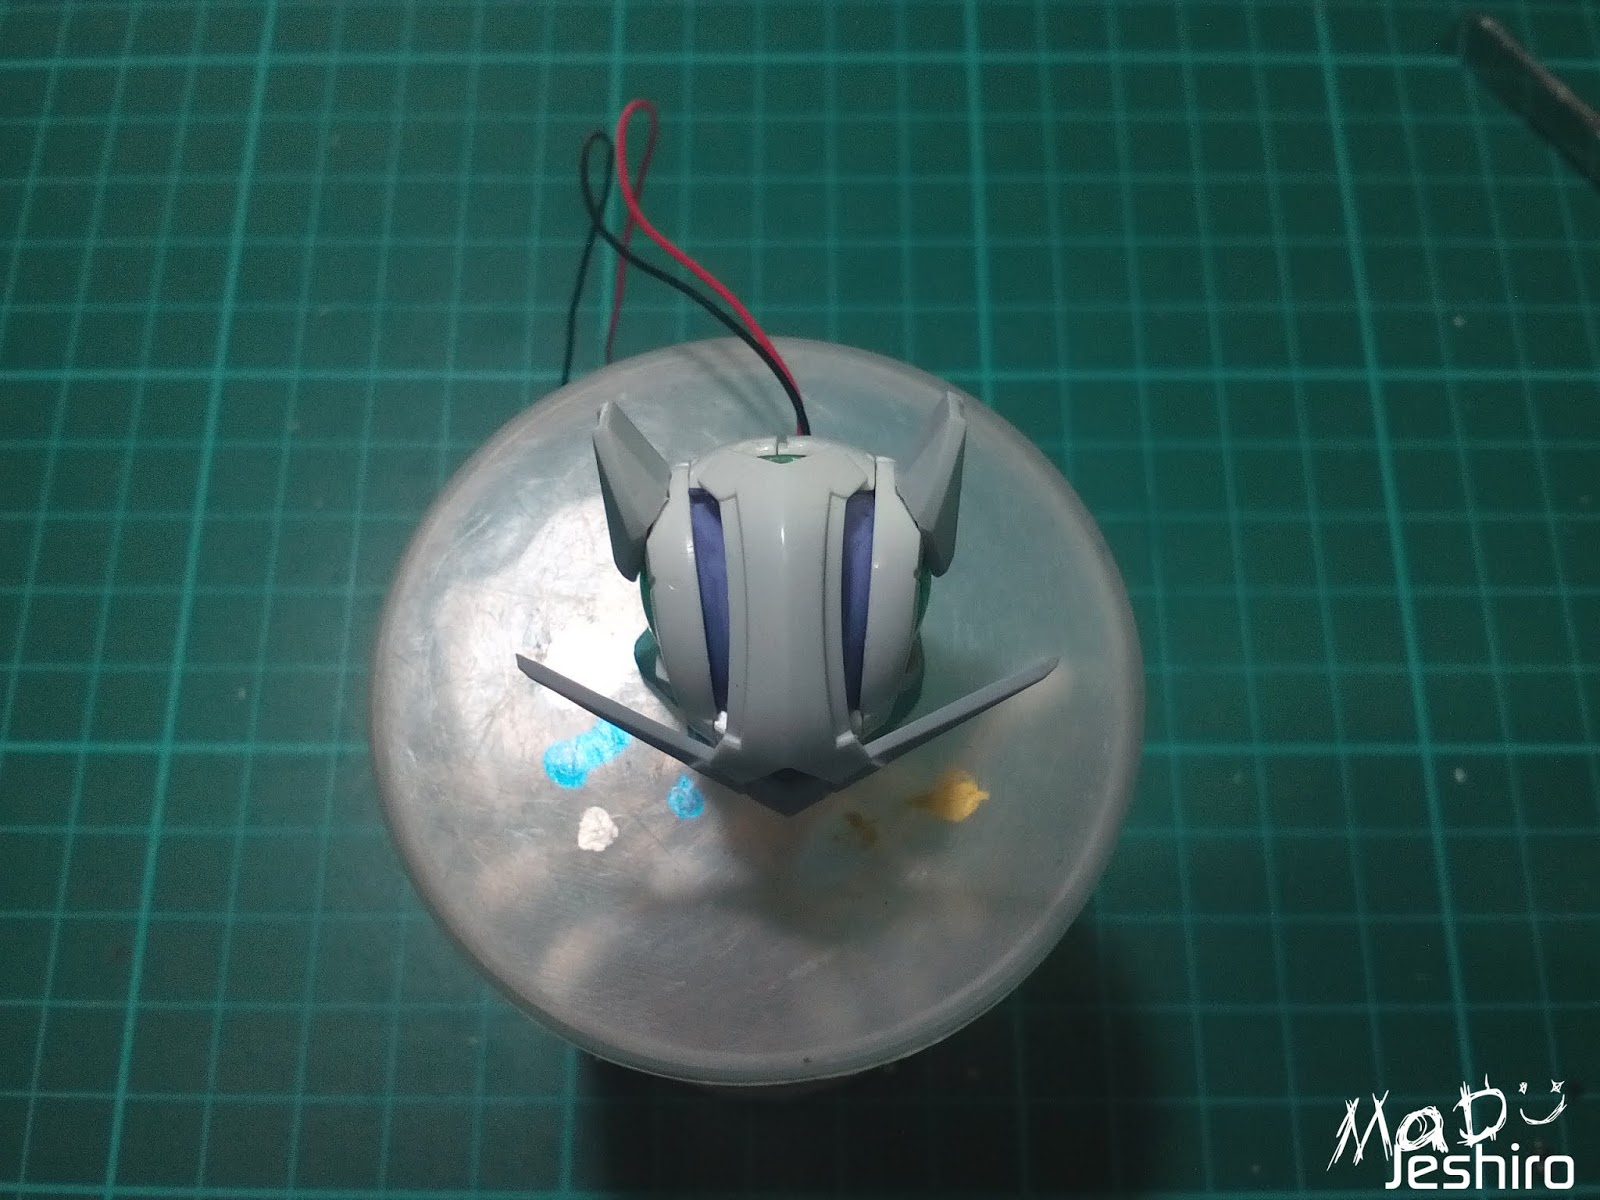
Head Unit:
The head features good parts separation here. There are no added parts if you want to change it to R2 or R3. Of course, the parts are different for the Exia Repair variant.
Typical issue as always are the tight fittings. I also used the foil stickers to add some detailing inside the clear green parts. Aside from the tight fittings, I have come across another issue here.
The Q5 parts (yellow parts for the cheek) have two problems. The first one is that the J3 (gray, face mask part) can’t fit well because the edge of Q5 is in the way (A). You might want to sand this a bit or scrape it up with a hobby knife. Second problem is that EVEN if you manage to fit J3 part without the need to fix Q5, it is still loose. I’m not sure if this is an isolated case because my friend didn’t experience this problem. Anyways, it’s your call. :/
The ear-like parts doesn’t have any problems and the fitting is good. But it is still scary that it might pop off after an accidental bump. Your call if you want to apply some glue here.
I tend to test the LED a lot. Just being cautious.
Arm Unit:
The amount of parts for the arms is just average in my opinion. Detailing however looks good and the gray parts did helped a lot to add some life to its plain white color.
Issues? Of course, there is still an issue. First is the seam line on the bicep. I am not sure what’s causing this but I have a guess it’s because of the wires inside. Even though Hobby Star designed paths where to place the wires, putting them was still tricky because they keep on moving.
I also need to scrape the canal/cavity of T5 and T4 parts so that the wires can fit more. The manipulators also contracted the same problem of Daban Model’s 00 Raiser. The index finger is really loose and sometimes pops off during posing. I have applied some blutac it because I prefer this type of articulated manipulators compared to the fixed ones. The led inside the forearm is also visible but I don’t mind if other people can see this.
As for the articulation here in the arms, it’s not that bad but you’re not going to get the best possible range either. The wrist joints offer nicer movement range and this is good for action poses using the GN Blades.
After finishing the arms, I had to do some tests to make sure that the LED is still functional.
Upper Body Unit (Shoulder Armor):
It’s very straightforward and the amount of pieces here is just average. I am not sure if there are more parts given if R1 or R2 part is chosen.
No problems here and everything were smooth. The only downside here is that there are no gimmicks to highlight. I also added some metallic green here using my Uniball Signo pen. This was the only part where I won’t be able to touch the ink. I am still going to use the green foil stickers to add some details though. :v
The female pegs for the body were the only movable parts here.
Leg Unit:
The amount of parts featured here is above average. I like how Hobby Star mixed both white and gray parts to avoid the color being too bland. The detailing here is really good IMO.
I was rushing a bit and I forgot to add this piece in the exploded view. >_>
Starting with the issues about the wires; there were none. But as I mentioned earlier, they move quite often. I like the wires being flexible and all but it’s quite a hassle to hold them down in just one place. I want to make sure that I am not stretching them too hard. So, I decided to cut a few sections as well in the inner frame. This will allow the wires to have some space inside even if I bend the legs.
Another issue is that the manual is correct but not entirely accurate. Once you reach Leg Section 3 (Right Leg I think), it will guide you to attach J26 and J24. But if you do this, you won’t be able to fit in the parts from Leg Section 2. What I suggest is to add J26 as the last piece. Attach J17 in Leg Section 2 and follow the rest to Leg Section 3 (J24 + PC part + J22 w/o J26). Then close it up with J26.
The fitting issues that you must focus on would be J37 and J34. Try to do some tweaks here before putting J22.
Since the manual is not translated into English, I had some several mistakes. I followed the parts where the LED will go through and this is for R1 version. I’m supposed to use more of R3 so I had to disassemble here and there.
And now you have a very sexy leg with tiny feet. I mean seriously, they kind of look small. Anyways, I’m sure some of you will notice that it’s not a pure R3 variant. Well I wanted to add more detailing and I need to think carefully how to do this. Some of the cool gimmicks are in the R1 design and I need to use most of the R3’s design. I decided to add the thigh part with the blue strips and also the blue strips on the shin. And instead of using the R3 beam saber holder for the hip, I used the R1 version again so I can still add the GN Blades. That means I will convert my waist unit from R3 to R1 to get the beam sabers again.
Movement range of the legs is awesome. The whole leg is divided into 3 sections. And yes, I added the foil stickers inside the clear green parts to hide the LED. Fortunately, the light emitted is still good.
Moving on, the feet also feature good articulation here. As you can see on the right side, you can fold or bend the foot that much. I also stretched it backwards. I stretched the other foot forward as you can see in the in left side leg.
Moving them sideways doesn’t pose any problems as well.
Body Unit:
The parts separation here for the Body Unit is also great. I just don’t like the flashes on some of the parts though. :/
I am also planning to trim this a bit and make it a little bigger. The reason is that they [Hobby Star] changed the engraved text inside the clear green part for the chest. It is not bigger compared to the original one. That means only half of it will be lighted up if I turn the LED on.
Oh my goodness! I like these kinds of challenges even though they consume a lot of time.
I will begin with the issues here. Some of the parts were tight and some of them were a little loose. I think these are very typical problems from a bootleg brand. W3 part (blue) sometimes pop off from J12. W2-1 and W2-3 were a little loose as well. I had to glue the yellow parts in those chest vents because they still have the tendency to be removed quickly.
And the body part is now finished. There is no way to build the body separately and insert the wires inside. I need to attach the head and the arms to complete the LED installation. But if you’re not planning on adding the LED, then you can build the body without adding the head or arms.
As for the articulation, you can tilt the body sideways to a limited degree. Not extreme, but still good for action poses.
The cockpit hatch can be opened as well even though the kit didn’t include any pilot figs. The vents on the chest can be opened up to reveal the whole GN Condenser.
These yellow fins in front can be folded backward.
So that’s it for the Body Unit and it was a good build with no big issues to fix.
Waist Unit:
The parts separation here features average amount of parts.
I will go with the R1 version to retain the Beam Sabers. I know the R3 features good-looking back skirts but I wanted to add more firepower with my Exia.
There were no snap fitting issues here and the only problem you might encounter is the LED installation. The wires keep on moving and I can’t put them in the cavities/canal inside the inner frame. I used some blutac to fix the matter; still, it was time consuming.
The front skirts features a very nice movement range that can be extended out and then upward. Same goes with the back skirts but it’s not as good as the front skirts.
Armaments:
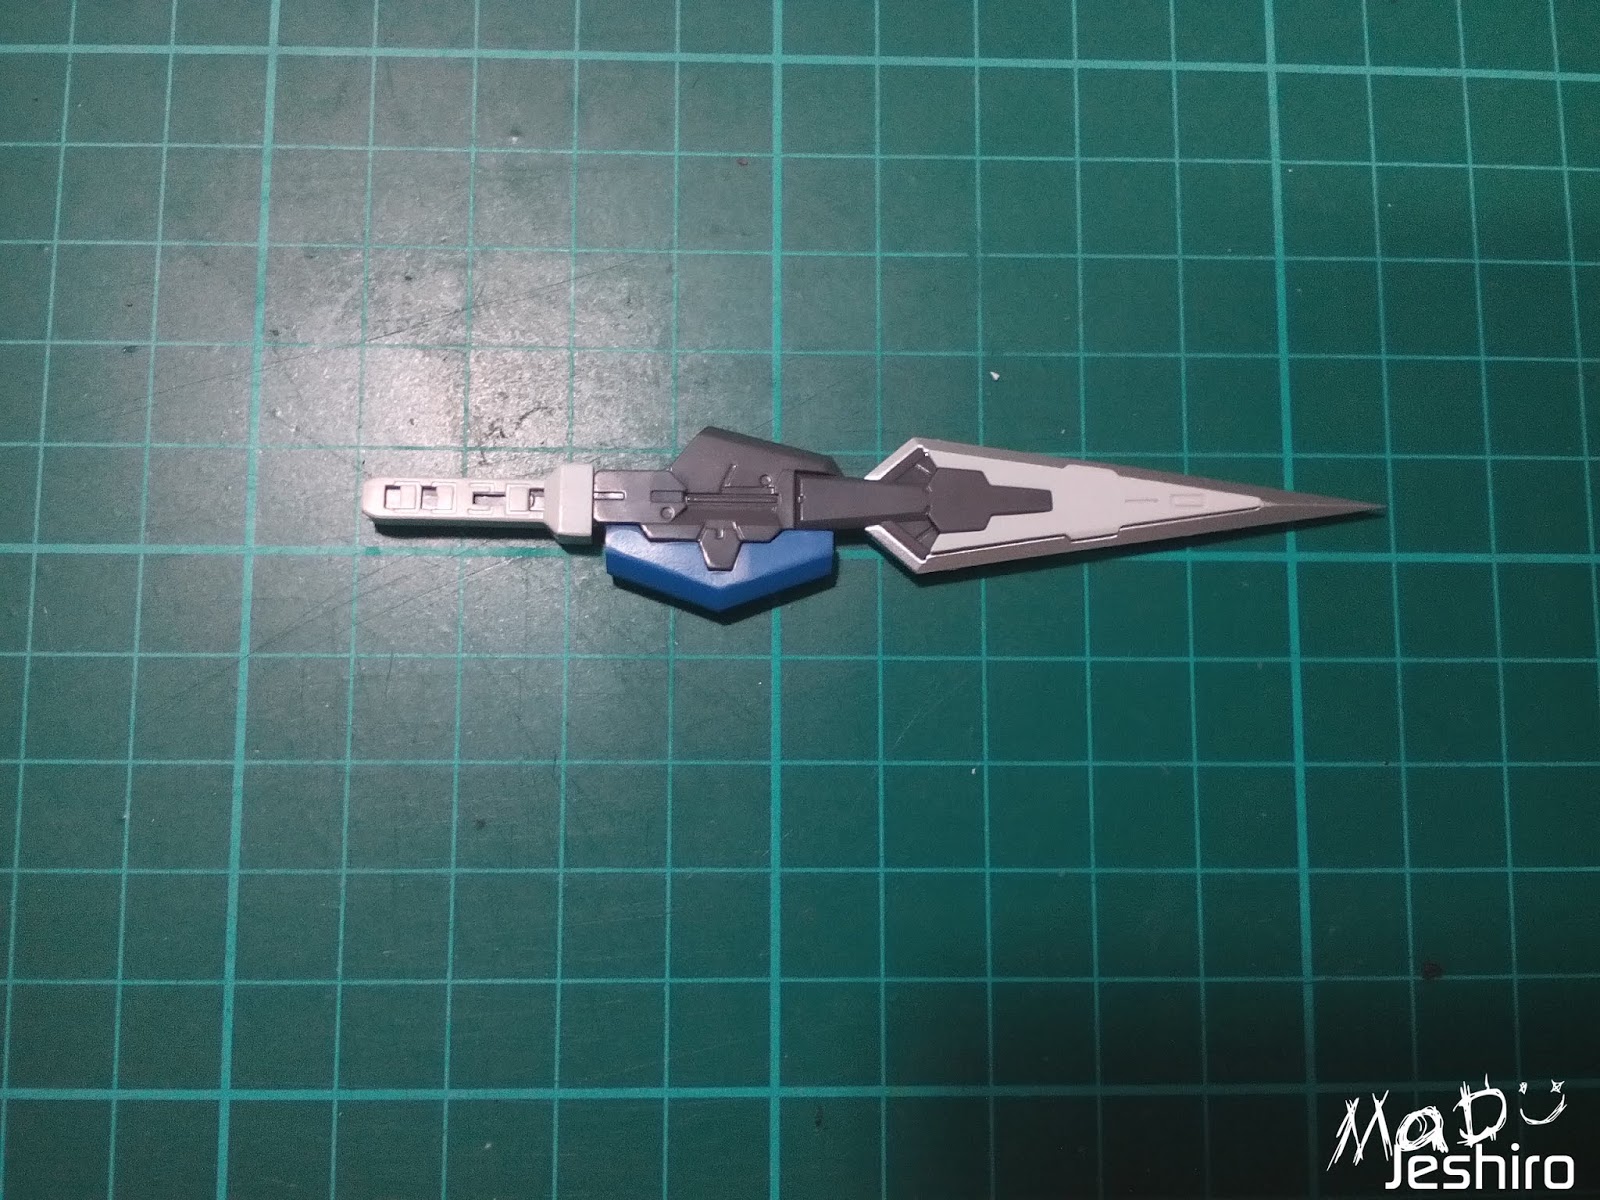
GN Sword Kai*:
Parts separation here is just average but the detailing is quite good.
The first GN Sword is nice but I wanted the latest version used in the R2 and R3 variants. There were no issues here and fittings are just fine.
*- The decals says GN Sword III and I remembered this is for 00 Raiser. I checked the information from wikia and it says “Kai”.
The shield-like part is separated using a connector with a PC part. This allows you to rotate the whole sword.
The blade is foldable same with the first version of the GN Sword. There are no problems here but caution is still needed. It’s quite scary because the tip of the sword looks easy to get broken.
GN Long Rifle:
I would say that the amount of parts here for the Long Rifle is also average.
No fitting issues here and it was a smooth build for me.
The Long Rifle is also a foldable weapon. Fortunately, no problems occurred when I fold it straight. But I find it hard to fold again because of the lock (check picture). It’s not a big deal once you get the hang of it.
Other movable parts include these flaps on the sides.
You can also fold the handle.
The other half of this clamp-like lock can be lifted up easily so you can put it on the arm.
GN Shield:
Parts separation is below average. But you get to decide if you want to add the green foil stickers here for extra detailing.
It was a very straightforward build. No problems here. :D
You can slide these blue parts as part of its gimmick. And yes, I added the green foil stickers. I think I am considered a monster for using a lot of foil stickers here. XD
GN Short Blade:
Nothing fancy here but it was well-detailed.
Same with the GN Shield, it was an easy build.
The only issue I find here are those visible nub marks because of the silver coating. :/
I used my silver pen to cover the black spots.
GN Long Sword:
No other stuff here and just featuring the same amount of parts.
Unlike the Short Blade, it was not as easy as it should be even though these parts look simple. There were tons of flashes and it was not that flat so I had to sand them down to fit the two halves properly.
I applied some silver here using my Uniball Signo pen that’s why the nub marks isn’t visible. Still, my cut was not very clean so you can still see chipped section on it.
Beam Sabers:
There are no fancy gimmicks here. LOL
Minor Detailing:
I have a good supply or waterslide decals but I wanted to add more detailing. So I used my metallic pens to add some extra color.
I added several foil stickers here because my silver pen’s ink is hard to dry. Besides, some of the parts are prone to skin touch and it might get erased. I am fully aware with the consequences of using foil stickers and its messy side effects after a long time. :v
Decals:
I have used this brand of waterslide decals several times. The quality is “so-so”. It’s not that bad and for me it was good because I can remove the marking quickly off from the paper. And this is just two seconds after dipping it from water! O_O
As I said a while back, the other sheet has a different tone. I tried using both but it's not a good combination. So I will just stick with the one that came from the kit. Sorry my camera sucks so you can’t notice the difference very well. :v
Before, I always place 4-5 markings then apply Mark Fit using its own brush. I’m not sure if this was a good idea but I decided to apply all the markings/seals, dry them, and then use a cotton swab dipped in Mark Fit to gently rub the markings.
Completed Model:
I forgot to use my 1/144 00 Gundam for size comparison. T_T
Articulation Test:
Not bad for the arms and I think this is just enough for dynamic poses. Even with the wires inside, I can still move it to a good angle.
No problem here in the body and the waist doesn’t hinder its movements.
The legs however were a bit scary. I don’t want to sever the wires accidentally. But this is the best I could do with the legs’ movement range. I’m not sure but it might be possible for Exia to do a split if there are no wires inside the inner frame.
I tried my best to do a good kneeling pose but I am not sure if I got it correctly. XD
Still, I will consider this as a “plus” factor for this model’s movement range.
Close-Up Shots:
Action Pose Shots:
It was really hard for me to take a picture while the GN Drive is turned on. I only have a 3-second window to take a picture and my hands were shaking badly. Some of the pictures I manage to get a near-decent shot. But most of the shots were just the usual LED turned on.
Now for my ratings...
Plastic Quality: 8/10
Some of the parts were glossy and some do have that matte look or feel. But both of their textures are smooth. For me it was not balanced at all. There were also flashes but not that much of a big deal. They were very small and can be sanded out easily. The edges and curves of the parts are not as sharp as Bandai’s. Some of the panel lines were shallow and not deep enough. Still, I like the outcome even though I can't apply a lot of metallic blue panel panels.
Assembly: 8/10
Several tight and loose fittings but these are very minor and typical coming from a bootleg brand. For those who have already experienced BL brands, I’m sure there’s a lot of ways how to get through them without problems. Plus, some of the parts were undergated. You now have few hours deducted when it comes to cleaning.
I will add the LED installation in the assembly. It was very tedious yet fun at the same time. If it were easier to place, I might have given a 9 for this rating. Still, it was a good experience in this model.
Detailing: 9/10
I checked some pictures in the internet and Hobby Star’s detailing is very different. It has more panel lines, etched surfaces, and raised surfaces. The gray parts also did a lot of help in making the Exia look outstanding even without the decals. Of course it is still better if you can apply the WSD. I have mixed opinions when it comes to foil stickers. As some of you already know, I don’t often use foil stickers unless it was a commissioned work. I only use them if the quality is not that bad. In my opinion, the silver foil stickers were just average and it’s your call if you want to use them.
Another factor is that you can mix and match using different variants of Exia. You may go for that pure Repair Mode, Repair II or Repair III. But you also have the option of changing the overall look by switching out some of the parts. It’s also possible to make a Repair Mode with R3 parts. The downsides however is that there are only single main parts especially for the Inner Frame. This means you need to disassemble a whole unit just to change its appearance (example: Shoulder Armor, Arms, Legs). The back skirts however can be replaced by a different variant easily. If you didn’t installed the LED, of course it will be easy to change the shoulder armor as well.
Articulation: 9/10
I was thinking of giving it an 8 but I enjoyed the flexibility of Exia when it comes to dynamic poses. I might have done a few extreme poses if the LED was out of the way. Probably a split if I take off some of the waist skirts. Anyways, I have decided to give this a 9 because the only thing that hindered some of my movements was the action base and the wires.
Gimmicks: 8/10
The LED given by Hobby Star was the main gimmick that climbed up in the lead against Daban and Dragon Momoko. Even though Dragon Momoko has been known for adding uber-detailing to their models, a lot of builders will still pick Hobby Star because you want to light up those GN Condensers. The GN Drive also has a spinning motor inside. The noise isn’t loud but it was a nice “PLUS” factor by Hobby Star to include it in their model. And this is nearly as same as Bandai’s PG Exia scaled down to 1/100. Of course, Bandai’s engineering is still top-notch making their PG Exia a very sexy and awesome model. xD
I will add the action base as part of the gimmicks. Having a switch to turn the LED system OFF or ON was a great idea.
Armaments: 9/10
You have a lot of weapons here because you have the other variants. But as I mentioned in the Detailing Section having single main parts, you won’t be able to build all of them like having 1 GN Sword and 1 GN Sword Kai. But look on the bright side; you can go for two GN Long Blades or two GN Short Blades depending on your taste. Putting down all of them, you can have at least 1 of GN Sword or GN Sword Kai, 1 GN Long Blade (or 2), 1 GN Short Blade (or 2), 4 Beam Sabers, 1 GN Long Rifle, and 1 GN Shield. I think that’s a lot already for Exia.
Extras: 6/10
There are a lot of extras here and most of them will be the leftover parts from the variants you don’t need. They are practically useless if you are planning to install the LED because it’s really hard to disassemble them again just to switch it to a different variant. But don’t throw these parts of course. You might be able to use them for future use.
Patience: 5/10
I think you will consume more time in fixing the wires here especially if there’s a problem like not able to light up.
Overall Rating: 9/10
I think I already covered most of the basic ideas for each section so I will not repeat them again here in my final comments. So yeah, it was a good experience indeed and my rating is just based on my own personal thought about the model. There are a lot of features here that makes it a good model. Now starting with recommendations; for a beginner’s choice I might say this is just normal. If you already have some background with other Master Grade kits then you can try this one. This is also a good stepping stone how to handle kits with LED systems like PG Unicorn or PG Exia. If I am going to pick one between DM, Daban and HS, I would go for Hobby Star. The reasons are simple – gimmicks and cheap. Both Daban and DM’s have their own respective merits in terms of detailing and gimmicks but their prices are now starting to rise up. Their prices are almost near as Bandai’s.
I still don’t have any experience with painting so I am not sure if I should give suggestions about color schemes. But I can suggest that if you want to retain that R3 color while using the first Exia variant, it’s possible because of the parts separation.
Bandai offers the first Exia and the Exia Repair [Ignition Mode] and they somewhat easy to find. But other builders have a 50:50 rating for the both of them. And as far as I know, Exia R2 is currently under the P-Bandai list so that’s going to be hard to find. If you are aiming for the R3 scheme while avoiding the BL brands, then you just have to tweak the models and paint it up. You might also need to modify a few parts in order to get the same design particularly the thigh and the back skirts. But if you don’t mind being open to all brands, I would definitely suggest this one. I haven’t checked the other reviews for Daban Model and DM’s Exia, so I don’t have any information what things they can offer that Hobby Star doesn’t have.
So that’s it for my review here in Hobby Star’s 4-in-1 Exia with the LED system. If there are some other things about the kit I might have missed, don’t be shy to ask them out. I am now set to build the Avalanche Exia of Hobby Star this September. As for the decals, I manage to find DaLin brand in Anastasia888 and D&M Toys Store in case you are looking for one.