

Introduction:
So after finishing the two kits, I started this one right away. This was one of the kits delivered to me and I still have three more IBO kits to finish and 2 other HG’s. I am trying to finish them within the allotted time and I should be careful not making any errors or damages.
Okay, frankly, I do not like the color of this kit but the pilot and mobile suit left a huge impact on my side after watching Season 2 (too much feels). I want to put my best here and planned to apply most of the foil stickers as well (avoiding the one for the eyes). I even looked for a new set of X-Acto blades to use so I can get a good trim on those nubs.
I will try to keep my comments short as long as the message or key information is there. I’m doing this because I still have a lot of reviews to finish. :/
Again, please ignore if there are typos because I always try to rush when typing and MS Word doesn’t give any notifs if do have a typo. But if I used any wrong terminologies, please do correct me.
Unboxing:

Same with the other kits from IBO you get to see the picture of the pilot. In this model, you get to see Shino with that carefree smile (NOOOOO the feels are returning D: ).

You are greeted with two plastic bags here and your usual construction manual. Odd thing is that I didn’t get any of those pamphlets I saw back in Kimaris Vidar. They may have placed a few of them probably on just certain kits.

Anyways, the first plastic bag has three sprues and the other has two.


The construction manual shows the box art with the usual short information on both pilot and Mobile Suit. The back side or last page of the construction manual features the gimmicks and weaponry of the model. One of the nice things here is that they added the English translation so we can read them.

Unfold the construction manual and you will see the whole paper. The front side is the only section printed with colors. The back side is the common black and white print.
The next images will be the sprues or runners of the kit.
Sprues:
From left to Right, top to bottom:
- Sprue A (x1)
- Sprue B (x1, 4 colored runners)
- Sprue C (x1)
- Sprue D (x1)
- PC-002 (x1)


Of course, you will notice that there are more parts here because of the backpack unit. Detailing is really nice and I love the texture. It has that smooth and glossy finish, but not too glossy to think it’s metallic. With this, I can choose between angelic and metallic pens. I will use the angelic green for this one because I still don’t have any angelic yellow.

You get the foil stickers again with more markings for the eyes and the cannons. As I said earlier, I will use them.
Body Unit:

The body features the same amount of parts here but there’s a movable piece in the chest, probably for the transformation gimmick.


It was a smooth build and the detailing makes up for the lack of extra parts. I will add some angelic green here on the final assembly.
Head Unit:

So yeah, there’s a similar head inner frame here. And there were only few parts here, mostly just for the front of the face.


No issues here and everything fit just nicely but you may want to take note on that white face part. It seems it’s quite prone in getting loose eventually. And I was actually worried with those ear-like parts but the fitting was good. I used my angelic green on the forehead to add some color.

As always, I avoided the stickers and I add some green again on the eyes using my uni-ball signo pen.
Arm Unit:

So here are the parts for the arm and you can see the finished right arm on the mat. There are a lot of parts here because of the shoulder armor with a separated yellow piece. And you get to have another extra part on the backside of the arm.

“Ouch”. I was trying to trim a certain part and then it slipped so the edge of that piece hit my thumb. It was just a small injury, but this is a reminder for me and for fellow builders to have a portable or mini pin vice to use when working on small parts or other objects.


At least I got a good breather because there were no snap fitting issues here.

Not bad for the articulation. Even with the bulky look, you still get a good bend here with the arms.

Same with the other HG IBO models, you can lift or move the shoulder armor upwards.

These parts behind the arms are also articulated and you can move it forward. This is a nice gimmick because of the transformation for Flauros.

Just a quick coffee break before I prepare the legs.
Leg Unit:

The legs feature average amount of parts but at least you will have a separated yellow piece here. It was a good decision for Bandai to put an actual part instead of relying with foil stickers.


I don’t like the color but I do like the design of this model. Looking at the ankle section, it already gives you a good factor in its articulation or movement range. And yes, there were no snap fitting issues here.

You can see I have bent the knees and the feet are moved in two different positions. The range of movement may seem so-so, but it’s actually pretty good. Another thing I noticed is that the feet have hooves making it look like Bison or similar type of animal. O_O
Waist Unit:

The parts for the waist were very few. Plus, you don’t get any huge front skirts here which can be a good factor how far the legs can go if you lift it upwards. The whole side skirts already acts as both front and rear skirts.


There are no snap fitting issues here and that’s what matters.

As for movement, you can lift the side skirts that much (B). Or you can twist it like so (A), but I don’t that’s possible once the body is attached.
Backpack Unit:

So far, this is the only unit I have built in the IBO line with a lot of parts for the backpack. Not only that, you will need to apply some stickers here if you want the extra pinkish color.


So yeah, I did add the stickers. I was feeling confident during this time thinking I won’t mess up. XD
No issues or problems here in terms of snap fitting. But just be sure to fit them well before you apply the foil stickers.


There are a lot of movable parts here in the back pack because of the transformation gimmick and that is awesome. These two machine guns can be move to certain degrees or you can remove it and let Flauros hold it up. These pink connectors holding the machine guns can be rotated as well to a limited angle. So yeah, you have a decent amount of options for Flauros. I bet he would look awesome in the 1/100 FM line.
Weapons:
120mm Machine Guns:
These two machine guns are attached on the backpack unit and serves as secondary weapon for mid-range.
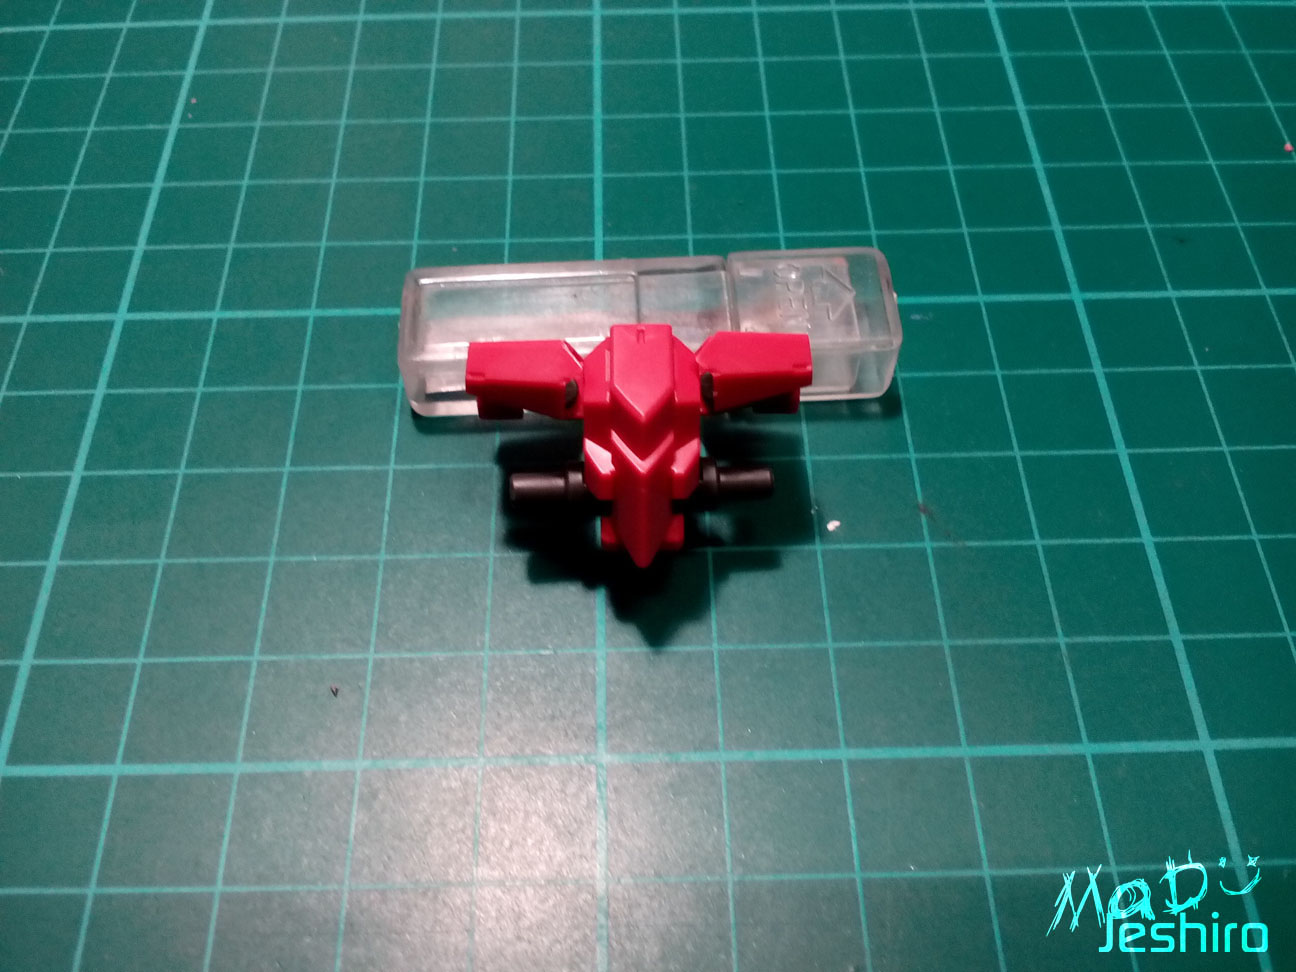
Rail Guns/Shot Barrel Cannons:
This is the main and signature weapon of the Flauros that is attached on the backpack unit. After you form the Shelling Mode, you will get a bigger one because the two parts of the cannons will connect.
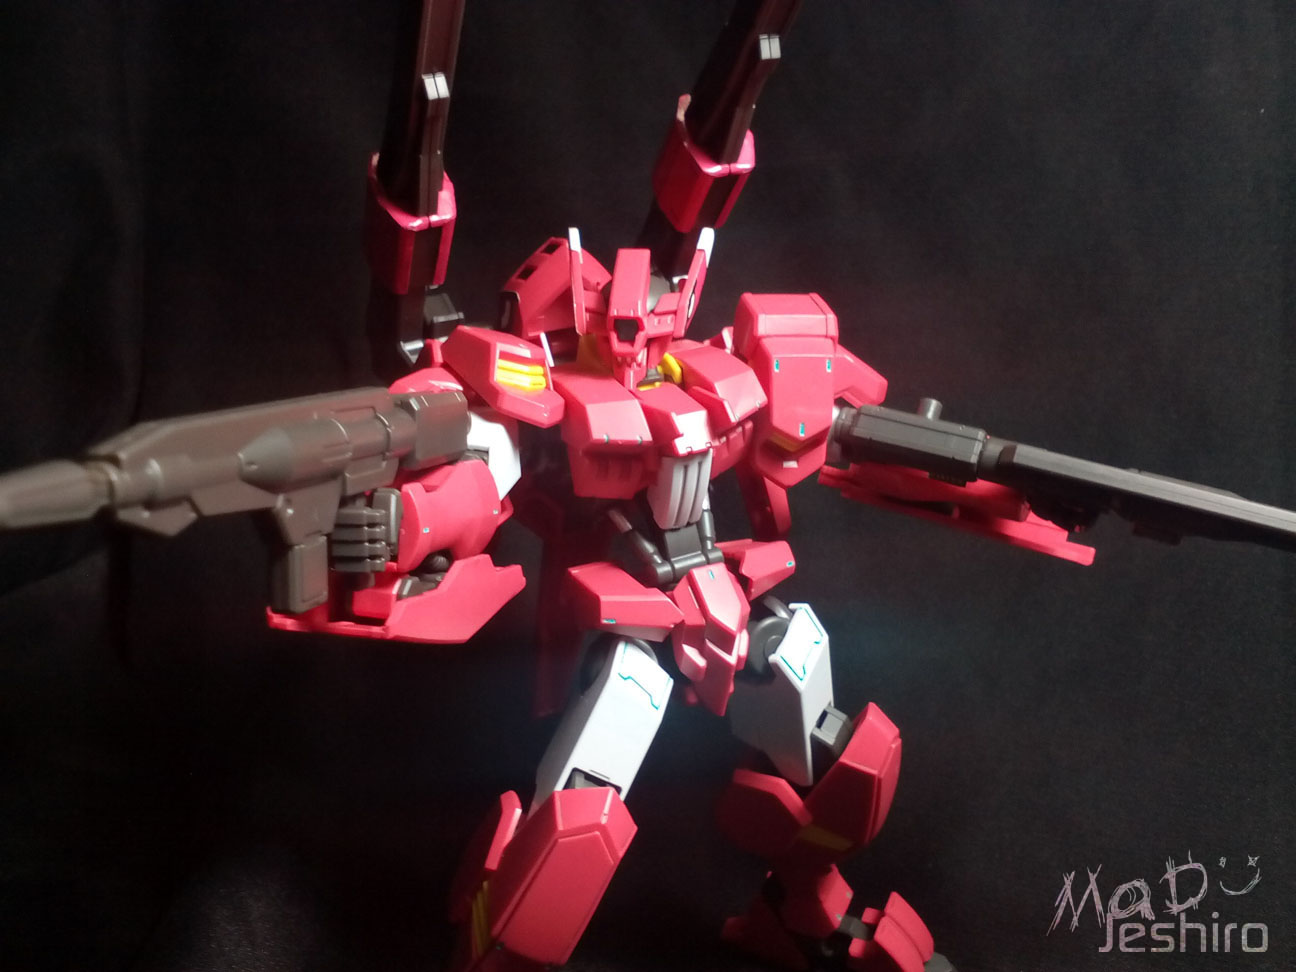
Completed Model:


I was amazed that even with the huge backpack unit; he can actually lift it up with a straight standing pose. I didn’t even thought of adding some blutac to hold him down.
Articulation Test:


As you can see for the arms, movement is limited if you try to lift it sideward.
There are no huge skirts to hinder the legs movement so I it’s possible that Flauros can even perform a perfect split. The male-peg mechanism instead of the common ball-joint peg for the waist was a great choice made by Bandai.
Rest of the shots:


I apologize if my pictures here were few compared to the number of pictures I got for Kimaris. I am not being biased. I was just very busy with a lot of kits to finish. Besides, my shots suck badly anyway and I’m sure you guys can do better.
So here are the ratings of a madman.
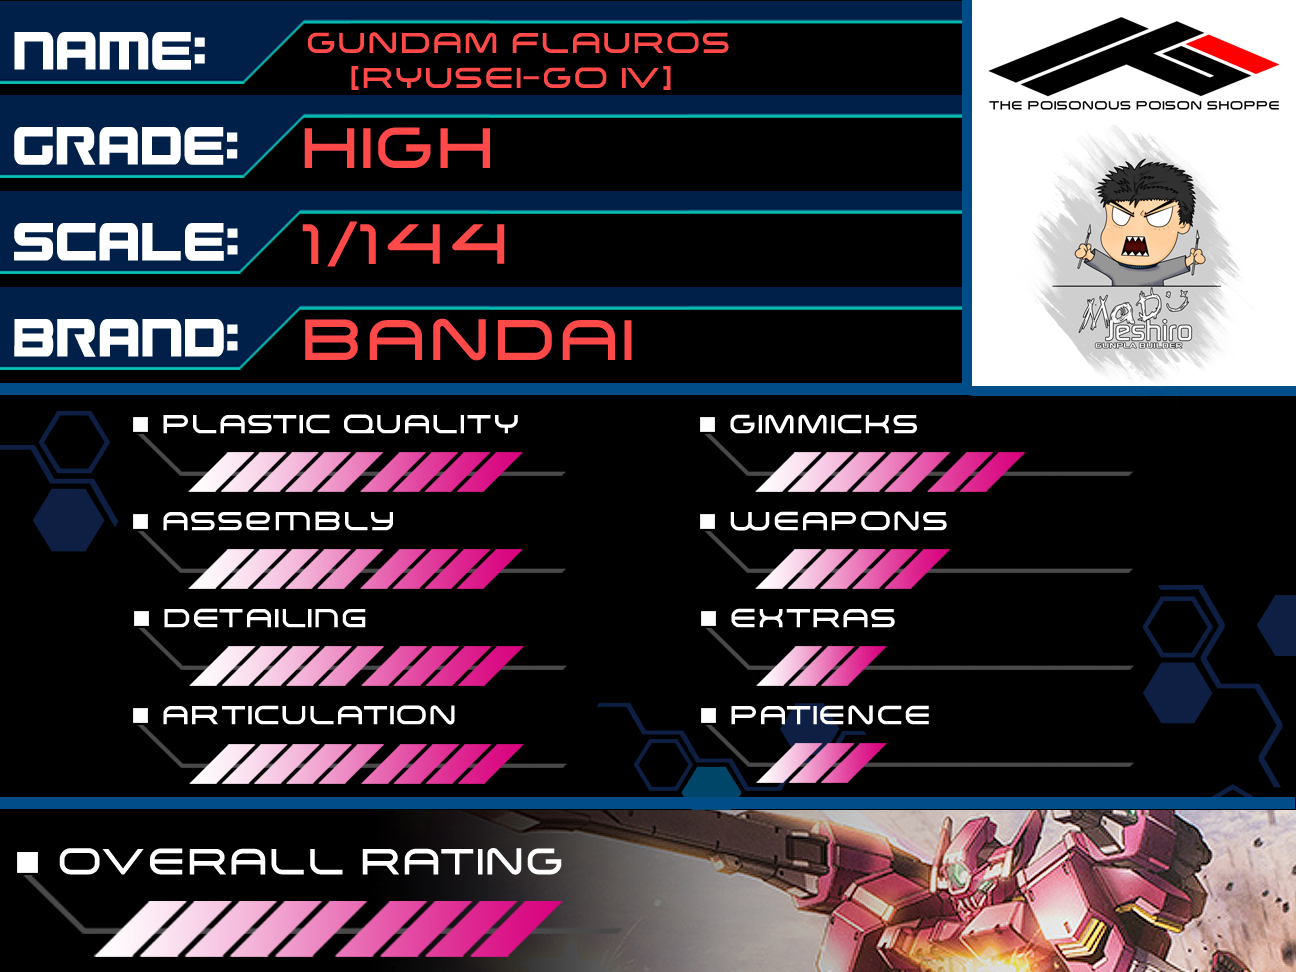
Plastic Quality: 9/10
There’s no need to question much in the quality if you know it’s made by Bandai. There were no flashes, dimples, and that rough composition of the plastic. The nubs weren’t much of a problem if you are planning to sand the parts. The gates are different now here in the HG IBO kits. The runners or sprues now feature a triangular shape “gates”, and the pointy section is on the surface of the parts. That means you have smaller nubs to produce. Of course, there were several gates that are quite thick and that can’t be helped. As long as the hobby knife can cut it clean without producing stress marks, it’s fine on my side.
Assembly: 9/10
There were no problems on my end and I expect that all other kits (same model) should be this smooth. I didn’t have any bothersome troubles fitting the head or the backpack which I find it always the hardest to deal with. So yeah, I don’t have much to say here because there were no problems to begin with. ^_^”
Oh, just some info why I mentioned the head, well it’s because you have a lot of fragile smaller parts here. Bandai or not, this one needs to be built with more caution than the rest of the body. And since the parts are small, lose them and you will have a hard time finding each piece. :/
Detailing: 9/10
For a High Grade kit, I love the added “semi vents” (what I usually call the oblong or rectangular carvings) on the surface. I can put some extra color in them to add life because you don’t have any decals here. There are a lot of raised parts and panel lines which is cool.
I am just disappointed again why Bandai didn’t bother adding a few more extra pieces for the pink parts in the cannon. They relied with foil stickers. I mean, this will only take at least 4-6 few more parts. But then again, Bandai’s quality for stickers was far better than Daban Model with precise cuts on the edges. With some time and careful application, this adds extra color for the Flauros. I should have given it an 8 given the downside of the foil stickers, but the model in general has a lot of detailing already. It may even look like a 1/100 if someone was just to look at it in the pictures.
Articulation: 9/10
I had some trouble picking a good rating here in the Articulation section. I was choosing between 9 and 8. Just because of the limited movement you can do after the final assembly, giving it an 8 or 7 might be right. But like other kits I have reviewed, I need to look for other possibilities and other factors I may have overlooked. First, let’s talk about the upper body. When you saw I tried lifting the arms sideways, it can’t even get to more than 90 degrees. But if you saw the images where I pose the Flauros with the gun aimed at the front, I don’t think I should pull the rating down just because the model can’t do an action it wasn’t meant to do.
Next is the lower body where you already saw I can lift
the legs to a very nice angle. This also is counted as a factor why I have
given it a 9. The last one is the transformation gimmick. Of course it was a
simple twist and flip mechanism, but will you buy Flauros if it can’t feature
the model it used in the series? Exactly! We should thank Bandai they considered
this simple yet nice addition to Flauros.
Gimmicks: 7/10
The kit features minor gimmicks like the shield-like piece in the arms, the removable machine guns in the backpack unit, and the short barrel cannons that is also attached in the back. The ability to do the Shelling Mode is already a great feature for the model and this gives you the option for poses. Or create a diorama to re-enact the scenes in IBO.
Weapons: 5/10
Aside from the visible weapons, there were no other visible weapons you can hold for Flauros. But you can play with your imagination a bit and make use of the guard or shield in the arms as part of its weapons. Maybe some options for modifications here as well. But if you will plan on modifying this kit, then you now have more options if you will remove the backpack unit.
Extras: 3/10
Well, there weren’t any extra parts or items here I have noticed. And I am not counting the excess PC parts in this section. :v
Patience: 3/10
Again, same with the other HG IBO kits, it’s easy to finish the model within a day’s worth. Of course, time for painting and other stuff you will need to do here isn’t counted. I am just referring to the straight build time.
Overall Rating: 9/10
If this kit also have the original Gjallarhorn colors (probably a p-bandai in the future >_>), I may like the kit. But after reviewing Flauros, the color is growing on me and it’s starting to look fine on my side. I also hope I can produce custome decals for the IBO line because Bandai didn’t produced anything I know of at the moment.
Anyways, this is a great kit with no issues to burden you. This is also very recommendable for beginners and good practice for using foil stickers. There were lots of nice details so it’s a good training model in applying panel lines. For the PRO ones, well they can do some masking here to avoid the foil stickers.
I think that’s all I have seen in this kit, but it is a good kit and I don’t think Daban Model can replicate the plastic quality and assembly factors here. I hope this short review has helped you guys and I will add more information about the kit when I learn some from other builders. I will follow the next review, Gusion Rebake, once I have finalized my notes.
Also, have a look on our Gunpla-related Facebook page - Click Here
Ooooooooohhhh. Para dun pala ang mini vise. Akala ko pang photography lang yun :-D
ReplyDeleteIdol anong ginamit mong pang panel line na white?
ReplyDeleteWala po akong ginamit na white dito..
Deletepero yung last na pen na ginamit ko ay Uniball Signo din yung name