

Introduction:
After a long sleep, my freedom is finally going to wake up or you could say finally going to be built. I bought this back August 2016 and it was also my first time attending to the PH Qualifiers of GBWC. I know there are builders and collectors out there who have backlogs that are way longer stocked than mine, but this is my first time having backlogs for more than a year. I usually build my kits just a few days after it was bought.
After a long sleep, my freedom is finally going to wake up or you could say finally going to be built. I bought this back August 2016 and it was also my first time attending to the PH Qualifiers of GBWC. I know there are builders and collectors out there who have backlogs that are way longer stocked than mine, but this is my first time having backlogs for more than a year. I usually build my kits just a few days after it was bought.
The reason why I bought Freedom 2.0 along with Build
Strike FP is that I sold my older model of Freedom (Dragon Momoko) during my
financial crisis. I sold 3 of my model kits and I am trying to gain back the kits I
have sold. One of them is Hi-Nu EVO but I already got the replacement which is
the Hi-Nu “ver Ka” of Daban Model. And this one is the replacement for my old
Freedom. The last kit was Ex-S but I don’t think I will be able to get one
soon, as I am now hunting for a new kit to review and it’s a part of my
wishlist.
Anyways, I have tried taking more pictures for the
model’s RoM (Range of Movement), as suggested by a fellow builder from
Gundamizers group. I will try to write down all the pointers I have noticed
when I built the kit. I don’t have the Daban Model version but this is the
closest one to mention some things Daban has. I said “closest” because as you
have already seen, Daban made a few changes on their Freedom 2.0 especially on
the external detailing.
You already know that I always get a lot of typos because
I just keep on typing until I finish the whole article. Of course I still
review the article before posting them but there are still errors I always
miss. Just ignore them. I hope you can share your comments regarding this kit
or anything related to Daban’s version.
Unboxing:

When this was announced, the hype really hit me hard and
I love the box art made by Bandai after I got the screenshot from a friend. I made sure I will get my hands on this kit and the 8-month waiting was worth it.

This side of the box features the RoM or articulated
parts of the model. A lot of stuff has been changed from toe to wing.


Here’s a closer shot of that side. I will cover these
feats later when I show each unit.


The other side of the box is the basic front and rear
view of the model. There are also a few featured gimmicks right off the bat to
entice consumers.

As expected from Bandai, each plastic bag is perfectly
packed inside the box.


Here are the plastic bags inside. You have 10 plastic bags with a maximum of 2 Sprue Frames per bag. The Sprue Frame A is in a plastic bag with no other Sprue Frames. That is a nice move and this decision protects the V-Fin. Even though you have other bags that will press Sprue Frame A’s plastic bag, the air keeps them from scratching one another.

The construction manual features the box art instead of
the finished painted model. I am also happy I managed to get them signed by
Meijin Katsumi Kawaguchi. :D

The last page of the construction manual shows the
finished model.

Page 2 of the construction manual features more about the
mobile suit. There are also images of the GAT mobile suits, but I don’t know
what it says about them because the texts are all written in Japanese. :v

Flip more of the construction manual and you will reach
page 12 and 13 with some nice images about Freedom in “MS Tracks in C.E.”. The
right side shows the model’s mechanism with half of its body revealing the
Inner Frame.

Here’s the list of the Sprue Frames inside the box which
I will show you next.


Even though it’s packed by Bandai, try to check them
thoroughly to make sure there are no damaged parts. Getting a molding error
from Bandai is pretty slim but you never know when you get unlucky.
Sprue Frames:


My apologies if some of the images are a bit blurry. You
have 18 frames in total and I think it’s the average amount for a model kit
from the SEED series. The plastic quality is really great and that’s no
surprise to the new products released by Bandai. The detailing is nice, precise
and sharp. The “gates” that hold the parts in the frame are also different and
I have noticed this when I built my Barbatos Lupus Rex. It is no longer a
rounded shape but more of a triangular one and the tip roots to the part’s
surface. But even with this design, there are no parts with stress mark or
already removed from the frames. As I mentioned earlier, Bandai’s packaging is
great.

Let’s not forget the usual Dry Transfer decals, clear
stickers, and foil stickers included in the model kit. I will use the DSD but only a few logos of them and the markings for the wings.

Now that I have checked them, it’s time to awaken my
Freedom. :D
Body Unit:

There are lots of parts here compared to their first
model of Freedom. It’s because of the new gimmicks to give Freedom more RoM
(Range of Movement) and I will show them later.


Since this is Bandai, there is no question regarding its snap fitting. It was a smooth build with no issues. I am not sure if there were some on Daban’s side, but a few fellow builders mentioned it was okay as well.

Starting off with the main male peg that will hold the
arms, you can pull them outward to this degree.

A new feat has been added here in the body and you can
slide off the chest sections outward to give you more extreme angles for the
arms. Sliding it outward may seem a bit
of a problem because it’s not that smooth.
Overall, it was good and there are no problems.
But the main factor here is the new detailing implemented and there were lots
of changes. They have added extra panel lines, notched edges, and few raised
parts. The proportion is also slimmer compared to the older version.
Head Unit:

The parts for the head are above average and there are
more extra parts here compared to the 1.0 version. Bandai has added separated
parts for the armor head, cheeks, and a clear part for the forehead sensor.
They [Bandai] have also used a base inner frame (gray) with a simple yet nice
mold for the “Picus” (machine guns). Unlike the Freedom 1.0, you won’t need to
paint this one because of the part’s color separation.


There are no problems with the head and snap fitting was great. But here’s a little reminder for those that will build this kit or Daban’s. The facemask is a bit fragile particularly on the “slits” or vent section. Do not press it with your finger too hard or else the middle section might crack and misalign. Aside from that, the “gates” are also large so you need some extra caution when trimming out the nubs. I forgot to take some pictures for the head that is why there are markings already applied.


After looking at the parts, I already decided to use my usual pen – the Uniball Signo. And I have applied my Metallic Blue on the inner frame parts so they will be visible on the vents. I also used my Gold pen to paint the eye sensors instead of using the foil stickers.
I love the design of the head and it has a fiercer look
compared to Bandai’s older version. And this was also far better than Dragon
Momoko’s Freedom.
Arm Unit:

Both the 1.0 and 2.0 have same amount of parts. Even with
this similarity when it comes to amount of parts, 2.0 was far because of the
new design. The semi-articulated hand used before is now removed in this kit
and Bandai designed it to stick with the common removable fixed manipulators. Unlike
the 1.0, there’s a new gimmick in this kit which I will feature later.


There are no snap fitting issues and they lock in just fine. I will also discuss the male-female peg issue which some builders overlook and ignore.

The range of movement here is great and you can see that
it can bend so with no problems.


And here’s the gimmick I have mentioned earlier. You can
the forearm to extend its length. In doing so, there are now a few angles added
to its RoM.

There’s a guard fitted here but it can twist perfectly.
Shoulder Armor:

The amount of parts featured here are above average. The
1.0 version doesn’t have any extra gray parts for the thrusters, but both
versions don’t have any gimmicks.


Even so, it was a smooth build and the design is really outstanding. They have also reduced the size of the thrusters underneath if you compared it to the 1.0 version. More panel lines, carved parts, and raised surfaces were also added in the 2.0 Freedom.

The only movable parts here are these female peg
connectors. They swivel just fine with no hindrance from the shoulder armor.

As you may have already noticed, I used my Metallic Blue
pen again to add some minor coloring. I’m supposed to add some red as well based
on the box art, but I ran out of ink with my Met Red. :/
Waist Unit:

Just like the body, there were a lot of parts added here
in the 2.0 version compared to the 1.0. The reason is that Bandai added a nice
gimmick for its movement.


I think I accidentally deleted the picture and I can no longer find any copies for the gimmick in the inner frame. Anyways, the gimmick is that the male pegs for the thighs are articulated. Both sides share the same concept like the male pegs in the torso. This allows you to pull down the legs giving it more RoM.
As for snap fitting issues, there weren’t any to but I
will discuss the issue with the male peg for the thigh after I feature the
waist’s movable parts.

First are the front skirts that are connected with a
longer hinge or clamp. Unlike the usual clamp connectors you see in other
models, this one gives you more extended movement with the front skirts
allowing you to move it upward or downward and not just simply lifting it up.

If you do the usual movement like lifting it up or
sliding it sideways, the front skirts feature nice angles.

Unlike the newer models like the Destiny or Strike
Freedom with 2 back skirts, most mobile suits like Aegis, Blitz, and Freedom
use a single back skirt with the thrusters on the edges. The back skirt here in
2.0 also uses the same connector like the front skirts.


You can move it up or down aside from the usual movement of lifting it upward.
Now for the issue regarding the male pegs that tends to
break off after you connect them to the thighs. There are NO issues to be
frank. It just happens that the builder hasn’t connected the male to the female
peg properly.
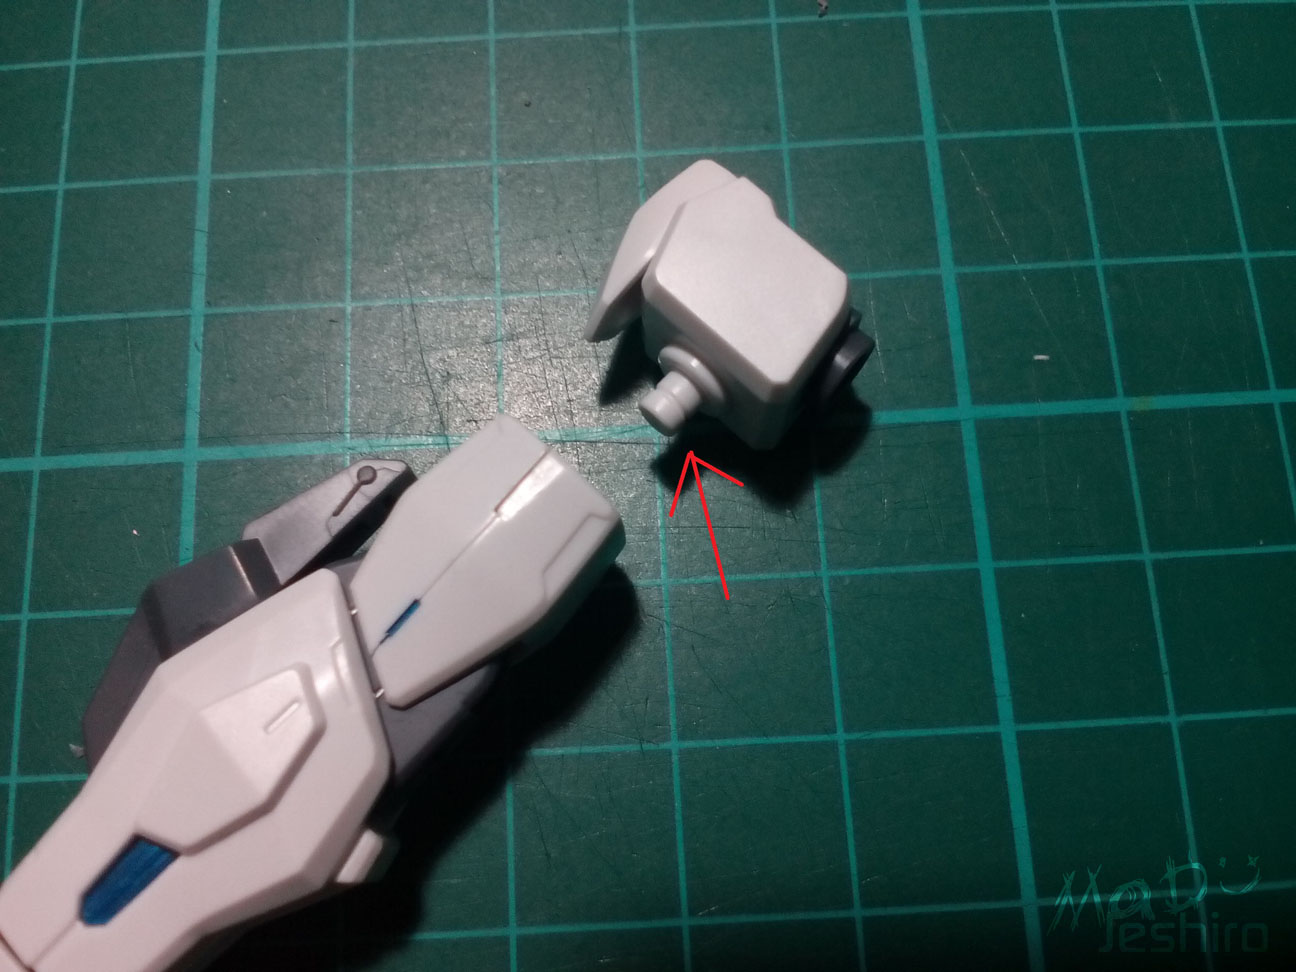
Take a look at this picture of the arm. You might have
noticed that there’s a canal like engraving in the middle of that male peg. Some
builders might have thought it’s just a simple design but it’s not. It actually
has a purpose. Now the female pegs have a single hump-like ribbing inside. And
you can already picture the purpose, yes – that single hump-like design should
fit in the male peg’s canal-like ring.

Here’s a simple diagram to explain it a bit. Object A is
our female peg and there’s the hump-like design inside. The black circle is the
lump (or ribbing) inside the female peg and I have drawn a mid view to get a better grasp
what it is look like. Now Object B is our male peg and I have marked the
canal-like design as well. My apologies if my drawing isn't perfect.


In our second diagram, the male peg should perfectly align
on that ribbing or lump. Usually, you tend to hear a faint snapping sound
or you can feel a slight budge when you connect them.

Now where is the issue? The issue is if you think they are already connected but they are not. Some of these male pegs are longer and will pass through any connector, polycap, etc., with a female peg. And in order to stop the female peg from getting inserted any farther, the male pegs have a guard on the far end which I have drawn as well (check second diagram). As you can see in the third diagram, the male peg isn’t fully inserted/connected yet. And if you twist the legs, the male peg gets a lot of stress because the grip is too tight (A). And the result is disastrous because the farther end of the male peg (B) gets most of the stress from your hand. The female peg now acts as a clamp that holds the rest of the male peg firmly. If you notice that there is still a small gap between the guard and the female peg, try to connect them firmly until you feel that feint snap.Another reminder is that this issue can happen any male-female pegs that use this kind of design.
The only thing I can think of about this design is that
to make sure they are locked even with the numerous twists and turns you will
do with the model. I remember the PG ARF (Daban Model) having a bad issue with the
same part because each time you move the legs, it slides out little by little –
there are no locks to hold the legs as you move it. The probable case as a fellow member said is the inaccuracy of Daban Model's molding. Afterall, they just copied Bandai so the exact sharpeness of each part isn't 100% perfect. There will be cases that the peg is loose ebecause these ribbings are badly molded or they are too tight.
As for Daban’s version, a fellow said that the male peg
is loose when you connect it on the thigh. I am not sure if they have the same issue
with the PG ARF or that there is still the same design here in Bandai but the
molding is not sharp. I hope this information can help you guys and sorry if my
explanation is a bit bad. >_>
Back to the waists general design, it looks really great
and the articulation is far better than the 1.0. :)
Leg Unit:

The leg features above average when it comes to parts
separation. Though almost the same, the 2.0 version have extra parts giving the
builders more ideas when it comes to painting. It also serves as a nice factor
for straight builders like me.


I have added some Metallic Blue using my Uniball Signo pen. I don’t recommend this pen if you will use them on surfaces that are too bared or prone to touch. You may need to apply some topcoat so it won’t smudge on the part’s surface.


I don’t have any issues in snap fitting and every part
fits just fine. Of course, that is no surprise coming from a Bandai kit. :v

I have some minor complaints regarding its RoM. It’s not much of a big deal but the foot of
the Freedom 1.0 can bend farther outward. The 2.0 can do the opposite and the tip of the toe can be folded inward. The image above is from dalong.com
(credits to them for creating fully updated reviews on Bandai kits). As you can
see, I have drawn the “reach” of the toe to its shin.


Now the Freedom 2.0 doesn’t have an extended range like its previous version but it still features a lot of nice movement. You can twist the main joint that connects to the waist, you can flip the fins on the back, and the ankles have decent movement. Like I said, it’s not a big deal, but I’m sure you will agree if the 2.0 version can do the same thing for extreme action poses especially when doing a dash-like pose

Another positive factor, you can twist the whole foot
around as you see in the image above. The ankle guard doesn’t hinder its
movement. It’s not like you will actually do this but I find it awesome (LOL).


foot’s inner frame is divided into two sections so you can move the toe separately. The good part about this is that the hinge connecting the toe allows you to move it downward beyond its actual range (B).
Backpack Unit:

The main backpack unit features below average amount of
parts. Though they have a separate mold for the thruster’s vents, it was still
very straightforward.


At least it was a smooth build and the detailing Bandai did makes up for it. It was really cool they have added an engraved text of the unit’s model number. Unfortunately, there are no gimmicks and you can’t move any of these thrusters.
Wing Unit:

Same with the rest of the units, there were pieces added
in the wings. The reason is for the new detailing and added gimmicks on the boosters.

The left side is the completed wing and you won’t be able
to see the beam cannon unless you slide the wings out. The right side shows
each completed section of the wing.

It was a smooth build but I feel that it will loosen up
after some time. I just noticed this when I checked the wings’ articulation
that they don’t have the same lock on the pegs I discussed earlier. Well as
long as you don’t move it every now and then it is fine.

Articulation is great and you can move all fins outward
including the beam cannon.

Each side has a large and small fin and you can stretch it out this much.


Now the added gimmicks here are these sections of the wings. Each wing has two thrusters on the sides that can be flipped open by slightly pinching the other end. On the first Freedom 1.0, they don’t have this kind of gimmick so it’s a plus factor here for 2.0.

We’re not done yet because the beam cannons attached on
the wings features new gimmicks as well. First is that the bottom and upper
sides can be flipped open. It’s more like a “charging” state before the cannon
is fired.


The tip of each cannon has a part that you can slide out. It’s like an extension of the nozzle during its firing sequence.

Same with the Freedom 1.0, you can fold the beam cannon
sideways so it will look like it is mounted on the shoulders.
Armaments:
Beam Cannons:
There are the cannons we have seen on the Wings Section.
I have covered the gimmicks for this part as well.
Beam Rifle:

The new beam rifle for the Freedom 2.0 features average
amount of parts. It’s still the same with the 1.0 version and the only extra
separated part here is that piece for the bottom.

It was a straightforward build with no issues and the
detailing is overall great.

You can lift the handle sideways with no problems.


Not only that, you can fold the handle back and forth.
Shield:

The physical shield for Freedom 2.0 features above
average amount of parts because of the extra design.


Again, it was another smooth build with no problems. I have added some Metallic Blue on some of the parts’ surface for some extra color. The shield doesn’t have any gimmicks but it’s really nice-looking because of the new detailing.


The only movable parts here are these connectors for the arms that can be folded back and forth.


There’s also a handle that can be used. There’s a slot
peg for the fixed manipulators and Freedom can hold on the shield.
Beam Sabers:

The beam sabers don’t have any separate parts and it
looks bland. I will add some metallic blue near the tip.

You can connect both beam sabers with ease, so that's a plus factor.

The beam saber effects also fit in nicely. I wanted it to
be in blue color but my beam saber effects don’t fit in on the peg. I don’t
want to trim them either so it stays as it is with the pink ones.
Railguns:

The parts of the 1.0 compared here to the 2.0 version are
practically the same. The only distinct feature is the detailing.


I have no problems here when I built both Railguns. They fold just the same with the 1.0 version and both have handles on the sides.

As for RoM, you can slide the Railgun (left, folded)
backwards this much. But you can’t move it on the front if it’s folded (right).

Articulation is still great and they are divided into
three sections.


You can attach the beam sabers on top of the side skirts.
But I kind of noticed that when you clamp the beam sabers, the other half of
the side skirt (white) tends to show a seam. So basically, the pegs are pushed
out when you place or remove the beam sabers. You might want to look into that.
:v
Action Base:

These are the parts to build the action base included in
the kit. But to be honest, I don’t like this design. It looks really bland.
Compared to the 1.0 version, it was way better because of the nice design that
resembles Freedom’s wings. It’s kind of disappointing Bandai didn’t retain even
this small adjustment to please the consumers. :/

Yeah it’s pretty bland and straightforward alright. -_-

Yeah it’s pretty bland and straightforward alright. -_-


This action base can only use two angles. The main stand is fixed and you can’t extend it further or shorten it.


This is the piece that will hold the bottom part of Freedom’s backpack unit.


As you can see in the image above, this clamp-like piece
has the same shape of the backpack’s design so it won’t shake.

Bandai has included this extra piece and it’s a connector
for the clamp.


This will allow you to connect it to other action bases
you have. I will use the action base from my Barbatos Lupus Rex because it has
more angles to give.
Now the problem I am thinking of is that the all of the
weight of the wings is carried by the clamp right? And the main backpack unit
is connected to the body. There is no support or anything from the action base
that will hold the body. It just relies on how it is fitted on the backpack. If
the body’s slot peg becomes loose, that might be a problem. The scary issue
here is the scenario when it becomes loose and you are not around when it
happens, especially if the model is placed on top of the shelf without any
cover. O__O
Well as long as you don’t pluck that backpack unit often,
it won’t loosen up quickly. :3
Decals:

Finally, my favorite part in building Gunpla model kits - decals! :D

This is my first time trying out a dry transfer from
Bandai and the quality is really great. I often check the quality by trying to
place the markings on the surface without the aid of any adhesive tapes. If the
marking sticks to surface quickly ONLY AFTER you tap on it with a blunt object,
I consider that as a good quality DSD. I will only use a few number of markings
mostly meant for the wings.

I bought a DL brand WSD so I can avoid the clear
stickers. Even though it is a Bandai brand, I still don’t like clear stickers
unless my client wants me to use them. This is my personal kit so I will not
use any clear sticker markings.

Quality is good but there were a couple of typos on the markings. They are not noticeable so there’s no need for me to cut them off. I did however fix and trimmed a few markings because the texts were “mirrored”. I already got the idea that DL brand just flipped the marking in their image-editing software without correcting any of them (rush workers like me). Also, I have added a few markings on the wings using leftovers from MG Strike Packs (Dragon Momoko). I carefully checked the markings first and cut the excess edges to make them fit on the surface.


And now that I am done with the markings, I will move to
the completed section along with the final photoshoot. :)
Completed Model:
Without the Wings:


Range of Movement:


Even with the final assembly, the articulation of the model is really great. First are the arms. The shoulder armor seems long but it doesn’t hinder the arms’ movement. The extra gimmick where you can extend the arms a bit does help.

You can twist the body to a great degree. You can’t
rotate the torso any farther because the skirts are in the way.

As for the legs, the articulation is still great even with the front and back skirts are in the way. If you can slide the railguns away, you can lift the legs sideways without problems.

Bending the legs doesn’t have any issues as well.


The great part is that you can do a kneeling pose. It’s
really stead and it’s not shaky or unbalanced which is an awesome factor on the
model’s RoM.

Here’s a comparison with the AG 1/144 00 Raiser. LOL XD
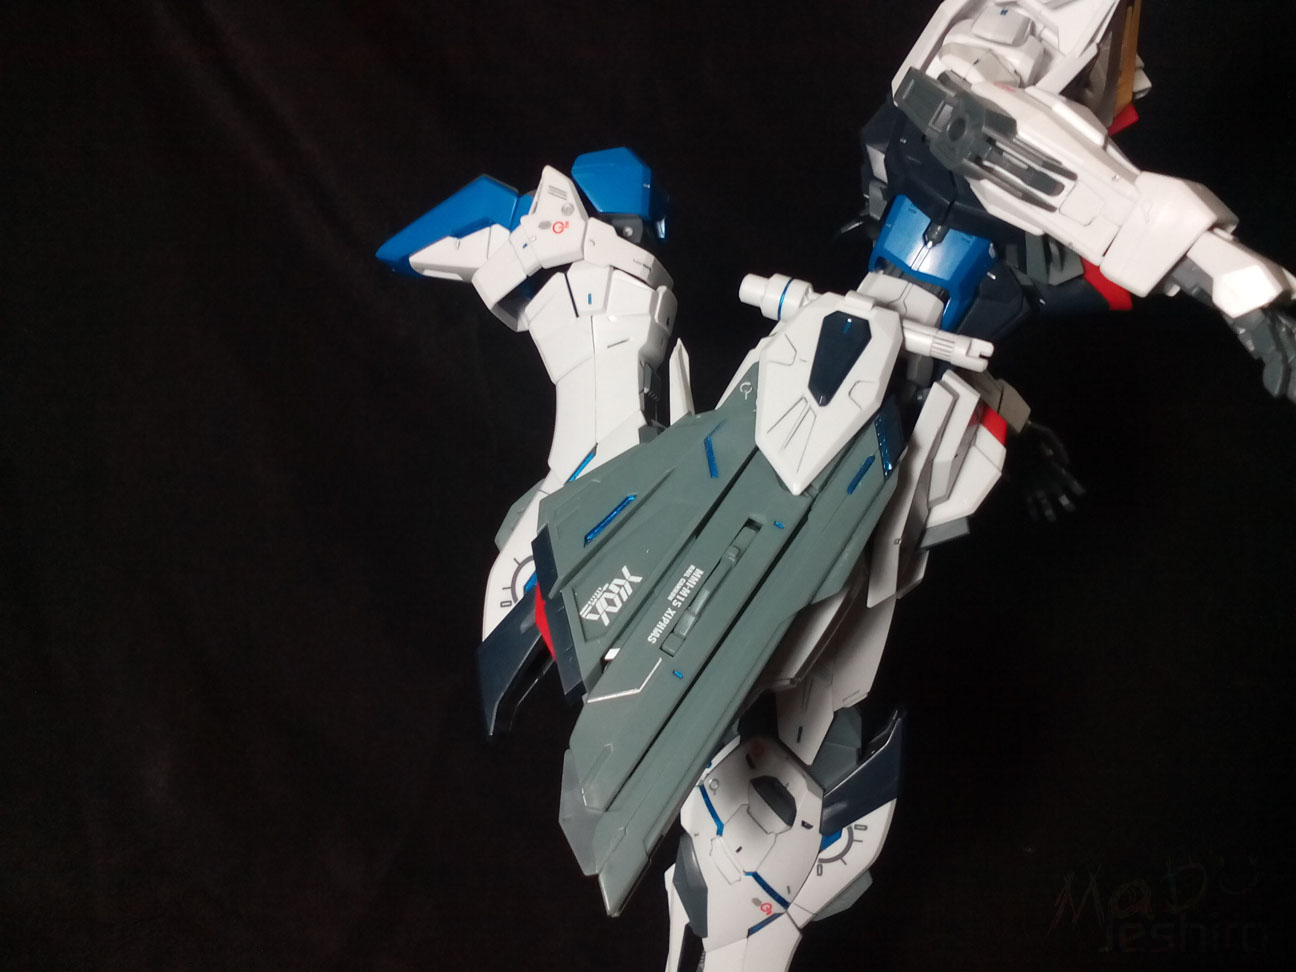
With Backpack Unit/Wings:


I used a clear rod because the model is already “back heavy”.
Close-Up Shots:


Action Pose Shots:


Now here's my personal rating for this kit..
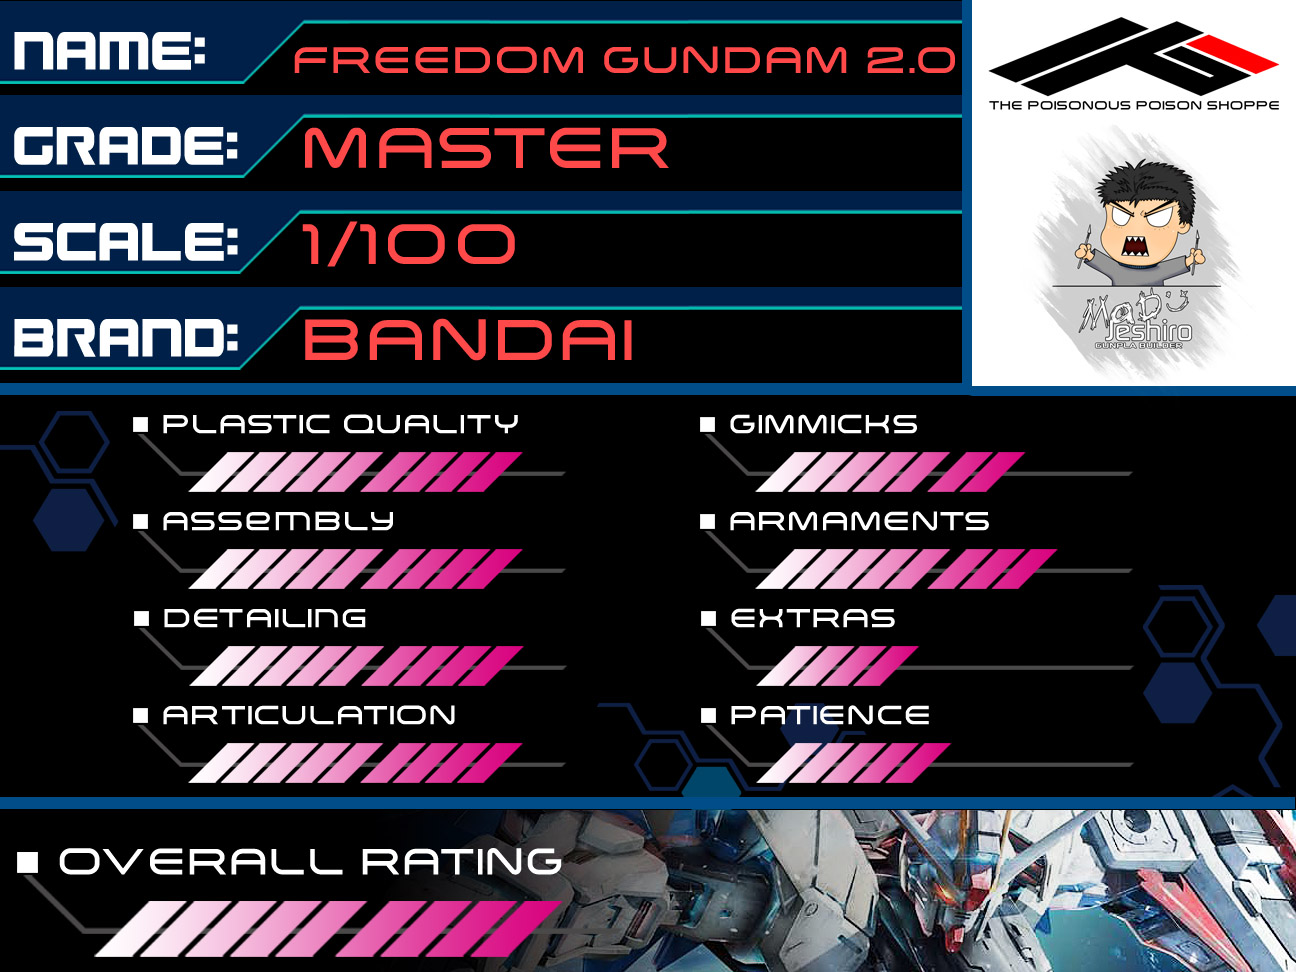
Plastic Quality: 9/10
The stress marks I encountered are not the sprue frame’s
fault but mine for cutting it too close to the surface. Overall, the plastic
quality is really great and that’s no surprise on the newer model kits released
by Bandai. The design they made for the “gates” to avoid large nubs is neat and
that helps straight builds having problems how to cut them off as clean as
possible.
Assembly: 9/10
Everything was easy and very smooth in terms of snap
fitting. However, it will take some time and it is a huge problem if you want
to disassemble each part, piece by piece and this can only happen if you forgot
to place a certain part or placed it in the wrong position. It happened to me
but only because I wanted to add a Metallic Blue on the surface. But I am
worried I might damage the edge. Even though the parts fit smoothly, its’
already a different story if you want to dismantle them.
Anyways, it was great and I will not change my rating
here.
Detailing: 9/10
It kind of breaks the original design of the mobile suit
that appeared in the series, but it is no doubt stunningly beautiful. I love
the detailing made here by Bandai. Of course, I still love the original design
from the Freedom 1.0. The added gimmicks also affect the model’s detailing
because builders would like to see something different from the original. The new
molding, new carved parts, notched surfaces, and extra panel lines definitely
shows the reason why it is called the 2.0 version. I really hope they would
make a Strike Freedom 2.0 someday. (>w>)
Articulation: 9/10
As you can see on each part and through the final
assembly, the range of movement this model can do is awesome. I am kind of
hooked with that near-perfect kneel and I am sure the model can do a perfect
split as well. The new mechanism on the arms and on the waist gives the Freedom
2.0 more extended angles for extreme posing.
Gimmicks: 7/10
For others, the new added gimmicks (on the wings) might
look few but it was more than enough to highlight Freedom’s beam cannons. The
other gimmicks I will count here are the inner frame mechanism on the arms and
on the waist’s male pegs where you can extend them a bit.
Weapons: 8/10
The armaments are still the same with the 1.0 version,
but they are already a lot for a single mobile suit. You have two large beam
cannons, two railguns, a beam rifle and two beam sabers. It’s not as many as
the Heavy Arms (LOL) but it’s a nice “eye catcher” if you spread out the wings
and show those weapons.
Extras: 4/10
There weren’t any extra items you can use. If I were to
count all of them, you have the connector for the back pack, the Kira Yamato
fig, and the fixed manipulators. At least, they didn’t forget the action base
even though it looks really simple. :/
Patience: 5/10
I think my rating here is just fine considering it is
still a Master Grade kit. It’s possible to finish a Master Grade in a whole day
but this isn’t a racing competition. There were no issues so you won’t have any
problems building it quickly or taking it on a slow routine.
Overall Rating: 9/10
It was definitely worth the purchase and I have no
regrets when I replaced my old Freedom 1.0 (Dragon Momoko) with this one. It’s
a nice model with a lot to offer. I would surely recommend this kit to
beginners who want to try out the Master Grade line, of course if they keep that
waist peg issue in check.
The model is also a nice “canvas” if you want to work
your new paint ideas into reality. With a lot of raised parts and a couple of
separated parts, I’m sure you will get a lot of nice color schemes for this
model. As for straight builders like me,
the extra separate parts and having a WSD is already a nice package even
without the paint.
For those who wanted to buy the kit but having a tight
budget and wanted the quickest shortcut, Daban Model is there for you with a price
half of Bandai’s. Of course, you will lose the gimmicks for those flaps in the
wings. And there is also a “loose peg” issue on the waist. These are minor and
easy to fix but I will still recommend going for Bandai. On the other hand, I
would recommend getting Bandai Fredom 2.0 and look for the bootleg special beam
effects. I think it also includes the metallic style WSD and that is really
nice.
I am looking forward to review the Daban Model Freedom
2.0, MG Avalanche Astraea (Hobby Star) and Daban Model 00 Raiser, as long as I
can get my budget in place. I also want to buy the MG Justice both for
reviewing and personal collection. There aren’t any new kits released by Daban
and Super Nova is keeping a lot of us waiting for their next kit. For me it’s actually
good news because I still have a lot of kits that I want to build. Once I get a
job, I will try to pick the 30+ kits on my wishlist and review them. Just bear
with me. xD
If you have any questions because I might have missed
them or just forgot to write them down, do leave them on the comment section. I
always check my email every morning at 7am to 8am (+8 GMT). If I have used any
wrong terminologies, do comment and let me know so I can change them for my
future reviews.
what did u use to panel lining it?
ReplyDeleteMechanical Pencil.. any brand would do.
DeleteI trim the tip so I can get a thinner line. It's also light than a pure black and a friend said it's better to use a dark gray panel line for white surfaces/parts.
that metalic blue?
DeleteOh no..
Deleteit's a brand called uni-ball signo..
it's a ball-pointed pen
thanks bro
Deleteok ba gamitin si uniball signo? pano binubura pag sobbra?
ReplyDeleteAny tips po ba para dun sa hip joint? According po kasi sa ibang reviews fragile daw po eh. Pinupush ko po kasi sa limits ung kits ko pag dating sa posing.
ReplyDeleteIsagad mo lang.. para sakin hindi naman siya considered na issue pero tama yung comment ni Andreas about sa design ng peg. And sana ginawa rin ng Bandai na ABS yung plastic...
Deletenakalagay sa review yung explanation and yung tips ko para dyan..
hmm... I thought your thigh connectors will break too because mine did :s (I built it really, really carefully tho)
ReplyDeleteI never noticed the design of the peg so probably my fault but Bandai should've mentioned it in the manual BUT I'd also like to say that it is Bandai's fault after all. I can say this because I also own Justice and Providence AND their male peg connectors for the thigh have DIFFERENT design from Freedom's.
The new design has a smaller tube at the tip, meaning they have size difference between the outer and the inner peg, like this for a simple illustration: ---===||
I have the same fear when I assembled Justice but I inserted it anyway, and disassembled it again after it goes inside and it didn't break at all or hard to remove. I even reinserted and bent it for like 5 times and it's all okay so yes this is Bandai's tiny but crucial problem. They might have the new tech but they didn't cross-check it when they sell it to public. If only the frame was ABS, it could be a different story bcs it would not break due to the harder plastic.
anyway, that's my opinion regarding the kit. aside from it's imperfection, yes this kit blew my mind too. every piece of it was worth it. people, you'll be disappointed if you don't buy this kit. it's a masterpiece.
Also, great job as usual! your OOB build is nice and clean, I really like it. I hope you can update your blog frequently too as I like to read your opinions on several kits. :(
Nice insight.. I think Bandai got a lot of reports from other builders to this peg design. And that may be the reason why they changed the pegs for both Justice and Providence.
DeleteThanks.. I actually got into several nub marks on the dark blue parts but most of them are just placed on the wings because the "gates" were too thick. Also, I don'ty have any sponsors so I can't review a lot of the new kits I want. I still can't find a job so I am running out of kits to review. :(
Just to give you a heads up..
DeleteThe next review will be Barbatos Lupus Rex 1/100 FM, followed by MG 1/100 Build Strike FP and MG 1/100 Universe Booster to form the Star Build Strike..
I have an old write-up of the PG 1/60 Tactical Arms II that might end up as my final review..
As for new bootleg kits, there are no news from any brands I know. :/
Yes, I have built the SF Daban. I have a review of it here including the WOL. I also have a review of the Dragon Momoko SF as well.
ReplyDeleteIf I were to choose, I'd say both but only on Daban's side. I don't mind the nub marks beucase they are still easy to dealt with. I like Daban because of its extra parts.
Nope. My settings are still the same. Just the lucky angles I guess? Thanks anyways. :D