

UPDATE 2017-04-21: Fixed some typos.
Introduction:
It felt like a celebration when I got the kit along with
the Destiny [Heine Westenfluss], but it was also a challenging one. I’m sure
other builders who take kits from their clients or customers have several
occasions where they also want that same kit. I also had few thoughts why would
I put all the effort in that model if I can use all my ideas to my own. Well you
just have to do your best to put all of your skills into the model you really
like even though it’s not yours. And this issue happened to me a lot especially
here in Strike Freedom ver MB. I love the model so much that it actually hurts me
like it was a kryptonite. LOL
But I am glad because I can finally review the kit and it
was a “solid kit” indeed. I haven’t tried building Daban Model’s version so I
can’t say who has the upper hand in terms of overall quality. I will expand the
word “solid kit” here on each part like I usually do. Of course there are still
issues and there is no smooth build from start to end within Dragon Momoko’s
line, unless there were kits that don’t even have the tiniest issue.
Again, I am still bad with photography and some of the
pictures were blurry even though I took a lot of shots to get the best result
out of the many. I am not that good in English so there might be some several
typos I forgot to fix. As for terminologies, please do correct me because I am
just using all the information I know so far. If there are information written,
I always state that it isn’t mine.
Unboxing:

We have been familiar with Dragon Momoko’s boxes and they are usually white with the finished model standing on the left or right side of the box. But in this particular model, Dragon Momoko decided to make a sudden facelift on their box art. It now has this design that you usually see in Bandai. The name of the model is there but without the word “Gundam”. You can even see the Akatsuki Gundam in the background with the same design from their released model kit.

But if you look behind the box, you will see the close-up
finished model of Strike Freedom. I’m not sure if this was already painted
because the gold inner frame seems to be shiny compared to the gold sprues
inside.


The model with its gimmicks and other features are seen
on the sides of the box. So yeah, the box art was the only thing changed here
by Dragon Momoko.

After removing the brown box inside, I noticed that they
are still packing 4 sprues in a single plastic bag. But it was neatly packed,
compressed to be exact, so there were no parts scratching on one another. Here
are the contents of the kit.


There are 13 plastic bags, 2 of them are small where the
beam shield effects and decals are packed. Let’s take a quick look at the
construction manual first.


The front page is showing the finished Strike Freedom and
you get to see the rear view of the model on the last page.


When you open the first 2 pages of the manual, you will
see featured action poses and gimmicks for the model.


And on the two to three last pages of the manual, more of Strike Freedom’s dynamic poses can be seen. This is also the first time Dragon Momoko included the WoL or Wings of Light feature for Destiny Gundam in the same manual. I think it was just alright since the first manual for Destiny doesn’t have images for its WoL.
The next images will be the sprues and other contents out
of their plastic bags.
Sprues:


I took some pictures of the list so you can check them.
|
|
|


|
|
|


|
|
|


|
|
|


|
|
|


|
|
|


|
|
|


|
|
|


|
|
|


|

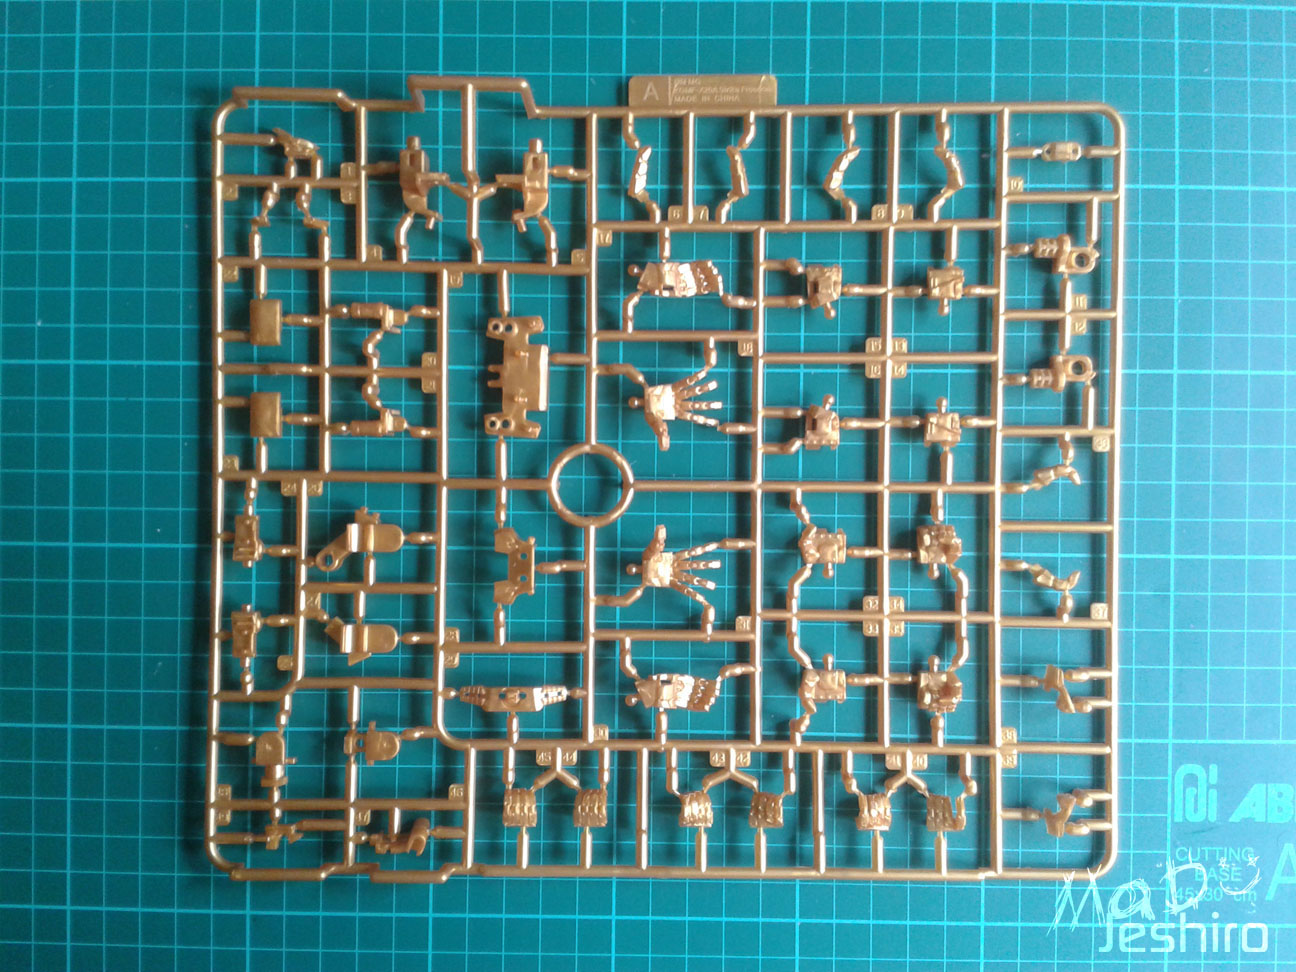
The color of the yellow sprues isn’t bad, but it is not that good either compared to the gold-plated parts of Daban Model’s Strike Freedom. Although, this is far better than the TTH Strike Freedom and the Daban Model PG Strike Freedom. The yellow sprues have a nice glossy finish or coating similar to the first Destiny MB they have released before.
As I recall, the parts for the body is supposed to be
dark blue. But you get black sprues for all of those parts including the wing.
I also love the glossy finish and smooth texture of the parts in the white
sprues.

Not a big deal for me, but it’s kind of embarrassing for
me to see this embossed text on the sprues’ label. You will see the model name
but also the phrase “Made in China” as well. LOL

Instead of the usual launch pad, they included the white
pedestal with this nice detailing.


The kit also includes a huge amount of foil stickers and I will use them on the beam cannons or DRAGOONS. Plus you get two sheets of waterslide decals where one of them features a metallic finish that looks really cool.

And you get the wobbly thin plastic effects for the wings. I would like to remind you guys that I will not include any
pictures of the Wings Expansion kit or WoL pack in this article and I will put
them on a separate post.
Pedestal/Action Base:

Here are the parts for the action base. Yes, you will not
see the word “Fighter” here which is a nice move from Dragon Momoko. Not bad
for parts separation and detailing looks amazing.
For some odd reason, I can’t seem to find the pictures I
took for the finished model of the Pedestal/Action Base. What I can tell about
it is that there’s a button of some sort that can be pushed on the left. And
when you do, the male peg will move on the right side and you can push it
again. This mechanism allows you to lock the main male peg where you can attach
the connectors for SF or the clear parts for the DRAGOONS’ mechanical
rods/arms.

Here are the main parts for the mechanical arms. You will
have to build eight of these and I only added two on them in this picture. The
joints are very tight and the quality of the clear parts isn’t that good and
it’s quite fragile.

Here’s what it looks like when finished. The mechanical
arms will be in a circular pattern when attached on the racks. You may need to
adjust the mechanical arms once you have completed the model in FBM (Full Burst
Mode) to get the correct angles.
Head Unit:

The parts separation here is average in my opinion and
you don’t get a separate part for the CIWS or the parts for the vents on its
cheeks.

I love the detailing though and you can see the panel lines
on the back of its v-fin. Maybe a little gold coloring could do some good here.

Instead of applying the foil stickers here for the eye
sensors, I used my Uniball Signo Gold and Uniball Signo Black. I love the
outcome after drying the ink. :D
 |
 |
 |
There were no snap fitting issues here and everything
fits perfectly fine. I also used my Uniball Angelic Blue on those forehead
sensors.

I’m supposed to use my mechanical pencil here but the
plastic is quite smooth or glossy, so the lines were not that good. I don’t want
to use the 0.05 pen because it looks too thick and I don’t want to ruin the
model with too much black panel lines. I don’t think using a 0.03 pen would be a
good option either.
Body Unit:

Nice parts separation is featured here in the body and I
am already wondering in Daban Model’s side. I wanted to add some extra
detailing on the yellow inner frame parts but the panel lines or engravings
aren’t as sharp as I expected it to be.

As for issues here in the Body Unit, just a few tight
pegs here and there. These parts for the body are quite tight. The encircled
section shows that you will have a difficulty inserting male peg A to female
peg B.

Another issue I encountered here that could be an
isolated case is the seam here in the abdomen. I pushed the part just enough to
fit them together but it seems to slide back. I don’t have any idea what’s
causing the problem and I just let it be since the seam isn’t that big.


That’s about it when it comes to its issues and everything is fine. I love the detailing of this model and I am looking forward in getting a Daban Model version of this.


The articulation of the body features good range. First is that you can move the main male pegs for the arms outward. This gives you extra length and movement range for dynamic poses.


The second one is the abdomen which is a common feat
among Master Grade models. You can tilt the body sideways or bend it forward
and backward.


And third is the collar that can be tilted left and
right.
The body doesn’t have any cockpit hatches and that means
less gimmicks here in the body.
Waist Unit:

Unlike my review for PG Strike Freedom, I didn’t include
the rail gun parts here. There are no inner frame parts on the front skirts so
you are looking to a not-so-remarkable parts separation.
Same with Destiny ver MB, you also need to build this
along with the body unit. Yes, the waist unit is locked into place and
connected to the body unless you need to correct some errors or paint the model
after a quick snap build.

I would like to remind you guys to check the polycaps in
this section because they are molded to lock into place on their corresponding
pegs or joints.
 |
 |
 |
So here’s the Waist Unit and it doesn’t feature any
visible yellow parts. I will add some gold detailing here later.


The articulation here is not bad and it makes up for the
lack of detailing. You can lift the front skirts this high up. These front
skirts are also separated into two parts and you can spread it wide as seen on
the image.


The back skirts can be lifted this much which is way
higher than the front skirts.

Just like your usual Strike Freedom, it features a
gimmick where you can pull down the back skirts. This will enable the rail guns
to move behind and you can attach the beam rifles on the sides.
There are no loose parts here and you just get few tight
parts. It’s very quick to build without any issues.
Arm Unit:

So here’s the finished arm Right Arm and the exploded
parts view for the Left Arm. The parts separation featured here in the arms
felt like a HG kit. It was few in my opinion but is alright if you want to
finish the kit quickly. You also get to paint fewer parts as well.
Before I show the articulation, here are the issues I
have encountered. They are not totally issues related to the arms but it can
make the building process a problem. If you still recall what I said on PG Unicorn about
Dragon Momoko’s construction manual having wrong information, then this is
section has two.
 |
| Exhibit A |
I followed the manual carefully and I saw that this gray
part doesn’t fit well but the manual does show it's supposed to be like this (A).
 |
| Exhibit B |
Then I found out that the position of that gray piece
should be like this (B). What a lazy move for DM not to check the manual carefully .
:/

The second one is this part of the wrist. If you rely too
much on the construction manual, then you might end up disassembling it here.
Please take a look at the picture and remember the encircled part on the
manual.

Here, you will have to do this twice.


Now when you look at this part of the manual for the Left
Arm, it has the same drawing for the Right Arm. The part H1 will not fit
because it’s supposed to be on the other side. Well it is kind of my fault to
follow the construction manual “by the letter”, but it is not the builder’s
fault too when he/she doesn’t understand that something is already wrong in the
manual. :/

This clamp is also fragile and you can’t avoid having
stress marks here once you attached the gray flap here. I am not sure if it is
advisable to sand the peg before attaching it here but extra caution is needed.

Another factor I
wanted to point out here is the lack of parts separation. Before this was
released here in the Philippines we got images where Daban Model’s boast good
parts separation. If you look at the image above, Dragon Momoko managed to mold
this tiny yellow piece (A) yet they didn’t try doing the same thing for these
parts (B). Instead, Dragon Momoko wants you to apply foil stickers which is really
lame.
 |
 |
 |
So here are the finished arms. I removed the MX-2000
piece so you can have a better look.


As you can see, articulation is great with or without the
MX-2000 beam shield part. The wrist can be bent this much and bending the whole arm doesn't pose any problems.
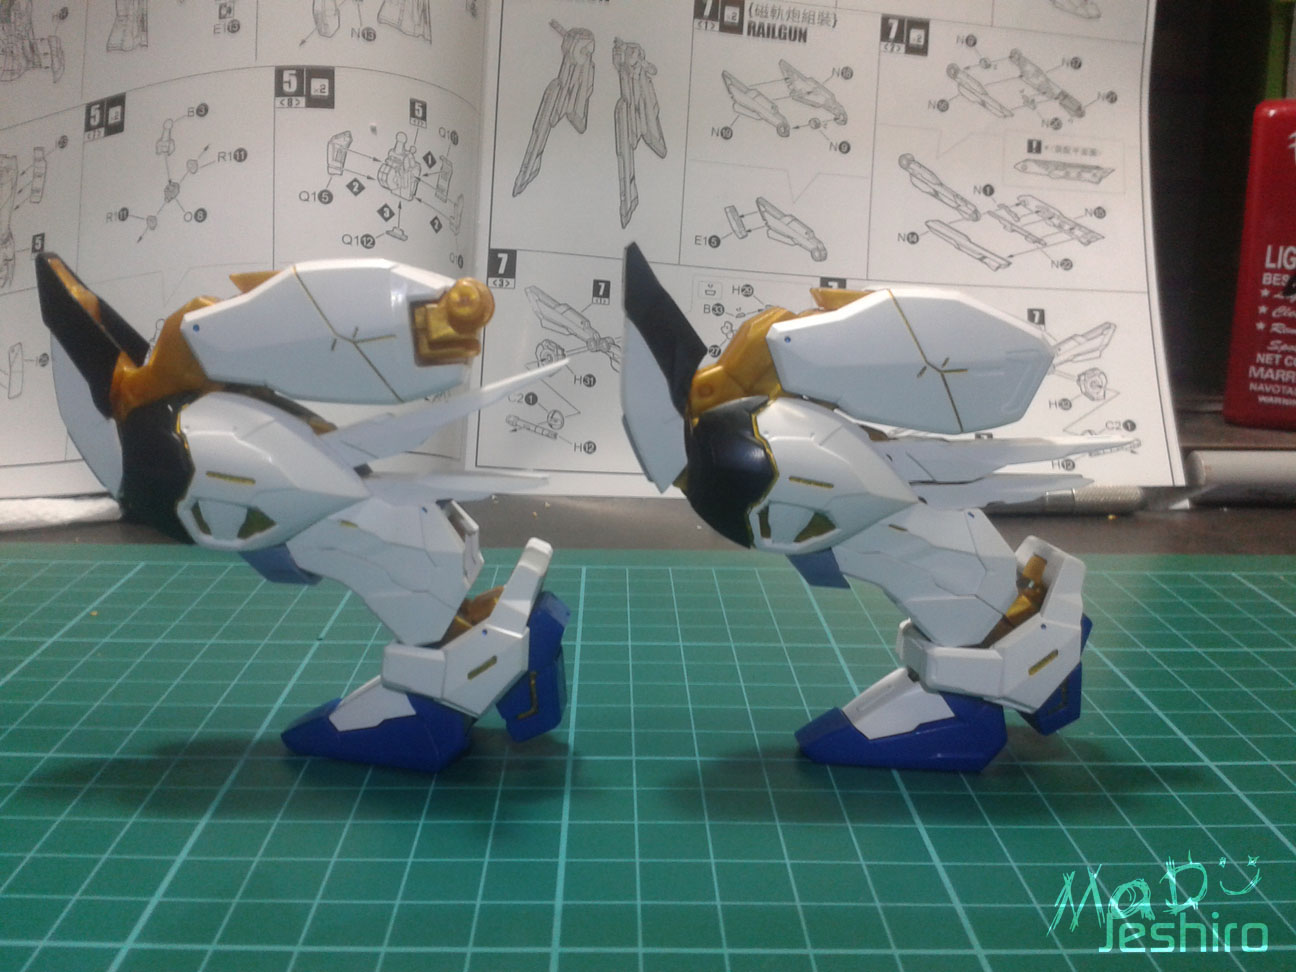
Upper Body Unit/Shoulder Armor:

Parts separation here is average in my opinion and it
doesn’t feature any good gimmicks compared to PG Strike Freedom.
The only issue here are those blue and yellow parts
(encircled) because they were quite tight and you might get some stress marks
here. Applying a thin layer of super glue would do the trick if and only if the
pieces get loose or you don’t need to paint this.


The finished Upper Body Units looked plain if you are not
going to use the gold foil stickers. I used my Uniball Signo Gold here instead.

Same with the Destiny ver MB, the Upper Body Unit
features excellent articulation that can extend the range of the arm’s
movement.
So that’s about it for the arms and we’ll move to the
next.
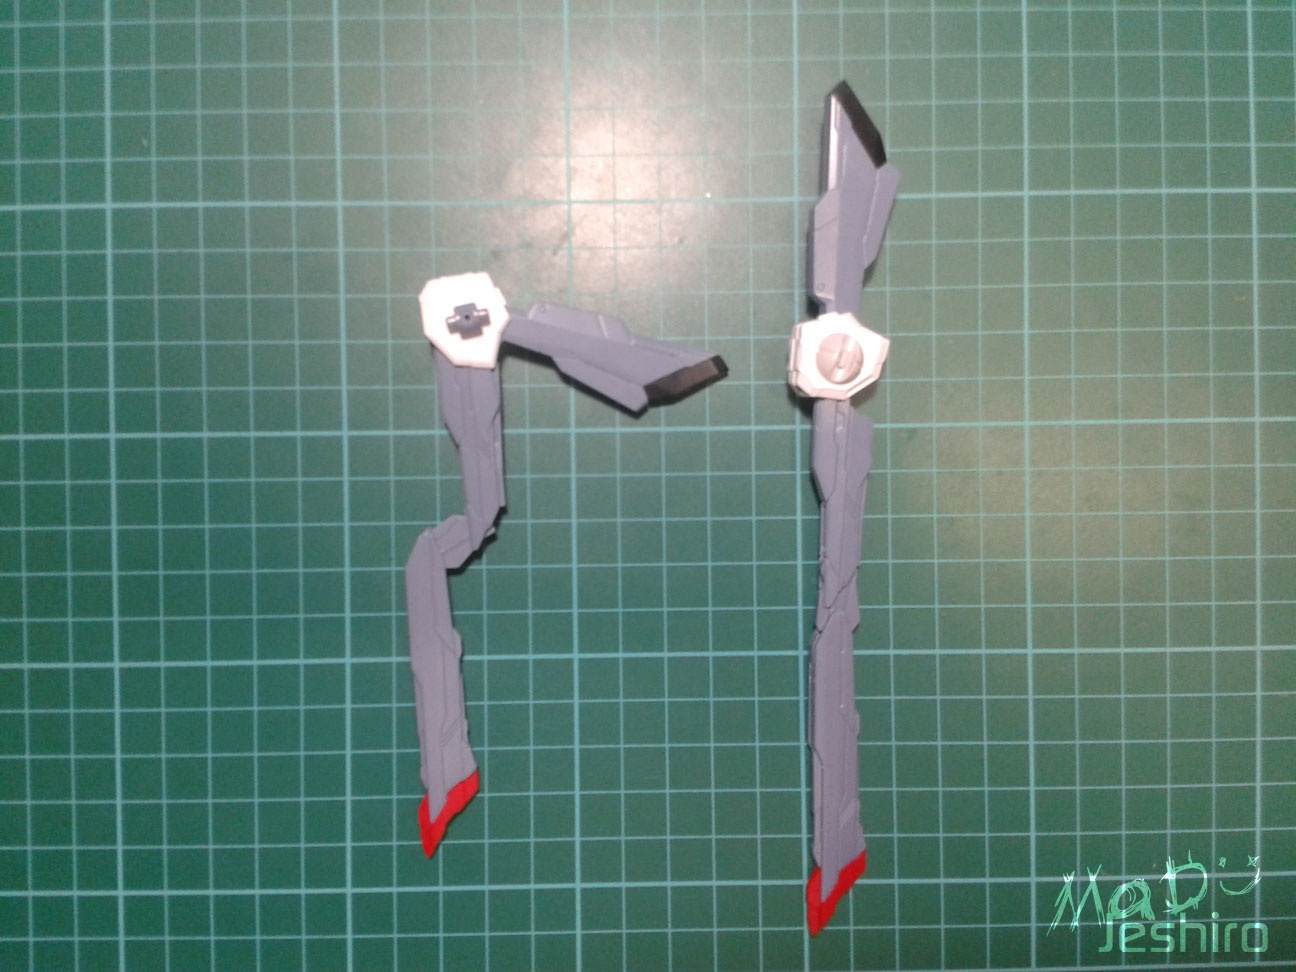
Leg Unit:

Here are the parts of the Left Leg and along with the
finished Right Leg. The parts separation isn’t bad but it’s not that good
either to highlight the gold or yellow inner frame inside.
There aren’t any major issues here and you will just
encounter the tight pegs here and there when building the parts for the Inner Frame. But
for the outer armor, it’s a breeze and everything fits nicely if you have built
the Inner Frame without seams.

I would like to share another reminder here. This polycap for the ankle is different from the other ball-joint type polycaps you will use. The common
ones, doesn’t have an opening at the back and this could lead to errors. If you
can see in the image, there’s some sort of ribbing inside that will hold the
ball-joint peg.

This part is also tight and you might want to scrape the female peg of this part (A) a bit to insert it here in the PC (B).

And because you are greeted with foil stickers here and I don’t like using them “as much as possible”, I have applied some gold on these parts using my Uniball Signo pen. I will dry it up and clean it with my nail buffer.
 |
 |
 |
Another thing that kind of put me in dismay is the lack
of gold parts for the inner frame. Here I had to carefully add some gold
detailing.


Here are finished legs and I am sorry if they are blurry.
:v
Anyways the articulation here is good and you can see in
the image in their limits when you try bending them.


Also, can someone please explain the use of this part? LOL
I keep on seeing this on several kits but I still don’t
have any idea what it is for.


Aside from your common movement, the thruster flaps behind also features a unique gimmick. If not pulled down (A), the flaps are higher. And when you pulled it down (B), the thruster flaps are almost near the foot. There’s probably a change in movement range when you do this.
So yeah, I consider the legs to be an easy and smooth
build.
Weapons:
Rail Guns:

So these are all the parts for a single rail gun
including the beam saber. It was kind of disappointing that it lacks detailing
and I expected some inner frame gimmicks here or at least a few more gold inner
frame parts. Still, the panel lines are great and you can add some gold here
for extra detailing.

The articulation is also great and the rail guns are
divided into 3 sections which is kind of same with the Freedom. I don’t know
why Bandai made it to look like this instead of the usual 2-parts but it was
still cool and blends perfectly for Strike Freedom’s physique.

The beam sabers is still attached to the sides of the rail
guns without any issues.

Another reminder for you guys to take extra cauition when attaching the rail guns on the sides of the waist. The clamps were tight and mine got visible stressmarks after attaching the weapons.
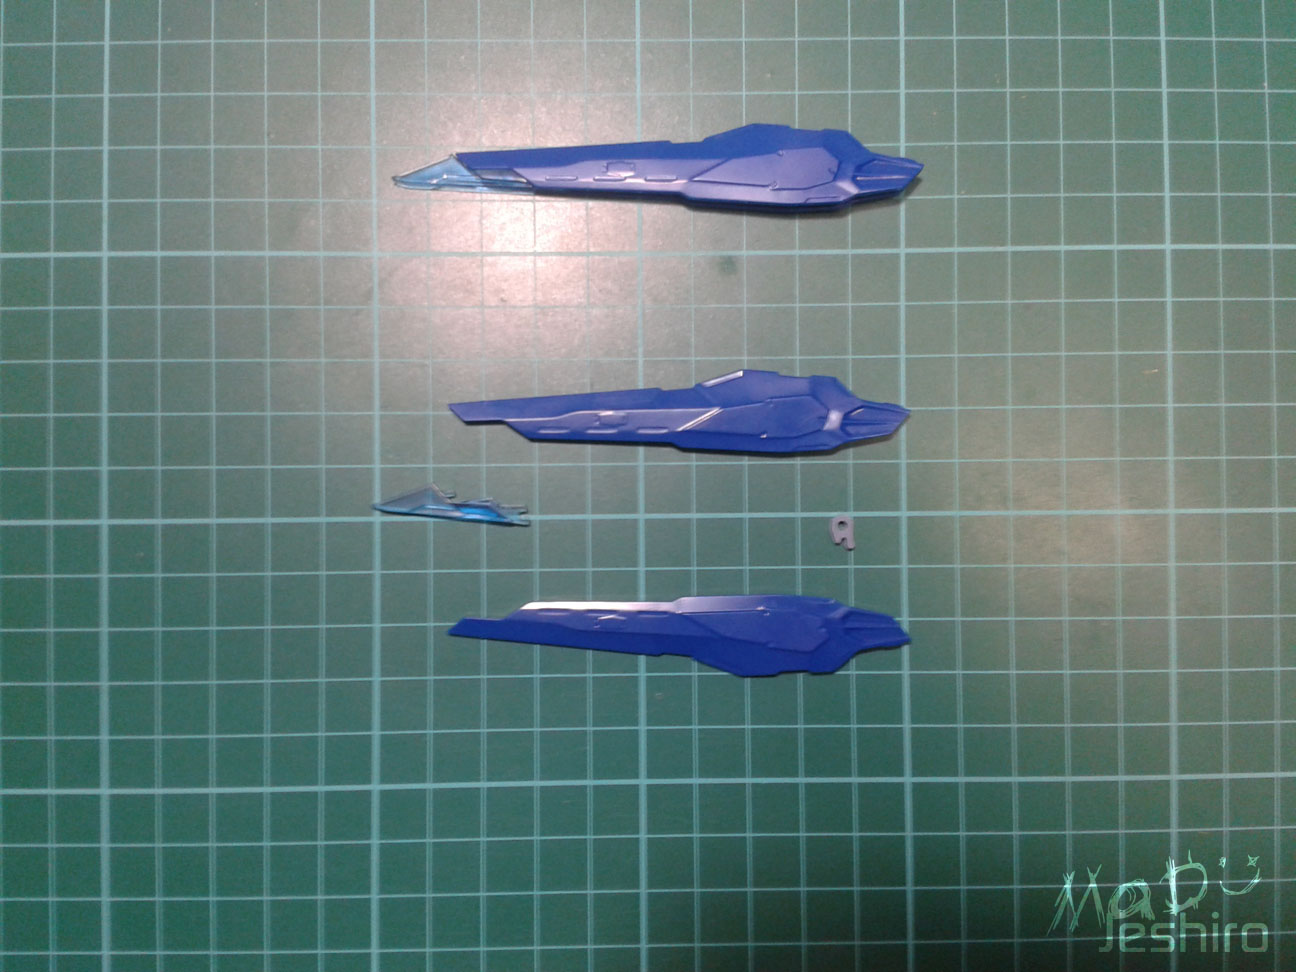
Beam Rifles:

The parts separation here is above average probably
because of the gimmicks it can feature.


As for the gimmicks or feature on the beam rifle, the
first one looks like this when all parts are slided out. The upper sensor (A)
can be pushed down. This little piece (C) can be rotated so that you can clear
the slot on the back end. The frontal
parts can be pulled to extend its length. As you can see, the nozzle (B) and
the lower part (D) are pulled out to add length.


The second rifle or the Left Beam Rifle also features
gimmicks but not as complex as the Right Beam Rifle. Only the rear part is
pulled out to extend its length. it is divided into 3 sliding parts as you see
in the image.

The issues here were just minor in my own opinion. The
first one is that when you connect the two beam rifles together, this small piece
from the front rifle tends to hit the nozzle of the rear rifle. The other
issue is that when you pull the rear part of the Left Beam Rifle, a visible
seam tends to happen.

Same with any usual Strike Freedom, you will get a really
long beam rifle once they are connected together.

So that's it for the two rifles and the backpack is next.
Backpack Unit:

These are the parts for your backpack unit along with the
2 connectors that will hold the wings. They were quite few but the detailing
makes up for it.

I didn’t encounter any big problems here aside from the
tight pegs. The backpack doesn’t have much gold to show off so I applied some
using my usual gold pen.
On the thrusters, I applied some metallic blue on those ridges and I love the outcome. I also applied the same blue on the vents of the rail guns..
 |
 |
 |
On the thrusters, I applied some metallic blue on those ridges and I love the outcome. I also applied the same blue on the vents of the rail guns..


The backpack features 2 thrusters and they are
articulated so you can move them to a certain angle. The lower part can be move
this much.


The larger upper thrusters can also move up and down to a small degree.

The connectors don’t have any snapfitting issues and it’s
a smooth build. The main male peg can move almost near the 180 degree, probably
a range of 177 to 178 degrees.
Once done, the first impression bumped into my head is
that the color scheme is somewhat similar to Unicorn Banshee. :v
 |
 |
 |
Good news that you can rotate these connectors (Left and Right) without
any problems.
Beam Cannons/DRAGOONS:

Looks like you won’t get bummed in building 8 of these because there are only less than 5 pieces to build in each Beam Cannon. There are 4 small Beam Cannons and 4 larger ones.

Here’s a comparison of the two Beam Cannons with their alternate nozzle-like parts.


Yes there are two types of nozzle-like pieces that you
can use. The first one is the same blue color of the Beam Cannons and the other
is in a clear blue or semi transparent mold. Of course, I picked the clear one.
:D

There were no issues here but the lack of detail and
parts separation was a real disappointment. Well you can add some gold
detailing here and there but it’s not enough to make it less plain.
What’s worse is that I need to use the foils stickers to
add some detailing. I wanted to use my gold pen but because the vents are too
bare, I fear that I might touch it accidentally and spread the ink on the body.


The good news on the on other hand is that the kit
includes beam effect parts. You just need to remove the nozzle-like pieces to
attach them.
So that’s it for the DRAGOONS or Beam Cannons.
Wing Unit:
The wings are also divided into two sizes; the large and
the small wings. The smaller one is seen on the front and the larger one is on
the back.

So here are the parts for the large wings. The finished
piece is on the right and you can see all the pieces needed here in the right.
Parts separation is so-so and it still lacks some good amount of separated
parts here.

I needed to use the gold foil stickers again to add some
detailing.


Articulation isn’t bad and you can stretch the wings this
much.


You can also move the upper part of the wing and move it
like so.

If you noticed the clamps (encircled), try to be cautious
when attaching the beam cannons or removing them again. The yellow inner frame
seems to be fragile and tends to break after removing/attaching the beam
cannons several times.


Here’s what they look like when the beam cannons are attached.

Now this is your small wing unit and the exploded parts
view on the right side of the cutting mat. Just a little change in size but the
parts are similar to the large wing unit.


The articulation is the same where you can stretch the
wings and the upper part.

After attaching the beam cannons, the design is the same
with the larger wing unit.

One of the gimmicks here is that you can slightly lift the
beam cannons to show some of those gold or yellow inner frame parts. There were
no bothersome issues and you will just have to bear with the tight pegs here
and there. Everything is okay here in the wings unit. :)
Decals:

I love the metallic waterslide decal sheet and it suits
the Strike Freedom ver MB. You get to use two designs or fonts for the beam
cannons and there are also extra logos that you can use.


The other waterslide decal features some of the markings already seen on the metallic one. Of course I will use the metallic markings so you can improvise where to use the rest. I would like to point out that these caution markings doesn’t have any copies in the opposite direction (encircled). All of them are pointed to the right. Surely, you can use them as a seal for any left or right part, but the problem is that they don’t have another left or right set of markings/seals to use. :/

I also got a small gift from dad and he bought these
tweezers for me. :D

The battle continues and I still have lots of markings
left on the sheet.

I you remember what I did on the PG Unicorn, I used
several markings to combine them and
create a new marking. I will place this on the right shoulder armor.

Here’s a closer look on the markings I am going to use.
The sheet has a “Strike Freedoom” and I thought it would be nice to use the
text by simply removing the extra “o”.


I’m finally done with the decals and you can see the
result of the improvised marking on Strike Freedom’s right shoulder armor.
Extras:

Just like the Destiny ver MB, you also get a set of fixed
manipulators that can be used on different poses.

I will count the beam saber effects as part of the extra
as well. LOL

And the beam effects for the DRAGOONS which is cool once
you set the model in FBM or Full Burst Mode.
Completed Model:
Without the wing unit:


With the wing unit:


Articulation Test:
Range of movement is satisfactory for my taste. The arm can be move this high up with the shoulder armor attached.


You can bend the arms like this without any problems as
well.


The polycaps on the ankle isn’t tight so balancing the Strike
Freedom with just one leg is really difficult. I used my empty buds container
to show the range of movement for the legs. As you can see, the articulation is
great even though the front skirt is in the way.
And these are the rest of the pictures I took. I would
like to apologize if some of them were blurry or out of focus. I don’t have a
mini tripod and I am just trying to hold my cellphone as steadily as possible.
:/


Again, I will not post any poses where the Wing Expansion kit is attached or featured.
So here are my ratings for the Strike Freedom ver MB of
Dragon Momoko
 |
| Design based from GDC card |
Plastic Quality: 8/10
Dragon Momoko never ceases to surprise me with their good
quality even though it’s a bootleg brand. I didn’t encounter any flashes at all
and everything is smooth and glossy. There were no bad moldings or factory
defects here or maybe it was just a lucky pick on the box. Some of them are
undergated which also adds a nice feat to the kit.
The yellow sprues or parts however were not that good. It
seems they were quite fragile or “chalky” and tends to break so easily. Even
though they have a bad quality, I am still giving this an eight.
Assembly 8/10
Only the Inner Frame parts were quite troublesome because
they were tight. But I mentioned this on the other articles that this issue is
considered to be a minor problem. It is a common issue among bootleg brands.
Then why the high rating you say? It’s because if you know how to handle a common tight male-female peg issue, then the rest is easy. Plus, the outer armor fits perfectly without the need to push them hard. I had to use super glue on some parts but that doesn’t mean snap fitting is bad. I was just being cautious and the model is planned to be a straight build anyway. For me, snap fitting is good for this kit and it deserves an eight. :)
Detailing: 7/10
It’s in Metal Build design so there’s no need to question
the detailing here. Although the model could have been a lot cooler if Dragon
Momoko added the same parts separation like Daban Model did. I’m supposed to
give it an eight but the lack of parts separation, not to mention the huge
sheet of foil stickers pulled it down in terms of detailing.
Articulation: 9/10
For me, the movement range is far better than I expected.
It can do a lot of dynamic poses as seen on the construction manual. Even with
the wide rail guns and skirts, the leg’s movement range is impressive. The arms
may not be able to do the things Perfect Grade can do but having to hold the
two connected rifles without problem is already a plus on my rating.
You get a lot of movable parts on the arms and on the
body that makes it really fit for extreme movements. Just do not force the
limits of its articulation as it may risk breaking any joints or parts. So
yeah, this section also deserves a good rating for the articulation.
Gimmicks: 6/10
It was quite few in my opinion but there was no need to
add more if the focus here is the cool detailing and physique of the model. But
it could have been great if there were any added gimmicks to the body like a
cockpit hatch.
Weapons: 7/10
I think the rating here is just fair considering all the
weapons of SF we already know. I mean there is no need to expect any extra
weapons. I just put the detailing factor and gimmicks here because it also
affects a weapon’s uniqueness. The rail guns were cool because of the 3-fold
mechanism. The beam cannons can use beam effects on their tip which I consider
as part of the gimmicks. What I really like is the beam rifles that show a lot
of movable parts to make it look awesome. :D
Extras: 5/10
I am giving it a 5 simply because there wasn't that much to add as part of the extras even though we get the assorted fixed manipulators and beam effects for the DRAGOONS. Or maybe I am expectign too much again because this is one of the mobile suits I really like. :v
Patience: 5/10
There may be a lot of beam cannons here but there were
few parts for each unit, thus making it easy to finish. If I weren’t that busy
or if I was just burning my time, I could have finished the model in two or
three days. There are Pros and Cons with this matter. Of course it is nice if
you can finish the model quickly and display it on your shelf for friends to
see. But there are also other builders out there who wanted to build because of
the challenge the kit can offer. For my side, I do like a little challenge and
I didn’t got that factor in this kit to be frank. But at some point, this is a
good kit for beginners or any builders that wants to get their model done as
soon as possible.
Overall Rating: 8/10
There may be some negative factors but I will admit that
I enjoyed building this kit. First of all, this was easy to build and I had no
problems with snap fitting. Second is that I love the articulation this kit
features especially when I try to move the arms and legs. And third, there were
no problems cleaning the nubs because most of them are undergated. Actually
it’s not “most” because it was like 90% of the parts were undergated if I
recall the sprues correctly.
Of course it can’t be avoided to complain that it lacked
a little detailing because of the few parts but this is a good test to try out
some detailing techniques you might not have done before. Masking may also be
an option here for those who want to hone their skills in painting.
If someone asked me if this kit is recommendable for
beginners, I would say YES only if that builder already tried building at least
1 or 2 Master Grade kits. But I see no problem if this is to be your first
1/100 MG kit as long as you’re careful and already know the basics about common
bootleg issues. Just try to think “out of the box” so you won’t get any
problems with the issue of wrong drawings on the manual and other problems like
that.
This is a great kit and I am looking forward what Daban
Model has to offer in their version of Strike Freedom ver MB. I just hope I
have the funds to get one because it still pricey here in Philippines. :/
I can’t remember if I have missed other factors in this
kit and any builders who will read this review can share their experiences on
the comments section below. I will be honored to edit the article and place
your tips and concerns related to the mentioned kit. :)
The next article will be the Destiny ver MB [Heine
Westenfluss] but I will not feature any exploded parts view.
I have a couple or projects in line again thanks to my friend and client. The 4 kits on the left are from him, and all the Bandai kits are mine. I got this back August 2016 and still I haven't started any of them. I am supposed to sell them too due to a financial crisis on my side. Fortunately, I received some help from close friends. So yeah, that means I need to get some extra time to build and feature them in my blog.


I have a couple or projects in line again thanks to my friend and client. The 4 kits on the left are from him, and all the Bandai kits are mine. I got this back August 2016 and still I haven't started any of them. I am supposed to sell them too due to a financial crisis on my side. Fortunately, I received some help from close friends. So yeah, that means I need to get some extra time to build and feature them in my blog.


Also, have a look on our Gunpla-related Facebook page
- Click
Here
you build the daban version ? can you compare two versions ? what is the best ?
ReplyDeleteNo I haven't and I am trying to get the kit before GBWC ends and that's in October 15th (Awarding).
DeleteI'm getting a lot of votes for quality if I were to mention Dragon Momoko. But in terms of detailing, Daban Model gains the upper hand. The reason why Daban Model was put down to a low rating in terms of quality is because of their decision to produce gold plated parts that that creates very visible nub marks.
But I were to pick between the two models, I would go for Daban Model. I really like kits with a lot of parts to build.
I was thinking of getting the momoko dragon kit, and then painting with metallic gold, since that yellow is not very nice really. As for the fit of the wings, which is better? I saw some reviews that dragon's momoko breaks easy.
ReplyDeleteAre there someone still selling this kind of kit? Dragon Momoko brand?
ReplyDeleteNot sure. I checked shoppee.ph just now and all they have are the ones from Daban.
Delete