

Introduction:
This kit was mentioned to me by my client last month of November 2016 and I was really excited because this is of one of the kits included in my “wish list”. After setting the schedule, I hurriedly picked it up. But there were certain problems to deal with on my side so it took some time before I got started. The PG Unicorn from Dragon Momoko was on its way as well but meeting up with the seller was a bit hazy. The PG Unicorn was supposed to be finished by the end of January, but it seems the PG SF will take the lead. With the consent and suggestion from my client, I started building up the kit.
A reminder though that just because the model is already finished doesn’t mean the article or my post is just as fast the same time I built it. Personal problems and other things to deal with always hinder my activities here in my blog.
The feeling was weird though (LOL). I’m supposed to be happy because I got the chance to build it but I was somehow envious my client got it first. It felt like I was building a statue made out of kryptonite. But instead of getting disappointed, I just focused on building the kit.
And again, I would like to apologize for the not-so-good picture quality and the typos you might notice. Corrections are welcomed and I will fix them up when I see them. :)
EDIT (2021-01-23): There was a confusion regarding on how I talk about this kit, and that led to a certain reader who thought that I was saying this is Bandai. Let me point out that Daban Model copied Bandai's kit, runner by runner, piece by piece. So basically, you're looking at a replica of what Bandai HAS TO OFFER or at least what are the things you can possibly expect on what Bandai already has. It was never my intention to say that this was Bandai to begin with. I also added LONG LONG LONG TIME AGO in the middle of the article about this matter too as a reminder. Either they skipped reading the article or just scrolling down really fast. Seriously, my reviews looked like a novel. LOL (Minsan kasi, may mga mahusay magbasa pero mababa comprehension eh :/ sad life).
Another thing, I mentioned halfway about this issue. So the person was just trying to find flaws against me. (sige lang. dyan ka masaya eh :v )
Unboxing:


The box was really nice and Daban Model sure did copied most of the basics. Of course, they changed the word Gundam to Fighter which is a noticeable factor when someone tries to be a troll and says the kit is a Bandai one. Unlike the previous kits, this one has a handle on top. And I think the box of PG 00 Raiser is bigger than this one.

There are 2 manuals inside – one for building the whole unit and the other is some kind of background info about the Strike Freedom. But the second manual has the instructions for the markings or seals. The kit has 54 sprues (55 if you include the base or pedestal).


The next images will be the runners and the other contents of the box.
Sprues:
|
|
|


|
|
|


|
|
|


|
|
|


|
|
|


|
|
|


|
|
|


|
|
|


|
|
|


|
|
|


|
|
|


|
|
|


|
|
|


|
|


Sorry if some of the shots were blurry.


You also get a lot of springs that will be used on the 8 beam cannons, the effect part for the shield, and the usual clear stickers. There’s a gold foil sticker as well and this is needed to add those gold detailing on the beam cannons and some portions of the wings. I also noticed that only Sprues A have 4 runners (black, yellow,white, clear).
Compared to Bandai, Daban was kind enough to include a pair of metal connectors (replacement for S1 parts). These connectors are inserted on the main backpack unit. Before, it was an issue in Bandai because the plastic connectors can’t handle the weight of the wings so there’s always an incident where it breaks in half. I can’t remember and I’m not sure either if Bandai didn’t released metal connectors. I’m thinking they did since Daban Model is just copying what Bandai has.

So back to the topic, the kit also throws in a pair of LED and 2 pairs of button cells or batteries for your LED. It was another issue before that the LED’s color was green same with PG 00 Raiser. Fortunately, it was yellow or more like an orange color. And this is the correct color for Strike Freedom’s eye sensors. One of the things I also noticed here is that the gold plated parts are not fully undergated. I was worried that they will show up when I move some of the parts or joints. Turns out that Bandai designed it nicely that at least 95% of the nub marks won’t be visible. So Daban Model of course, copied the same issue. Like I said, it’s not fully undergated. So there were still very few parts that received the undergate treatment. Probable factor is that these sections will be seen when you move some of the joints.
If you also noticed, the 2 connectors were the only parts that are metal. Unlike the Strike and the Wing Zero Custom, this one will not use any metal parts for the leg or the waist.
Leg Unit:

I think I need a bigger cutting mat if I continue this routine in showing the exploded parts of each body segments. Well as you can see, I already built the other side or the leg and I will do the same thing for the arms. I just thought it would be faster to do this knowing what parts should be sanded or not. But I am not leaving those parts with nubs. I will just cut them with my hobby knife.
Okay so here are your parts for the leg. I’m sorry if it’s still blurry even though I am already using a half-decent phone camera (probably just a setting issue). Anyways, I love the parts separation and the combination of the 3 set of gold parts. The gold or yellow color of the main inner frame parts is somewhat dull when you look at it. Bandai may have a better or sharper color, but it still not that good. On the bright side, I think Bandai thought it would be a waste to put most parts in gold plated and just end up being covered by the armor parts.


Here you see what I mentioned earlier regarding the undergated parts. This specific piece will be visible if you bend the leg so it was smart of Bandai to place the gate under it and not on the edge.

The issue however is that if the Strike freedom is just standing still, you won’t see them. But if you bend the leg to a certain degree, you will see the nub mark as shown in the picture. I don’t think it’s a big deal because this portion is covered by the skirts which Bandai might have probably figured out firsthand.


There are no snap fitting issues here. It was a nice experience to build one of the hardest body parts without any troubles. I added some Uniball Signo Gold on those “semi vents” to add some extra gold color that will compliment Strike Freedom’s usual color scheme.


Articulation is great! No parts pop off and everything was still in place. There’s this flap behind the leg that you can pull outward. The feet can be folded down instead of the usual bend upward. I have no issues on how it works though. So again, there are no problems here.

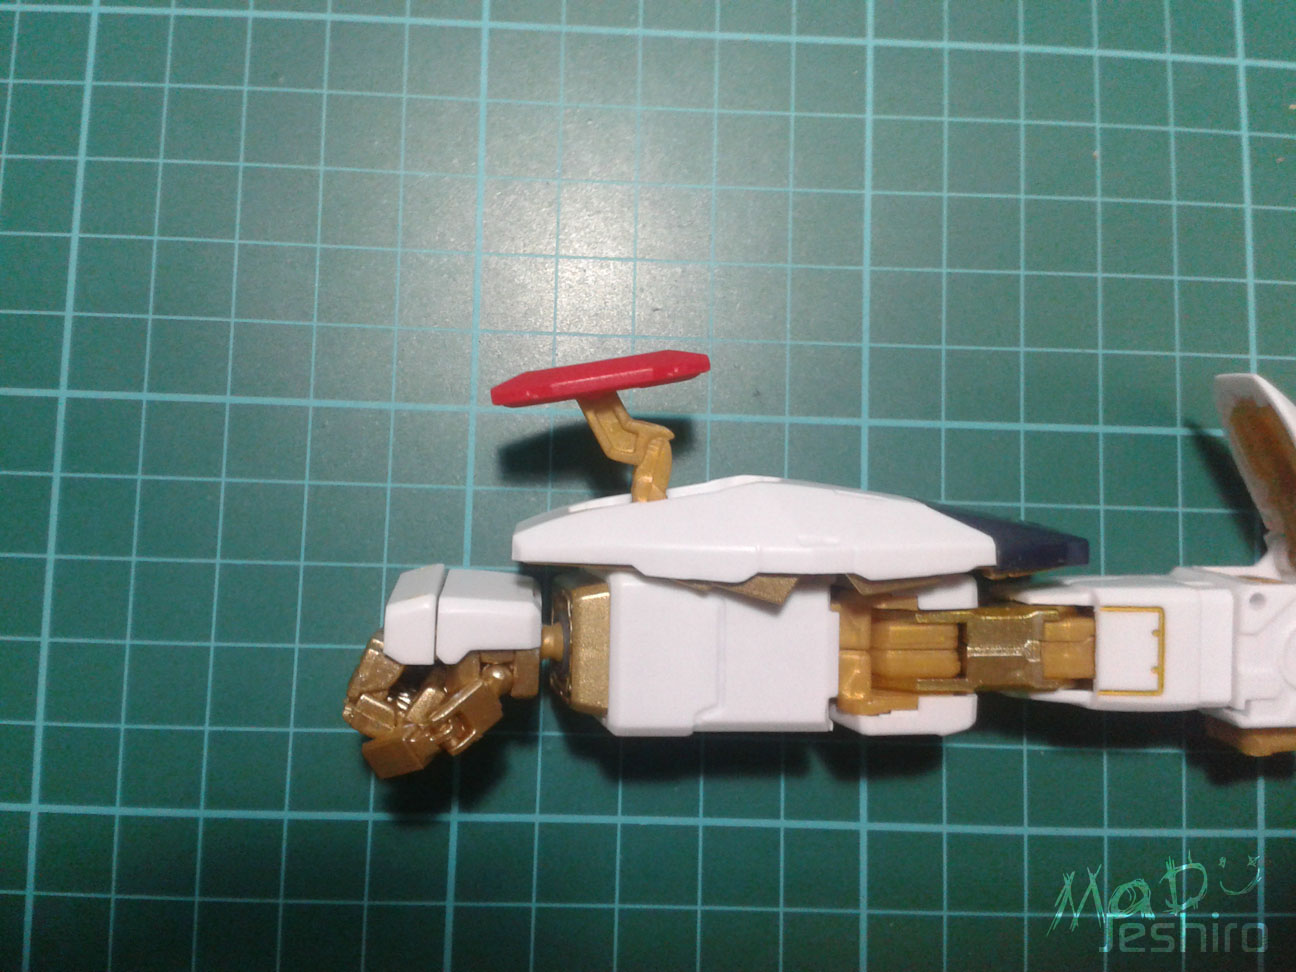
Waist Unit:

Nice parts separation here in my opinion, but Bandai could’ve at least separated those…ermm.. I’m not sure what to call them. :v But if you look at the upper part of the front skirt, it’s already molded to look like that. Bandai shouldn’t have done this . The waist unit has more parts compared to the other PG kits I have built personally. The obvious reason was the rail guns built in the side skirts. Like I mentioned in the Unboxing segment, there are no metal parts for this kit. All parts in the Inner Frame will be your usual dull yellow plastic.

I forgot to add these red parts. LOL xD


The waist also has a lock that will hold the leg’s peg on certain angles. I’m not sure how strong this lock is thinking how heavy a single leg is. :/

I didn’t sand-clean any of the pegs but it keeps on showing that visible seam even though I snapped them firmly. Might as well put some adhesive here but I will leave this be as it doesn’t show any bothersome issues.
 |
 |
 |
LOL! I don’t have any action base that I can use to hold the waist so I used an empty bottle of pickles and my cotton buds container to place the waist unit on top. The rail guns are quite long. >_<
I also added more gold detailing here using Uniball Signo Gold.
Okay I think I found some issue here. Looking back at the picture with the lock for the pegs, these pegs are quite loose and can slide down or up so easily. Maybe that’s the reason why it has a lock but it could have been good if these pegs were tight so the locks won’t have any stress from holding the weight of the legs. Other than that, snap fitting is still great and there are no bad issues.


Range of movement is nice but not that good in my opinion either. I was hoping the front skirt can be lifted to a full 90 degree angle. The peg however enables the front and back skirts to move upwards for a bit. The side skirts (rail guns) can’t be tilted high up because of the design but it’s not a big issue for my case.


The rail guns features a gimmick where you can extend it's length and show more of the yellow inner frame. This would be a lot cooler if you can paint the inner frame parts of the rail guns.


One of the other gimmicks for Strike Freedom is the mechanism built in its waist. You can rotate the pegs and move the rail guns on the back. You need to pull the whole back skirt down to do this. This feat enables the Strike Freedom to attach the two beam rifles on the sides of its waist.
"Isang kinakape kape kape kape kapeng break ulit!"

Body Unit:

I’m not sure if I forgot any parts here for the body. I don’t think I did though. Lol~
I noticed that some of the parts were same with the Strike. Just a few designs on the other sections of its body but yes, most of them have same inner frame parts from PG Strike. There are no issues about it; I just thought I should mention it. XD
 |
 |
 |
So back to the topic, the pieces to build the body aren’t many but still feature decent parts separation both the inner frame section and the outer armor pieces. You will have an extra of that WB-11 for the back. If yours are starting to get soggy or loose, then you might want to change it. But it would be a hassle so applying nail polish would be practical.


The lower section of the body doesn’t have a wide range of movement. It can be tilted sideways to a certain degree and that’s about it. You can move the main male pegs for the arms.

And unlike the MG Strike Freedom, the cockpit hatch has a much better mechanism where you can actually slide the seat outward when you pull the outer armor. Sorry for those nub marks though. :/


Glad to see that there were no snap fitting issues here. It took me some time to insert the pistons on the sides but it’s not much of a problem.

Okay, so I’m halfway done here.
Head Unit:

Not bad for the parts separation with a lot of small parts that can be an option for painting – credits goes to Bandai.*
*-PS. Some people think I am referring this kit as Bandai. NO! I am saying credits to Bandai or something like “Bandai did a great job with the design”, because Daban and TT Hongli copied it from Bandai. These bootleg brands may be bad in quality at some point, but it’s the quick window you can use on how Bandai worked on the model kit.

A few people thought the one I’m building is Bandai because of the yellow LED. It seems Daban finally replaced the green LED from before which was a bothersome issue because it’s not fitting for SF. I think the new batches now have the yellow LED. And if you recall the unboxing segment, you get 2 pairs of button cells that will give you a heads-up or perform a test run if the LEDs are not functioning.

I noticed that this part for the CIWS seems fragile. Be sure to trim the slot-type female pegs before you attach these. Too much force can lead to stress marks and/or breaking it.

I saw the review from duelmaster before and I thought I should color this clear part so the light won’t pass through. Besides, this was supposed to be blue considering it was the default color for Strike Freedom.
 |
 |
 |
The test was a success and the light didn’t pass through its forehead sensor. Now it’s time for the arms.


Arm Unit:

Here are the pieces to build the arms. You can see the finished arm on top (right arm), and the exploded view of the parts below (left arm). Unlike the Strike which is the closest kit to this model, the manipulators have a similar concept that of PG Wing-Gundam Zero Custom. The parts are gold-plated though. What’s worse is that the gates are on the middle section of each piece, so the nub marks will be really visible when you look at it closely.


Again, there are no metal parts here and I think I’m getting the idea why there are no metal parts on the body. The construction manual shows that the base stand is connected just under the backpack. And the only thing connecting to the backpack that will add weight are the huge wings. It was a smart decision to consider the weight distribution of this model.
Other issues include loose parts. The part M2 and C18 tends to pop off when you move or stretch the arms. If you’re not planning on painting the kit, then using some super glue might be wise to hold them. I don’t see any problem on the parts A9 (end of handguard or white part on edge of the knuckles), but the only thing that holds this off is if and only if the sockets or female pegs are tight. Be sure to push them carefully until the male peg hits the ball-joint end of the manipulators/fingers.


The bright side is that the arm has a pretty neat articulation and the range of movement is outstanding. As for the gimmicks, the red pieces for both arms here where you can attach the beam shield have a movable connector or arm. Unlike the Master Grade version, you can move it up.

I also added a few minor detailing here using Uniball Signo Gold and Artline 900XF.
So those are the issues you might encounter here in Daban Model. I’m not sure if Bandai have the same issues as well. But since Daban is just copying all of the parts, there’s a possibility some of these issues are actually from Bandai and not from Daban.
My usual coffee break......................again. >___<

Shoulder Armor:

So these are the parts for your shoulder armor or upper body unit – nice parts separation credits to Bandai. It has more parts as expected for a Perfect Grade. Unlike the Master Grade version, it doesn’t have any separated parts for the vents or more parts for the inner frame.
 |
 |
 |
Once you finish building them, it kind of looks simple at first. But as seen on several images through the internet, the upper white portion can slide upward-sideways. There’s a mechanism inside the inner frame that will also push the red piece on top and will flip it open. Closing it isn’t hard but you should start at the white section and then close the red piece. Otherwise, you might break the inner frame connected to that red piece (J1-3/J2-3).
There are no major issues here regarding fittings, but you should take note of the blue pieces (L7+L4). It doesn’t fit well. These blue pieces are a bit tight and the slot-like pegs don’t fit through probably because of the gold plating layer. The gold parts for the thrusters (E1-12+E1-11 / E2-11+E2-12) were also tight.
NOTE:
Here’s a little information here regarding the DRAGOONS when I was doing some browsing. I was corrected when I mentioned it on my post as “funnels”. Just to defend myself, it was more like a keyword since it’s the CLOSEST word to describe the beam cannons. I mean, not all builders are familiar with the beam cannons and what the DRAGOONS actually look like. Anyways, thanks for that correction he gave me.
In gundam wikia, it says that the DRAGOONS are the beam cannons and not the actual wing where they are attached to. So that’s quite obvious seeing different designs from Akatsuki’s Shiranui and the back unit of Providence. It was mentioned in gundam wikia that it is still unknown if the Astray Blue Frame D uses the first or second generation type of system, but it was certain it uses DRAGOON. This means, the DRAGOON system “doesn’t have to look like a cannon or a rifle”. As some of you already know, the ABF D have lots of these blade-like weapons. They have different functions but they are considered and a part of the DRAGOON system. :)
Backpack Unit:

The Backpack unit features good parts separation with some gold-plated parts for the thrusters.


Just a few tight pegs but it was a quick build here in the backpack and I love the detailing done here where you can see the yellow parts in the mid section. It you can paint it or have the skills to do so, then do it because the dull yellow really doesn’t look good here. I used my Artline 900XF to cover the dull yellow on the sides. Anyways, there were no snapfitting issues here and everything was okay.

I needed a coffee break because of the tiring work to build the 8 beam cannons.
Beam Cannons (DRAGOONS):

Okay so here are your beam cannon parts (DRAGOONS) and the finished product is on the left side. A lot of inner frame parts here because of the gimmicks you can do with it when finally attached on the wing.

Another coffee break again while adding gold detailing for the DRAGOONS. :)

The gold foil stickers are for the vents on the sides. It was kind of disappointing Bandai didn’t add extra sprues for this instead.
 |
 |
 |
I added some gold lines here with my Artline 900XF. It was messy and you will need a lot of cleaning (2-3 swabs) to get a good result.
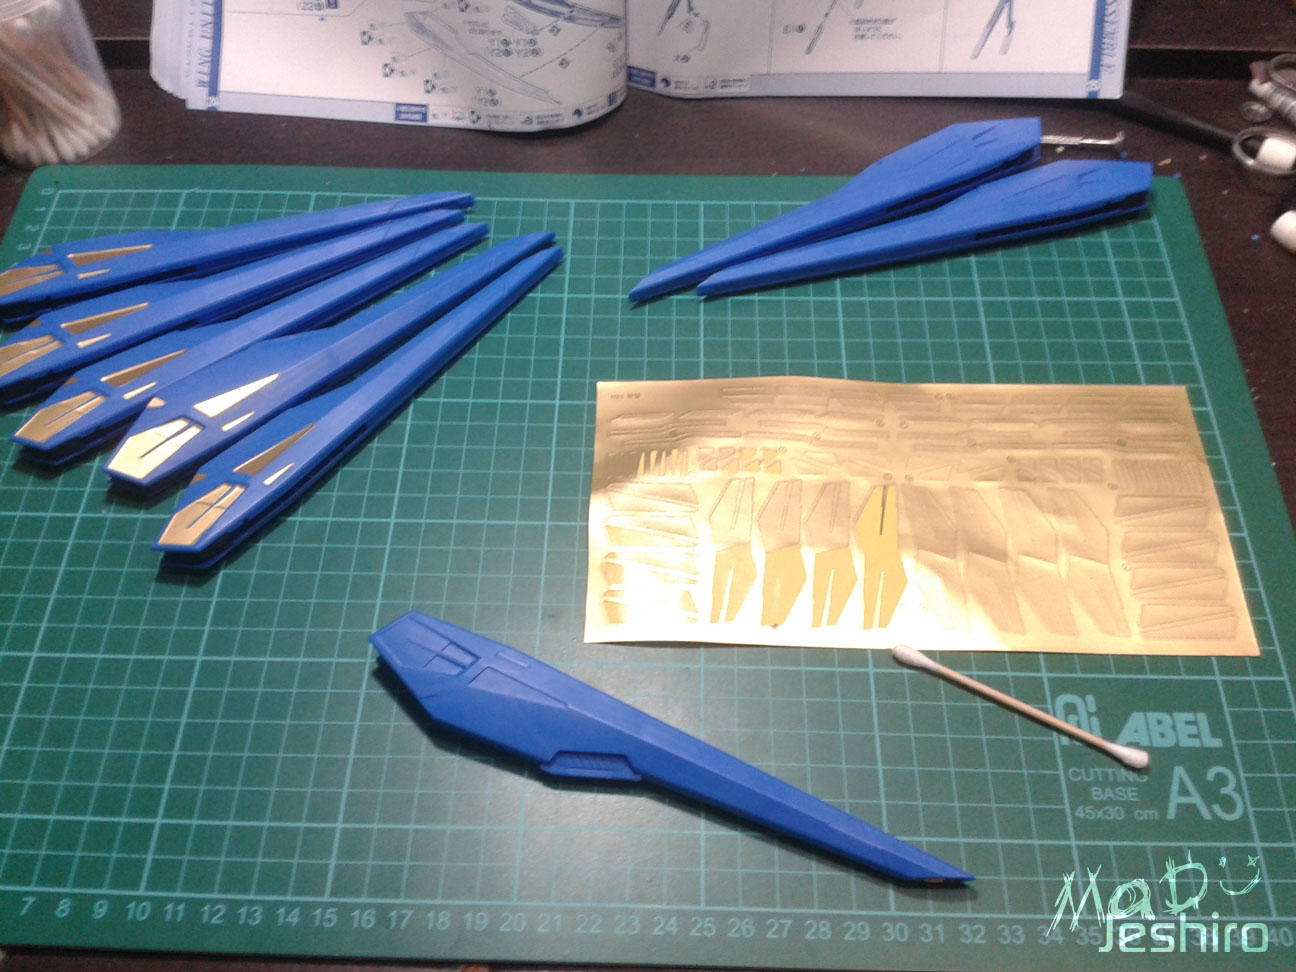
Wing Unit:

There are 2 pairs or 4 wings here and these are the parts. It’s not much visible here in the photo but you also have two tiny clear parts (top left).

There were no snap fitting issues here as I recall and the only bothersome section here is placing those foil stickers to add some gold. These gold foil stickers have a checkered pattern that looks good.


As for articulation and gimmicks of the wings, you can pull or slide it outwards. You will notice that the gold inner frame parts that will hold the beam cannons will show up. You can also move this (A) portion sideways to expand its width.

Here are the connectors for the wing. As I mentioned earlier, you get two metal parts (A) with better durability to hold the weight of the wings. I also placed the plastic counterpart (b) on the mat to give you a quick comparison with the metal one.


Good thing that there are issues here regarding snap fitting and its movement range.
Weapons:
Beam Saber:

Aside from the rail guns already attached on the waist, you also get two beam sabers.

Each beam saber consists of just two parts to build.

Here’s a quick look with the beam effects attached.

Just like in the master grade version, you can also combine the two beam sabers.
Beam Rifle:

As for the beam rifles, it features a nice amount of parts to deal with and it seems quite “chubby”.


I encountered some minor issues here after completing both rifles. The first issue is seen on the image below – a very visible seam even though I didn’t trim any of the pegs.

Second issue is still related to the seam earlier. It tends to get wider when you combine the two beam rifles. I don’t have any ideas how to fix this up. :/

But as for the gimmicks, they have more sliding parts compared to the MG version; as expected from a Perfect Grade. The first beam rifle (Right) has 2 movable parts. You can rotate the rear piece and slide it down (A). The lower section can be pulled outward to extend its length (B).

As for the second rifle (Left), you can pull the rear piece backwards (A), pull this part upwards (C), and pull this lower part down (B).

I added some metallic green here for extra detailing.

So that’s the issues here for the rifle and there were no other problems aside from the seam earlier.
Decals:


The waterslide decals my client bought have lots of typos and they were very visible. All of the markings are in black and there were no red or white ones which mean I can only use a few. But I hate the shade of black on this one so I will use the clear stickers. :/

The quality of the clear sticker is so-so. It was not that thick but the texture of the plastic is visible near the light and I can see its edges which is an eyesore. :(
Completed Model:


Again, sorry for the blurry pictures and these are all I got. T_T

If you noticed, there's an issue here in the Wings Unit. The DRAGOONS or Beam Cannons doesn't lock itself on the wing's inner frame (B). There are still seams even if you managed to lock the beam cannons in place (A) but it's not much of an issue for me especially that the mode looks cool in its burst mode look.

I figured that the the mechanism inside the beam cannons tends to get stuck when pushed. I don't know what's causing it even though I cleaned the parts well. Could be the spring though. :/
Articulation Test:


There were no problems on both arms and legs after completing the whole model. The movement range is really awesome.The arms can move that much and the shoulder armor doesn’t hinder it. The legs can be bent that much even though it tends to hit the back skirts a bit. Plus, you can even perform a perfect split! :D
(see pictures above)


So here are my ratings for this kit..
 |
| Design based from GDC cards |
Plastic Quality: 7/10
The plastic was somewhat similar to Daban Model’s earlier kits like Astray Red Frame Kai, 00 Seven Swords, and so on. The white seems to be a little yellowish at some pointy or “dirty” and I am not certain if this was the result of being stored in the box for a long time or if this is the actual color from the factory. It’s not as glossy as I expected it to be and it was kind of a disappointment on my side as a straight builder.
I do like the gold-plated parts but some of them have bad gate placements. I mean most of them are undergated but they were kind of more of a problem instead of being helpful to avoid the nub marks. The yellow sprues were dull as always same with the TTH and I don’t like that tone when combined with the other 2 gold sprues. It is wise to paint these dull yellow parts to add more “life” to the model.
Assembly: 7/10
I consider the tight parts as minor issues so this kit is still “solid” as other builders claim it to be. But I am giving it a 7 because of the loose pegs on the waist, the problematic mechanism when attaching the beam cannons to the wings, and several seams along the way.
Regarding the issue about the beam cannons, I cannot fully lock it in place and it is pulled halfway from the connectors (A). One or two of these beam cannons doesn’t have this issue (B) but most of them are stuck. But there were no problems if you pull those outwards. (See pic fore reference)
Detailing: 7/10
I am giving it a seven because I am expecting a lot of nice parts separation and detailing. I know it already looks cool when built, but I can’t help it to notice that some parts are quite plain. The front skirts don’t have any other gimmicks and it’s just as it is like your usual front skirt from a High Grade kit. The rail guns are kind of lacking in details same with the body unit. Like I already mentioned, the beam cannons also needs foil stickers to add details instead of using extra sprues to add the gold color.
Maybe I am just demanding too much after seeing the Metal Build version, still, this is a Perfect Grade! If you check in Bandai’s catalogue, the brief description says “The Ultimate Gunpla”. Of course, if you bought the Bandai one, you might agree that there are some parts here that can be pushed for improvements.
On the positive side as a builder, this is the chance for others to test their skills in adding custom modifications and ideas in painting. You can also test your skills in scribing those plain parts that lacks panel lines.
Articulation: 8/10
Movement range is really good and a lot of parts were articulated or movable. If I that split wasn’t possible, I may have put this on a number 7 rating. I don’t have much to say in this section because there weren’t any problems for me.
Gimmicks: 7/10
Not all of the parts feature a unique gimmick that can’t be seen on the Master Grade version. There’s the shoulder armor, LED for the head, and the complex mechanism on the wings. I love these gimmicks that make the Strike Freedom stand out in its PG version. For me, this is just enough to highlight the model’s main feats like the golden wings when spread out. It’s possible that the other gimmicks I might have overlooked are the mechanism in the Inner Frame. Because these parts too have nice engineering that makes a Perfect Grade, perfect.
Weapons: 6/10
I am giving it a lower rating because there are no extra gimmicks for the beam cannons where you can actually place it on rods and add beam effects. There is no stuff like that here in the PG version. At least you still have the beam shield effects, rail guns on the side of the waist, and the two beam rifles to use in action poses.
Extras: 7/10
It was nice Daban Model added another pair of button cells (batteries) for the LED. And you get two of the LED in case the other one is damaged. Unlike the Wing Zero Custom, you get a pedestal/action base for Strike Freedom, and credits go to Bandai for this idea.
Patience: 8/10
Yes I am giving it an eight because of the redundant parts you need to clean, especially on the wings and the DRAGOONS (beam cannons).
Overall rating: 7/10
I may be a fan of the mobile suit, but I am not going to give it a high rating just because I like Strike Freedom. Anyways, the rating I gave is just fair based on the issues, both negative and positive that I have encountered. Surely there are lots of things I might have missed on these sections and I hope you can share some of them through the comments.
If you are already familiar with other PG models, then you can start with this one. But if you are new in the Perfect Grade line, I suggest starting with other PG kits that doesn’t look difficult to build. Starting with the RX-78 or the Zaku II seems to be a good push just to give you a feel in this grade.
If you are looking for spare parts, I am not sure if Daban Model can suffice or the job especially if your kit is Bandai. :/
I have mentioned this part a lot of times on my other articles but I will say these again. If you want to test or try painting it, then going for Daban Model might be a good idea since you don’t have to risk messing the project and spending too much. I haven’t tried painting yet so I am not the right person to be one giving such advice. :P
Still, if you already have the skills or experience in painting, then go for Bandai.
But if you just want to go for that straight building path, both brands are recommendable. So yeah, this is a good kit that you can call “solid”. :)
Also, have a look on our Gunpla-related
Facebook page - Click
Here
This comment has been removed by a blog administrator.
ReplyDeletewhy are you saying bandai in your description s? I thought this is a daban model.Be consistent please. lol
ReplyDeleteI guess you didn't read much. I was comparing it to the things Bandai has with their kit and to the things Daban model has on their side. Be consistent when reading too please. LOL
Delete--------------
COPIED FROM THE MIDDLE OF THE ARTICLE
"-PS. Some people think I am referring this kit as Bandai. NO! I am saying credits to Bandai or something like “Bandai did a great job with the design”, because Daban and TT Hongli copied it from Bandai. These bootleg brands may be bad in quality at some point, but it’s the quick window you can use on how Bandai worked on the model kit."
-----------
I mentioned Bandai because Daban Model copies it by the runner. So basically, this is like a cheap replica or a mirrored model of Bandai's. And everything that Bandai doesn't have is just an added extra made by Daban.
(sakit sa bangs pag hindi nabasa maigi eh hahahaha xD )
Best option to fix the issue was to delete your comment.. but.. I didn't. After all, you're just "Anonymous". :3
ReplyDeleteNice review for future reference.
ReplyDeleteThanks for the review, I was thinking about getting this kit, though i think the white parts or armor is less detailed compared to the 1/100 MB version of Strike Freedom, Daban really slay that kit.
ReplyDeleteThat's not surprising to be honest. Because Daban copied it from it Bandai's Metal Build. And as we all know, Metal Build models have good detailing.
DeleteNot to mention that the PG Strike Freedom is an old kit dating back to 2010. And Metal Build kits with better details have been released after this one.
This comment has been removed by a blog administrator.
ReplyDelete