

Introduction:
It was a huge blow on my side when I sold my Hi-Nu EVO to a friend. I was on a financial crisis during those times so I let go three of my Gunpla models. And I was overconfident that I will be able to get new ones to replace those three models, including the Hi-Nu EVO, but I was wrong. It took me over a year to get them. I was planning to grab the Hi-Nu ver Ka back when Daban hasn’t decided to copy this one. I posted on several groups asking whether I should pick the EVO version or the “ver Ka”. There were mixed suggestions and I finally decided to go for the Hi-Nu ver Ka.
I posted my decision on my wall and then two of my colleagues teased me that Daban might copy this in the future. I was torn again with my plans and took their recommendation to let it pass until Daban Model released the kit. I used my Gunpla funds to get the Freedom 2.0 and Build Strike FP. Well, the Freedom was part of the models I lost during my financial crisis and it was a Dragon Momoko brand. I think this was the best comeback for the same mobile suit I lost.
After receiving the images here and there, those two friends of mine were actually right off the bat. Daban Model finally decided to release a copy of the Hi-Nu ver Ka. I waited a few more months and ordered the kit along with the Strike Freedom ver MB (the review I just recently posted here). I am still looking forward to review the EVO version but this is a good start to replace the models I have sold before.
Again, do ignore my typos but I don’t mind getting corrections if I have used any wrong terminologies related to the Gundam universe. And if I missed something or there’s something wrong with my comment, you can correct me as well. Another reminder to you guys that some of my pictures were blurry because my hands were shaking. :/
Unboxing:


Aside from the usual change in the word “Gundam” to “Fighter” and several Chinese text, I keep noticing that they [Daban Model] continues to go for the Folding Carton type box where you can no longer remove the top cover same with Bandai (they use a Rigid Box type). Now, only the top and bottom sides are opened and you can pull out the plastic bags. But it’s not just that simple, because Daban Model placed these plastic bags in a brown box. I am not sure if there’s a good reason why Daban would follow the same idea Dragon Momoko did. If that was to protect the plastic bags, the front part of the box is still vulnerable and anything pointy can tore through it. :/

The plastic bags inside were sardine packed and it seems the factory workers just tried to fit them well in the box and didn’t consider the position of the sprue frames. I will discuss about it later.


You have 10 plastic bags inside the box and an unusual case where a single sprue frame isn’t packed. I checked the plastic bags if one is opened and there’s none. I am not sure if this is an isolated case but do check the kits carefully. Leaving a single sprue frame out of the plastic bag may lead to damages or missing parts.


There is nothing much to see on the construction manual. It features the usual treatment of Daban Model adding the Chinese characters and removing the word “gundam”.

The text inside however retains the same Japanese text same with the original along with the info about the model.

The second page is folded and you will see on the other page the gimmicks and features of the finished model.
Sprue Frames:


I forgot to take a picture of the sprue frames listed in the construction manual. There are 27 sprue frames in total if you also count the pedestal.
The plastic is glossy and there are no flashes on the edges which is a nice thing. I can’t say if Daban Model managed to copy the same tone of violet but it was good for me.

Now there were several issues I would like to mention during the unboxing phase. First of all as I’ve said earlier, the plastic bags are sardine-packed inside that brown box. That means there are parts pushing the other parts. And the result is bit problematic if you are looking at the image above. These parts are for the fin funnels and they should be straight flat. But the fuel tank parts have pushed them for a long time so they look bent. I didn’t try the common hot water solution to fix this problem because I am just a bit scared to mess them up.
I don’t mind if these parts are bent because I can treat them with the method I mentioned. But the smaller v-fin was also bent to the extent it already have stress marks. I tried the mentioned method and slowly repositioned the v-fin. I still got a few millimeters away from the exact position but the stress marks are already getting bigger each time I try to bend it back. :(
It’s like a domino effect for these sprue frames. Because they were badly crammed inside the box, there were several stress marks already visible on the parts’ surface where the “gates” are connected. That means it will be hard to hide the nub marks even if I try to sand them. Best option left for other builders is to paint the model.
The last issue is just mine but can happen to anyone – missing parts. I only got a single missing part from the G Frame (G19) and this piece should be attached on the beam rifle’s lower section. I will show this issue when I get to the Armament s. So be sure guys to check each sprue frame while still in the plastic bag. If your reseller doesn’t mind replacing any kits with opened plastic bags, then you can check them thoroughly. I have checked this kit for about 20 minutes and it was stupid I still missed this one issue. :/

Fortunately, the waterslide decal sheet isn’t badly damage but it looks a bit crumpled because of the crammed plastic bags problem.
Body Unit:

As expected from Bandai, there were lots of parts here in the Body unit. Daban Model managed to copy them nicely but the detailing isn’t as sharp as Bandai’s. I also forgot to add another part here in the exploded view.

And here’s the part I forgot to add on the cutting mat. It’s for the chest inner frame.


You will get the usual and very common issues from a bootleg kit. Daban still can’t make a decent one (like their Wing Gundam Proto Zero) with very few fitting issues. So yes, this kit has lots of fitting issues. First are the clear green parts for the cockpit that has tight fitting issues on its pegs. Second is the inner frame part J17 which is also tight if you attach it on the chest. And last thing is that the purple parts for the outer armor are slightly tight as well.
Overall, it was still a solid build because the fitting issues are just minor especially if you have already handled a lot of them through the older kits of Daban and DM.

As for gimmicks, the chest upper part can be slid out like so. It’s the same with the Nu ver Ka except that this model doesn’t have any psycoframe parts.


You get the typical sliding cockpit hatch, but you get to lift the whole front-mid section of the chest.

Movement range is great because you pull the joints out. These are the main male pegs for the arms. The peg can be twisted upward to give you more range.

Hi-Nu ver Ka features the LED system so that you can lit the eye sensors. There’s a hollow space on the chest portion if you pull out the whole neck and back cover. Unfortunately, Daban Model didn’t spare any LED here unlike their Nu ver Ka. :/
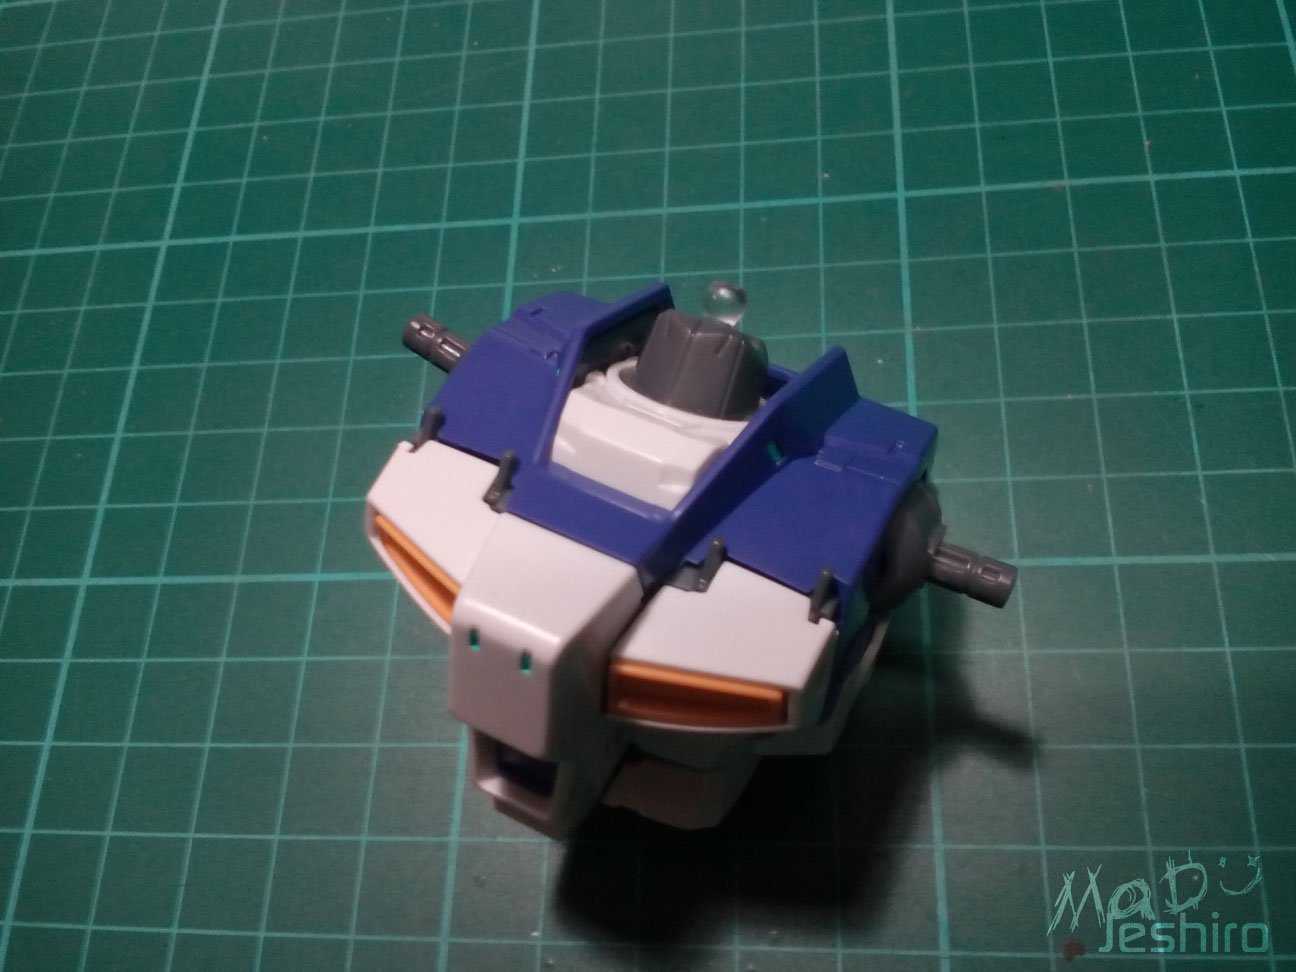
Head Unit:

The head features decent amount of parts. Bandai designed the Vulcan to be a fixed mold in the inner frame part. I think it was a good decision to avoid “blackhole” incidents (missing/lost parts).


The only issue I have encountered here is that the green clear part inside is a bit tight. Other than that, everything fits just fine. I’m not sure if you have noticed it and I did mention this earlier that the small v-fin is bent. There’s a stress mark visible on the middle so I didn’t fixed it any further. I was afraid it will complete break in half.
It was a still a smooth build for my side and I don’t think there are any other issues here.

I was also surprised that the rear bottom part can be tilted back and forth. I don’t get to see such features provided in a Head. All credits goes to Bandai for this one.
Arm Unit:

Both arms may look identical but they are actually different in design. The only part that makes them similar is if you build both arms without the outer armor. I only built the right arm without the extra armor parts. The arms have good amount parts thanks to Bandai.

You may want to check this part for snap fitting problems.


Other than that, it was another smooth build with no other issues. But you may want to be careful with those tiny round parts on the sides since they are quite small and may get lost quickly.

It was also mentioned that there’s a problem (loose again) with the manipulator’s thumbs. I didn’t encounter such issues and that would be a possible isolated case. Just make sure you twist the joints slowly to prevent disastrous accidents (breaking a finger).

At first, I thought it has limited movement range because the arms look bulky. But it turns out that they have good angles if you bend them so. The wrist is separated from the arm so you can move it back and forth and that is a good thing if you will use the bazooka and beam rifle.

The right forearm features a 4-barrel machinegun. You can slide the lower section out and lift the machinegun up. The same lower part will act as a lock once you slide it back. This gimmick isn’t available in GoGo’s Hi-Nu EVO.

As for the left forearm, you can place the beam saber here. But the good thing is that this will allow the Hi-Nu to use the beam saber without the help of its manipulators.
Upper Body Unit (Shoulder Armor):

Now here are the parts for the Upper Body Unit or Shoulder Armors. It features good amount of parts to add that nice gray, purple and white detailing.


Let’s start with the issues first. The small parts that kind of acts as vents on the edges are a bit loose but some of the pieces were not. That means the molding may have several unnoticeable dimples that affects its fitting. To make sure they don’t fall off, I didn’t sand the nub marks and cut it straight from surface. This will add some rough texture to hold it in place. The several parts I have sanded because I thought the nubs will be visible were treated with some blutac.
The last issue is the purple part on top that can be opened up to show those hidden thrusters. It was a quite tight and that can affect the main female peg (K21). The clamp on the K21 part seems easy to break if not careful.
Those are the problems I have encountered but I don’t think you will break any parts here if you keep the traditional look (no gimmicks).

On the construction manual, it shows I can slide this part (A). But I tried that and it seems it’s stuck. Either that or the purple part is just really tight. Anyways, the gimmicks for the shoulder armor look great. As I wrote earlier, the upper part (B) is quite tight if you try to open it up.

The good side of this gimmick is that the white lower sections are now loose and can give a small degree for the arms.

Almost there~
Waist Unit:

The waist unit features above average amount of parts and most of them are large.

There were couple of tight fitting issues here but they are not much of a problem. First is this part coded J33. It is the vent on the crotch’s bottom section. You may need to trim or sand it a bit to fit the peg in.

The second tight fitting issue is located on the back skirts. These thrusters are quite tight when you attach them on the white piece. You may need to press it really hard to get a good fit, which will only happen if you do not trim anything.


Overall, it was still a good solid build. It looks a bit plain but it will look nice when treated with some panel lines and decals.

Articulation is great and I don’t have any complaints on the design made by Bandai. The front skirts can move like so giving you a way to get around the pointy knee armors.

The side skirts can do the same thing if you move or slide it upwards (B). You can move them sideways to a good degree as well (A).
The back skirts looks large but they have a nice range when lifted upwards.

The gimmicks here in the waist are placed on the back skirts. There are two hidden thrusters on each skirt that can be opened out. You start with the upper section and then move on the purple part. It was a bit tight when I try to open these hatches but it was okay for me so that they won’t close so easily during action poses.
Getting ready for the legs..

Leg Unit:

The leg features a lot of parts (which is really common on most kits LOL )and that might be a good thing for builders who love to paint.


It looks really chubby (>__<), But I love the detailing done here by Bandai. The parts that supposed to be gray gave me the idea to put some angelic green on them.

A lot of builders back then told me to go for EVO again since it is thinner meaning I will have more angles when posing. But the articulation done here by Bandai is really awesome. It does look bulky but you will be surprised that the thighs can bend this much.


The front part of the feet can be tilted up add down. The joint in the inner frame allows you to twist it to a small degree as well.


The flaps have hidden thrusters giving you an idea how much maneuverability the mobile suit has in the “ver Ka” design. I am not sure if these hidden thrusters are already attached on the old version of Hi-Nu because I haven’t seen any images of the Beltorchika’s Novel. LOLOLOL :P
I forgot to mention that the issues are just several tight pegs in the inner frame. I didn’t put notes on what exact parts because they were just very minor on my side. Yes, the legs give you a good solid build with no major problems. *wink wink* :D
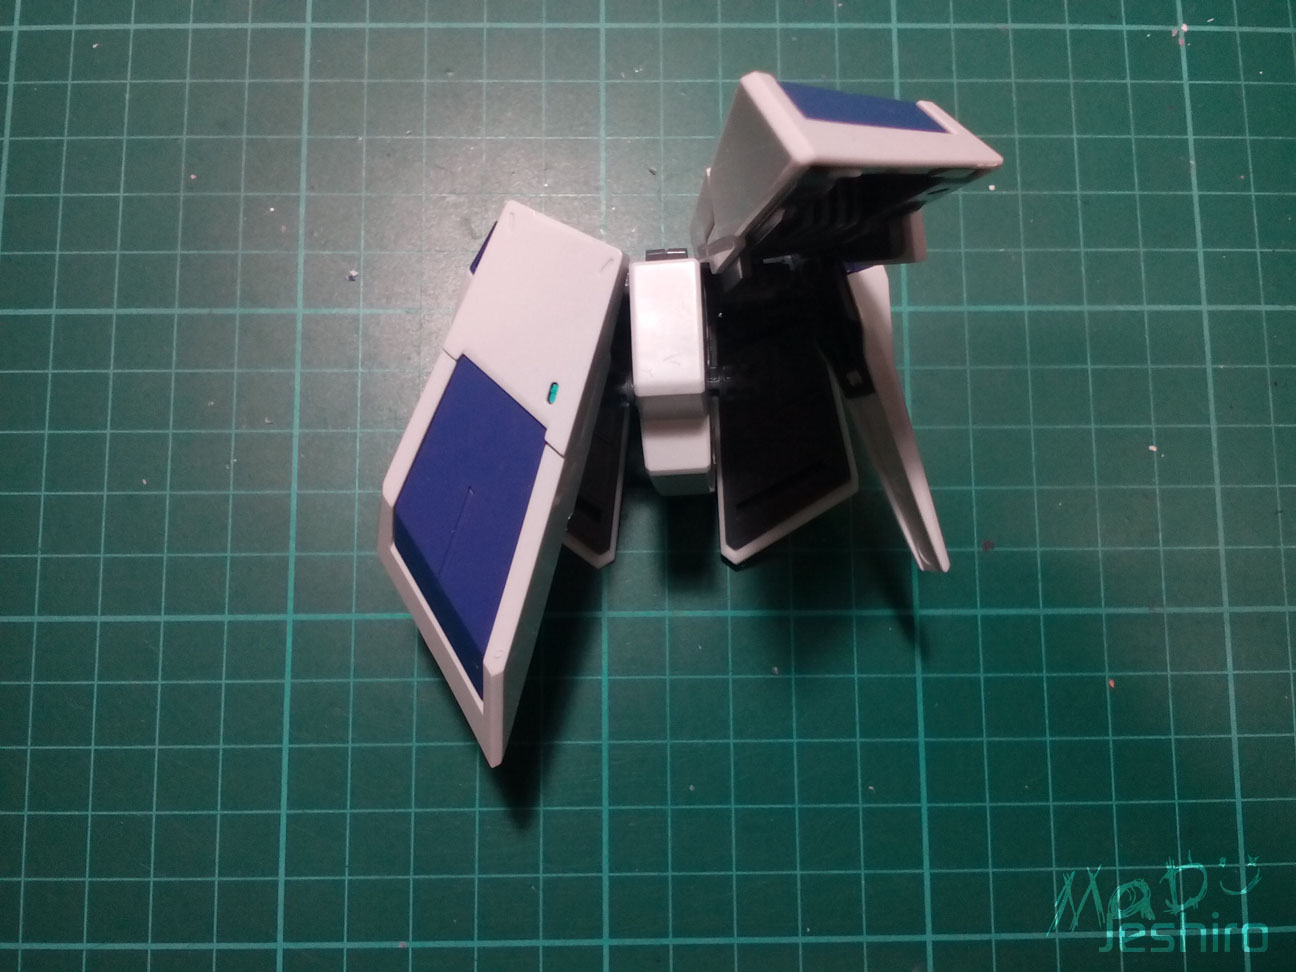
Backpack Unit:

The backpack features good amount of parts. Some of these parts are separated from the main “pods” that can give you some nice ideas if you want to paint it up.

Straight away to the issues, you have the connectors that are a bit tight to fight. It’s just fine since it needs to be locked in place in the pods’ bottom section. The K22 parts (dark gray piece on each pod (I think XD ) are prone to stress marks if you are not careful attaching these funnel connectors.
The second issue is that the fuel tanks are separated into three sections. The pegs that will connect each section were tight and you may need to fix either the male of the female peg to get a good fit.


Those are the only issues for the backpack unit and everything is good because they are not much of a problem - fixable to be exact. The backpack does look like a bird and I remembered my Hi-Nu EVO again while looking at it.


As for the movable parts, you have the two fuel tanks that can give you a nice swing back and forth. Of course it will be limited once you attach this to the body.

The connectors for the funnels are movable as well but the angles are very limited.

The connectors of the pods (attached on the main backpack) can be twisted to more than 90 degrees.

Each pod features a nice gimmick where you can pull this up. This is where you place the other beam sabers.
Armaments:
Beam Rifle:

The detailing done here is great but it kind of lacks separated parts.

And this is where the missing G19 is supposed to go.

There are no fitting issues here with the beam rifle and all parts fits nicely.


I may have found a replacement part for that G19. I found these two pieces on my extra sprue frames of Hi-Nu EVO. I even got the effect parts for the funnels but they were a bit smaller. Anyways, I have trimmed the upper surface so that there’s a gap to slide on.

The black is a bit off but it was a nice recovery from that missing part issue. If I have the skills to paint the model, I’m sure this will go nicely with gray.
Hyper Bazooka:

The bazooka seems the same with the Nu ver Ka, or I could be wrong. Another thing I noticed is that having a bazooka included for the model looks like a standard equipment. I mean starting from RX-78-2 until Hi-Nu, they all have a bazooka. Even the Zaku units have them. I guess it's better to go off in war with complete armaments than having 1 rifle and a shield. I remembered my friend’s favorite quote when it comes to battle that seems related to this situation; “If an archer runs out of arrows, what good is he in battle?”. :v


Anyways, the issues here are slight tight fittings on the gray parts. No big issues other than that so it’s considered a good build.
Shield:

The shield features decent amount of parts.


The light gray piece under is bit tight and the whole
shield looks really bland without the decals. The EVO version’s shield has
extra black parts on the sides and on its tip. Because of that, it has more
life to the shield even without the help of the waterslide decals. You can also
paint those black parts and replace them with gray or any color that suits the
model.
Even so, the “ver Ka” is a pretty much a good canvass if you want to try painting it. It looks sleek and the curvy sections match the overall look of the Hi-Nu ver Ka.
Even so, the “ver Ka” is a pretty much a good canvass if you want to try painting it. It looks sleek and the curvy sections match the overall look of the Hi-Nu ver Ka.
Beam Sabers:

I think the Nu ver Ka has two but this model gives you
three and all of them are hidden.

You
have two beam sabers on the backpack "pods" and another one on the left forearm. Just be sure to attach those pegs carefully and
everything is fine.
Fin Funnels:

No snap fitting issues except for bent parts

These are the parts to build a single Fin Funnel. It’s completely bland and the only option here (without painting) is the waterslide decals provided in the kit. At least you now have clean funnels to try out new paint designs.
The hinges that connect both fins are a bit tight when you connect them to the main middle body. It’s just natural since it needs to be locked in tight. Overall, there are no major snap fitting issues but the bent parts in the middle is pushing the other half that can result to seam lines.

Articulation is great and the issues mentioned earlier aren’t hindering its movement.

There are also no problems when you attach these funnels on the backpack thrusters or you could say “pods”* .
*- I am using this word because I remembered checking a review about Hi-Nu EVO and he used the same word where the funnels are attached.
Extras:


Bandai did an amazing job to add the action base for the Hi-Nu. And what’s great is that there’s a clear part that you can use to support the Hi-Nu when standing flat on the surface. Unfortunately, I discovered this late so I used the styrene rods as a support in the Completed Model section.

Back to the items, there are clear mechanical rods same with the Nu ver Ka so you can display the fin funnels into action.


You can’t move it smoothly because it’s designed to be locked on each joint. This will give the funnels a steady pose.
Decals:

Now it’s time to put some “tattoos” on the model. :)
I would like to mention something I noticed when I packed my Destiny ver MB for a supposedly swap deal (the deal failed though). One of the markings in my Destiny’s thigh is a bit damaged probably back when the marking was still fresh. I put some water and tried scratching it. The result was really surprising because I can’t remove the marking. It felt like the marking has been glued on the plastic’s surface. I had to scratch it really hard just to remove the marking.
So what’s the issue about it? I just thought that the waterslide decal’s quality is based on THAT. You can’t really tell if the waterslide is good or bad until it is fully dry, so time is the essence here. And after my experience with the markings applied on Destiny, I am saying that the decals were great. It sticks really hard on the surface so there’s no need for me to use any mark softer. I hope that the result on the kits I have built with WSD’s are just like that. Unfortunately, you can’t really do a quick experiment on this. :/
But if we are to judge the quality of the decals after letting it dry for a long time, then the other factor to consider for a great waterslide decal is how well it was printed. The markings or caution seals should have a clear color. Even if the texts are no longer readable, it is a good pointer if the colors (red, blue, green, etc) are bright and visible on the plastic’s surface. If you noticed this, the waterslide decals from Daban’s Nu ver Ka have a grid-like texture and that makes it look cool IMO. I am not sure if the same texture was originally from Bandai, but it was a nice texture indeed. Unfortunately, those grid-like patterns on the markings are no longer applied in the waterslide decals of their newer kits.


Okay so back to this kit, I am still a few markings away from completing it. The markings for the fin funnels were the most challenging ones. I have no clue if I should start placing Marking #1 or Marking #3. I started with the Marking #1 and you can see on the image above that I am focusing on placing all markings of that number to all the funnels. I make sure they are perfectly aligned to the other funnels so that I won’t worry when I place #3.

There were a few leftovers here that can be used on other kits. One of the things that got my interest is that the white markings or seals left are supposed to be for the fin funnels. But they are white so there’s no way these marking will become visible on a white surface. And it hit me that this is a actually a nice extra so that you can still add seals on the funnels even if they are painted. They are placed on the tip so they will be visible if the funnels are painted red, blue, purple, green, or any dark color. That’s the only reason I can think of why it’s been added on the sheet even though you already have the signature markings for the funnels.
Completed Model.


Movement Test:


With the Backpack Unit:


Close-Up View:


Rest of the Shots:


And here’s my rating chart…
 |
| design from GDC card |
Plastic Quality: 9/10
I have no complaints with the plastic here. The plastic was good and the stress marks are just the result of bad packaging. It can be avoided though if their factory workers handle each sprue frame or plastic bag carefully. :/
The plastic doesn’t have any bad molding or flashes. I can’t say if the color matches the same brightness that of Bandai but it was good for me. There were no dimples as well when I checked the parts. By the way, the color is a mild violet and it’s not a blue color if that’s what you think base on the images. The color blue on my model was just the result of my cellphone camera’s settings.
Assembly: 8/10
It’s not as bad as TTH or very painful as Supernova’s Altron. The tight fitting issues here and there were very minor for my side and I think anyone can handle them well. Or maybe I was just used with bootleg kits that I find the hard issues to be easy. :v
Another thing I should add is that Bandai’s design in terms of stability was questionable. The pegs that connect the shoulder to the arms are small. A little bit of the same issue in their Perfect Grade 00 Raiser. There were times the arms fall off if I try to move them upward. The pegs that are supposed to be holding the arms are not long enough to get a lock in it. But yeah, it was still a good “solid” kit and I had fun building it. Each new kit with new inner frame or gimmicks is a nice experience that can help me with the kits I will build in the future.
Detailing: 9/10
I am still fond with the design of GoGo’s Hi-Nu EVO but the “ver Ka’ design of Bandai is really stunning. I love the panel lines added on each part of the body. The panel lines were not overwhelming but not too few and make the model look bland. The design looks simple but the gimmicks are still a part of the detailing section so it has a huge impact with the overall looks.
Next is how sharp the detailing was in the model kit. The panel lines were not too shallow and I think a drawing pen with a tip of 0.03 can slide there. For me it was just enough so that I can use my mechanical pencil. I mean, some panel lines are too deep that you can’t even use any of the drawing pens to add some panel lines. Of course that gives you the option that it can be done by panel washing the surface.
Articulation 9/10
For a macho-looking or you could say bulky kit, it was pretty articulated; from movement range to movable parts because of the gimmicks. This is my first time trying out a Hi-Nu ver Ka and the comments other builders have mentioned regarding its capabilities in moving have gotten blurry. I was surprised that the finished model has good angles despite its chubby look (O_O). The kneeling pose isn’t as perfect as expected but it was still a good performance that the model can do such extreme poses. There were no parts that pop off as long as you position the shoulder armors and the skirts well.
Gimmicks: 7/10
I am not sure if the Hi-Nu ver ka would look cool with psycoframe parts inside just like the Nu ver Ka but it was already a fine feat that the model can open several parts to show off some of its thrusters. I was hoping there would be more on the front. I know that the thrusters are supposed to be on the back and the sides, but what I meant is that there should be other gimmicks aside from that movable chest part.
I know I am being demanding and I should be grateful that Bandai design their Hi-Nu ver Ka with a space for a LED unit. Having an action base where you can pose the fin funnels is also part of the kit’s gimmicks. Not only that, you have a hidden machine gun on the right forearm and a beam saber holster on the left forearm. I don’t think the EVO version has the machinegun and beam saber gimmicks. :v
With all those nice features added in the model, I am giving it a 7 instead of an 8 is because there were no effect parts for the funnels. The Nu ver Ka have funnel effects and even the Hi-Nu EVO have funnels effects. If there were such items, then the possible reason could be the P-Bandai treatment. Even so, Daban Model should have managed to copy it like what they did on the P-Bandai Tallgeese units. :/
Weapons: 7/10
The weapons were great but I feel like there should have been some add-ons given for the funnels. I am not sure if Daban Model is cutting corners on their expenses but they should have done something. The fin funnels were the iconic weaponry of the Nu and Hi-Nu Gundams. Even though the main focus here is the new look on the Hi-Nu ver Ka, adding some effects would also help beginners what is the purpose of those objects. Back then, I was very new with the Gundam Universe and I don’t have any clue how this and that work. Adding some charge effects (same with Nu ver Ka) on the Fin Funnels will help new builders that are not familiar with the mobile suit to have a brief idea with that weaponry. Just my own 2 nubs.
Anyways, the gimmicks helped a lot to feature the 4-barrel machinegun on the right forearm. Plus, you have 2 beam saber s hidden on the top side of the thrusters and this is not available on the EVO version of GoGo.
Just a follow-up of my first paragraph comment, I will not erase it but I will just update what I have learned from my team. So Bandai never did created effect parts for the Hi-Nu. They did however created the “thrust” effect parts but there were no beam effect parts. Then the cheapest one you can get is the BTF version which includes the beam effect parts but there are no included thruster effects. Now the screenshot from Reddit (shared to me) says that you can paint it up to match the Hi-Nu colors. So technically you will be using the fin funnels meant for the Nu ver Ka and just paint them up. It’s a good alternative but it’s not something straight builders like me can do quickly. :/
Extras: 5/10
I think it’s the usual package for a mobile suit that uses fin funnels. Like I mentioned on the weapons section, Bandai should have added some simple yet nice effects for the funnels. :/
Patience 5/10
The parts were not really time consuming because the plastic quality is good. Cleaning the nubs weren’t much of a problem (though I had some messy sanded surfaces >_> ). The gates were thin enough so the stress marks created from the packaging issue aren’t big. You may still need a decent amount of time if you plan to sand clean each piece because there were lots of parts. Most of them are small, so building it up with a shaky hand or if you have big fingers than mine could be a hassle.
Overall Rating: 9/10
This is a nice kit copied by Daban Model and the issues are just the tight fittings, which is easily fixed. If I were to make a list of the bootleg kits that I wouldn’t mind building again, I would definitely add this one and the Wing Gundam Proto Zero. Plastic quality is really good and it’s at least 90% close to the original in terms of overall looks (detailing/molding). I haven’t tried the Bandai one so I can’t say if the issues in terms of any parts that pop off are same. I mean, Daban copies them that even the issues Bandai has are not spared. :v
Anyways, this is a good kit I’d recommend for beginners. The inner frame isn’t that complex and the issues are fixable. And because of the new design with lots of parts (credits to Bandai), you also have a good model to use for painting. If the model is painted, there are still a few markings you can use from the waterslide decal sheet. And please do not forget to check the sprue frames carefully if there are missing parts. Even though it’s a good kit, it’s pretty much troublesome if you have missing or broken parts. I was lucky that my missing part is just for the rifle and it could have been worst if it’s a part meant for the inner frame.
The rating I have given is just right considering the neat features. I know its Bandai’s work on the design but you definitely have a cheaper shortcut because of Daban. If you have the means to go for Bandai, then do so to avoid such issues. I think Bandai has a better packing than Daban as well. But if you are really tight on funds and you want it so badly, then Daban is there to fix it up. It’s also a cheaper alternative if you have an experiment in mind (modding). I also hope that this review will help you guys who already have the kit or if you are planning to buy it. This may also give you a quick insight if you will gor for Bandai or Daban Model.
Please do leave a comment if I have missed something or if you have any questions related to the kit I might have overlooked. Do correct me if I have used any wrong terminologies. My next review would be the Rx-78-2 “ver Ka”.
Have a look on our Gunpla-related Facebook page - Click Here
2 years ago nakabili ako bandai nito 6,200 tapos nung nakaraan december nakita ku ito 1400 hayzzz dapat hinintay ku ilabas ni daban sayang kahit marami payang flashes at deform.
ReplyDeleteAko naghintay na lang din kasi tinakot ako ng friend ko. Balak ko na kumuha ng Bandai that time pero sabi baka daw maglabas si Daban.
Delete6.2k? Parang ang OP.. mall price ba or kasama yung HWS?
wala pang HWS un. Sa SM AURA nabili ung akin.
DeleteGrabe ang mahal talaga pag sa mall..T_T
Deletex2 presyo sa online sellers...
Hi. Do u think its possible to buy this kit and assemble it together with the hws expansion?
ReplyDeleteI think it's possible. Daban Model just copied all of the contents and didn't changed anything.
DeleteLoose ba yung connection from body to backpack mo sir? Medyo loose kasi sa akin.
ReplyDeleteHello sir,
DeleteSa akin rin medyo malapit na talagang maging loose lalo na pag kinabit na yung backpack. Bale naghohold na lang sya maigi if nakakabit yung stand. Gamit ka na siguro cement or super glue if wala ka plan maglagay ng LED
This comment has been removed by the author.
ReplyDeleteLk need onto your internet site despite the fact making an application find basically basically a lot of section submits. Restful strategy for near future, I'm sure bookmarking right this moment access patterns implement originates separate. hi rise camera
ReplyDeleteThis comment has been removed by a blog administrator.
ReplyDeleteErr.. thanks xD
Deletei love this blog, since review MB built Strike. its very clear and details explanation.
ReplyDeleteI am trying to get back and hopefully continue the blog
DeleteHow many sprues in this kit??
ReplyDelete26, not including the pedestal/base
Delete