
 |
| Finished 10-10-2016 |
(2016-10-29) UPDATE: You can click the images to show the original size and to give you a better look. I have been doing this since my first post. A lot of people probably thought the images are small. ALL IMAGES ARE LINKED TO THEIR ORIGINAL SIZE.
Introduction:
This is my third PG review and it’s from the Gundam Wing series. It was shown in the Endless Waltz OVA. My impression is that I am expecting few runners and simple inner frame design for this kit. And I will probably get a lot of hard time assembling the whole model. I also took note that it’s from TT Hongli so there might be flashes, rough surfaces, dimples, and the other half of a certain piece is misaligned. Fortunately, not all of those expectations were true and I had fun with this kit.
The other concern for me is that Bandai didn’t design this kit to be released with an action base. That means they must’ve created the action base or base stand to be a “separate purchase” item and that’s one thing I hate about Bandai. Wing Zero looks nicer in an action base and it’s supposed to be like that because the Wing Gundam Zero Custom is an aerial MS. Well for me it is generally meant for high-speed movements in air even though it can still do battle on the ground.
Anyways, I hope this short review will be able to help you guys who are planning to get this kit or if you already have one but still having doubts about the issues. I would like to say that there might be several issues I haven’t found during assembly, mostly because I had a smooth run on most of the parts. Again, I apologize for the fuzzy camera shots and I will try to get more lighting materials in the future.
Some parts here do have visible nub marks and it’s actually my fault because I have cut the nubs a little close to the part’s surface. And if there are any errors (spelling, grammar), please do mention them on the comments section. If there are also any errors on the terminologies used, please do correct me.
Please be advised that some of the pieces on each “parts exploded view” might be missing. I sometimes forget that they are still on the runners. But usually, I don’t notice them quickly in the construction manual.
Unboxing:

Wing Gundam Zero Custom is one of the earlier Perfect Grades released by Bandai. It’s the fifth Perfect Grade I think, so there were a lot of “old school” feats you might have noticed. The box isn’t the same as you see now. It doesn’t have a handle and the design doesn’t have any openings on the top side where you can pull out another brown box like you see in Strike Freedom or Unicorn. Instead, the box can be opened like your usual MG or HG kits. :v


As for the manuals, you get two of them again. The black-and-white one is your construction manual and the colored one is your brochure of some sort where it shows some info regarding the series and about the MS itself.

One of the things that caught my eye too is the huge wing that will be attached on his back. I’m glad there weren’t any scratches on the part’s surface. Another factor I noticed is that the runners are not crammed in one plastic bag. There were just 2 or 3 of them inside. I’m not sure if the older kits don’t have any clear stickers because this one doesn’t have any. Bandai should have at least spared a small sheet to add some color on those white parts.
The next images will be runners and the other contents of the kit.
Runners:
|
|
|


|
|
|


|
|
|


|
|
|


|
|
|


|
|
|


|
|
|


|
|


Aside from the runners you also get screws and nuts. And I’m not saying a small sachet with a couple of them. You get a lot of them inside this small box called the Material Box.


Here's a closer look on each pack including the metal parts and springs...


As you can see on the back of the box, you get 11 types of screws and 2 nut sizes. There are also other things inside the Material Box. You get the metal parts that will be used in the waist, arms and in the legs. Check the manual first and look closely at the drawing because there are no markings for these metal parts.The box includes the LED and the wires that you must place inside the body’s inner frame manually. Please do take note that some of the screws are a bit rusty.

I’m not sure if they are rubber or just a softer plastic but you get the feathery parts that will be attached on the edge of the primary wings. There’s also a note on the box that you shouldn’t bend them. Yeah, “fear bring damage” as written on it. LOL
After 2 years of servitude, my old cutting mat will have to say goodbye now.

Arm Unit:

Okay, the manual let’s you start on the arms first. And here is the finished arm and the exploded view of the parts.

I forgot to add the hand guard piece on the exploded view.
And please do look on the manipulators carefully. When you look at them you might think they are just the same length. But I noticed that there’s a small difference in length. Not only that, the mid section of both thumbs sometimes pops off only when you move it.
Overall, there are no snap fitting issues here in the inner frame. Well there were several tight parts but none of them are something you can’t handle. And you can also customize how tight the joints should be when moving by simply adjusting the screws.


As for the details, you may also think the plastic parts look nice on the front but on the back side you get these ugly round nubs of sort.


The articulation is nice and both arms can bend this much.

Unfortunately on this large peg where you will connect it to the body, it doesn’t have a good movement range because of the design. Not a big deal for me though.

The whole manipulator is attached on the arm’s inner frame and you can rotate it. It’s possible for a 360 degree rotation only if you move this blue part because the thumb will hit on it.


The wrist portion in the inner frame allows you to move it sideways as well.
Shoulder Armor/Upper Body Unit:

So here are the parts of for the shoulder armor.
It looks simple but it features a good articulation range.

In the image below, you can see the shoulder armor (left) where all sections are opened or pull up. And the other one (right) has its parts pressing against each other or closed.


Not only that, each segment is connected using a ball-joint peg so you can move them sideways as seen in the image below. The main female peg also has a decent articulation because of the ball-joint peg.


On the numbers written on the image, you can move #2 and #3 sideways which is really neat and you don't get that kind of feature in the Master Grade line.I'm not sure if the RG also shares the same feature. Credits goes to Bandai for this engineering.


The female peg where the body's male peg is inserted can be move sideways as well.

Lifting it up to a certain degree is also possible which is a common feat on most PG gunpla.
Leg Unit:

And here I thought the A3 cutting mat is large enough for my projects. :/
I think I'm going to need a bigger one..

Anyways, here are the parts for a single leg and it almost covered my whole A3 cutting mat. I was planning to put the other built leg to compare it but it seems I’m going to need an A2 cutting mat but I will get that some other time. O_O


The lack of design on the outer armor is compensated by the complex and cool inner frame design all thanks to Bandai’s engineering. Here you will need lots of screws to tighten the joints. The metal parts are also used here in the legs probably to add some weight to balance it against the wing’s weight. Sorry if the bent inner frame image is blurry. :/


As for snap fitting issues, this red part for the feet have a really tight female peg and I had to trim the inner rim a bit. There are lots of tight parts too here in the inner frame and they tend to show those ugly stress marks. Fortunately, they will be covered by the outer armor. So overall, there’s just minor or less issue here in the legs that you will encounter.

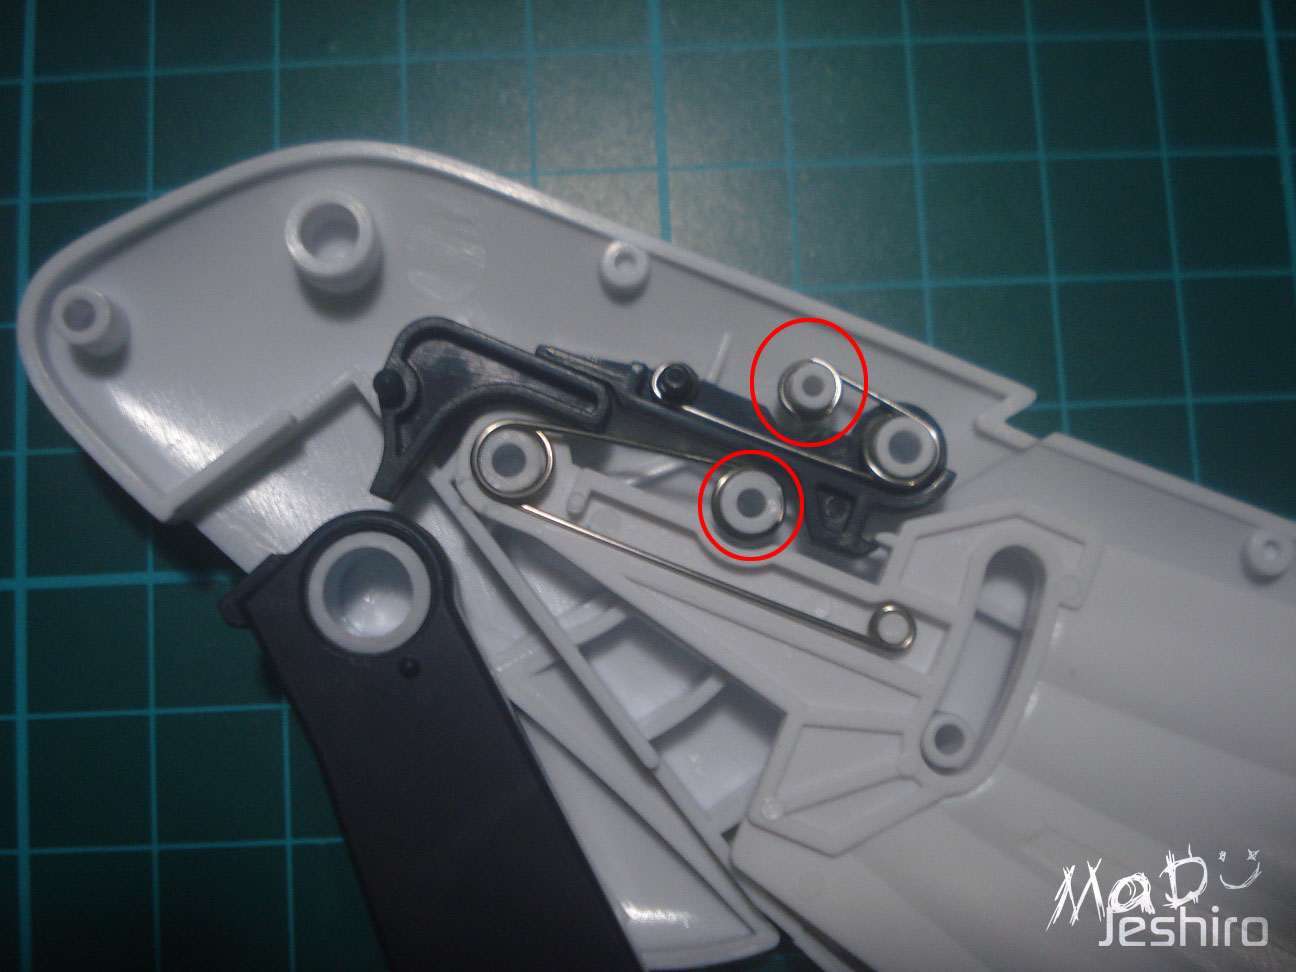
I have already mentioned this but some of the screws are rusty and the other problem is the washer inserted in them have this issue of misalignment. There’s a time where it gets stuck halfway so you will need to use something flatten it up or push it up to the head.

And now here are the legs fully assembled. I have used my mechanical pencil to add some panel lines. It’s a bit odd and I checked it a lot of times but I can’t seem to remove this huge seam on the thigh. I know it features a sliding gimmick but it shouldn’t look like that right? :v
I wonder if this is just from TTH.


Regarding the articulation, it was nice and you can see that the legs can bend that much. The thigh’s armor slides down when you bend the legs. Not only that, the armor behind the legs (the one with the springs) slides down as well.


The two parts on the sides can be lifted up, but I don’t know what its purpose is. I’m not sure if this is really included in the MG so I might mention this is the Gimmicks Section. :v

The legs were too plain so I added some detailing here using Uniball Signo metallic blue. :)
Waist Unit:

So here are the parts for the waist. They still feature nice parts separation even though WZC has a plain design. Well, as expected from a Perfect Grade and credits to Bandai.
 |
 |
 |
Here in the waist, you get to use more of those metal parts. I added some metallic blue on the front skirts for some extra color.

I kind of forgot to add those PC parts for the side skirts so I took another shot at them.


As for the articulation, it gives the same feature you see in any usual Master Grades.The back skirt and the front skirts can be lifted up. The side skirts can be rotated like so.The front skirts not only do the usual lift-up movement but can be tilted sideways.

Issues here would be the very visible seam under the waist.


Another issues is that the metal male peg that should be inserted to the leg is really tight. I had sto scrape the inner rim a bit to fit it well.
Body Unit:

And here are your parts for the body unit. This is my first time seeing WZC’s inner frame in PG.
I didn’t expect I will have more troubles here in the body compared to my common issues I encountered on the legs or the arms.

So I tested the led and made sure it works. Unlike the Strike Gundam where you can attach the LED easily, this kit has a different approach. You will manually connect the copper wirings inside the inner frame.
Setting up the wires here was one of the tricky features I’ve encountered so far, but it was really fun and challenging.

I also faced another issue here. Here in the image, you can see the pin on the mat. It doesn’t go through this part I’m holding so I had to scrape the inner rim. But be sure not to overdo it or else it will become loose. I even had to use a small hammer to punch the spring pin inside those female pegs.

Another issue here in the body part is that most of them have really tight pegs. If you forced them, you will get these stress marks. I already trimmed the female peg but it was still tight. Fortunately, the part didn’t break in half.

I keep on testing the LED making sure the copper wires are still connected to the screws inside.

When you start building in this section, the waist is needed because the body unit is supposed to be connected into the metal ball joint. You won’t be able to remove the body from the waist once the whole uni is completed. And it will also consume a lot of time if you want to adjust the screw inside. One of the issues I have encountered here is that the metal parts that doesn’t fit well, thus resulting to a loose waist that will surely lean backward when you attach the wings. :/


Anyways, here are my shots regarding its articulation. You can move the body sideways, front and back. And because of the ball joint peg, you can twist the body to a certain degree.


The female pegs here in the body are quite loose because of the metal part issue again. The screw can't hold it firmly and the result is that they become a bit shaky.
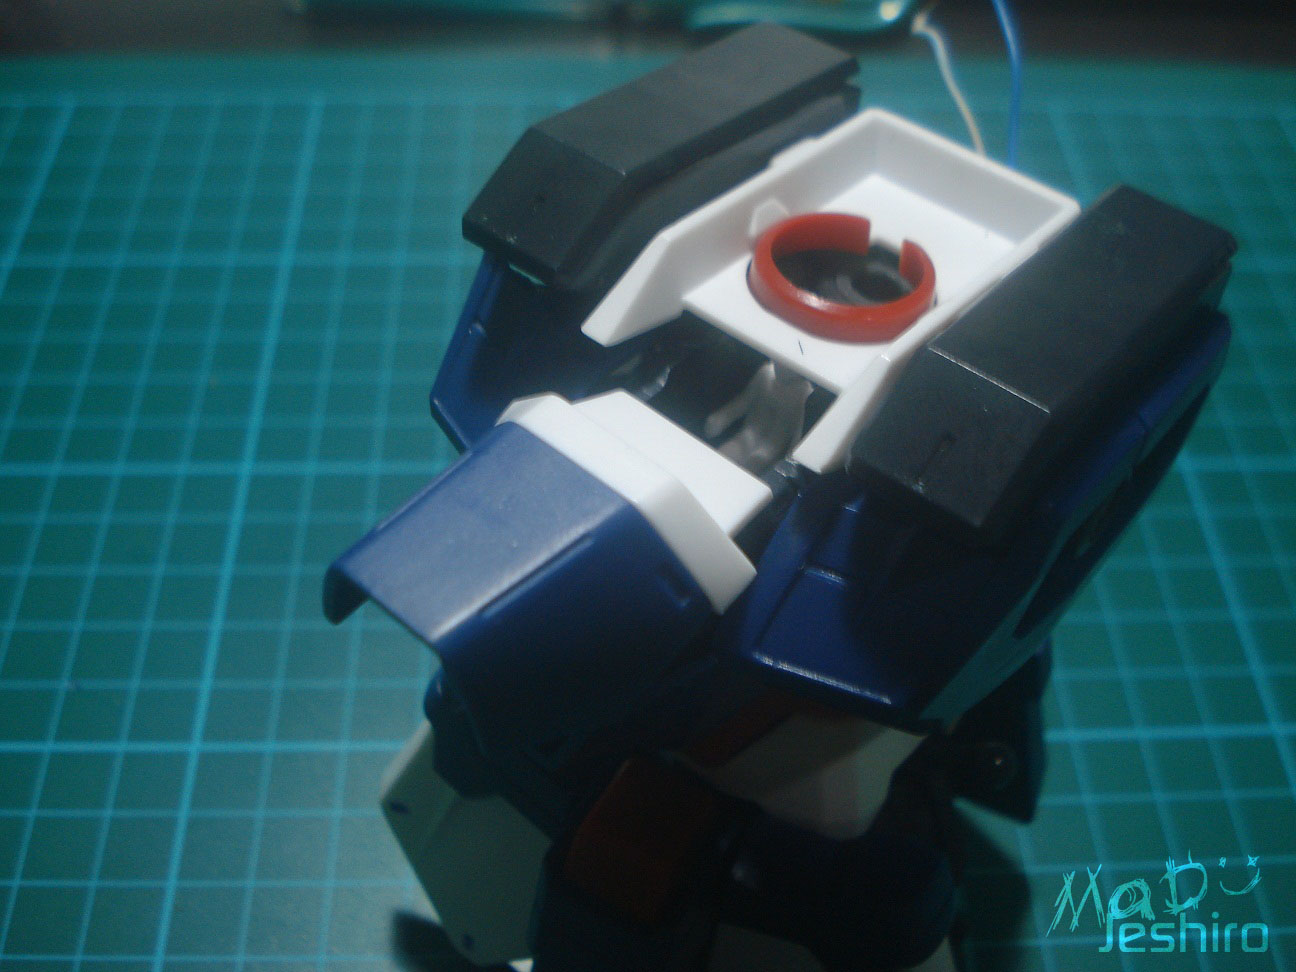
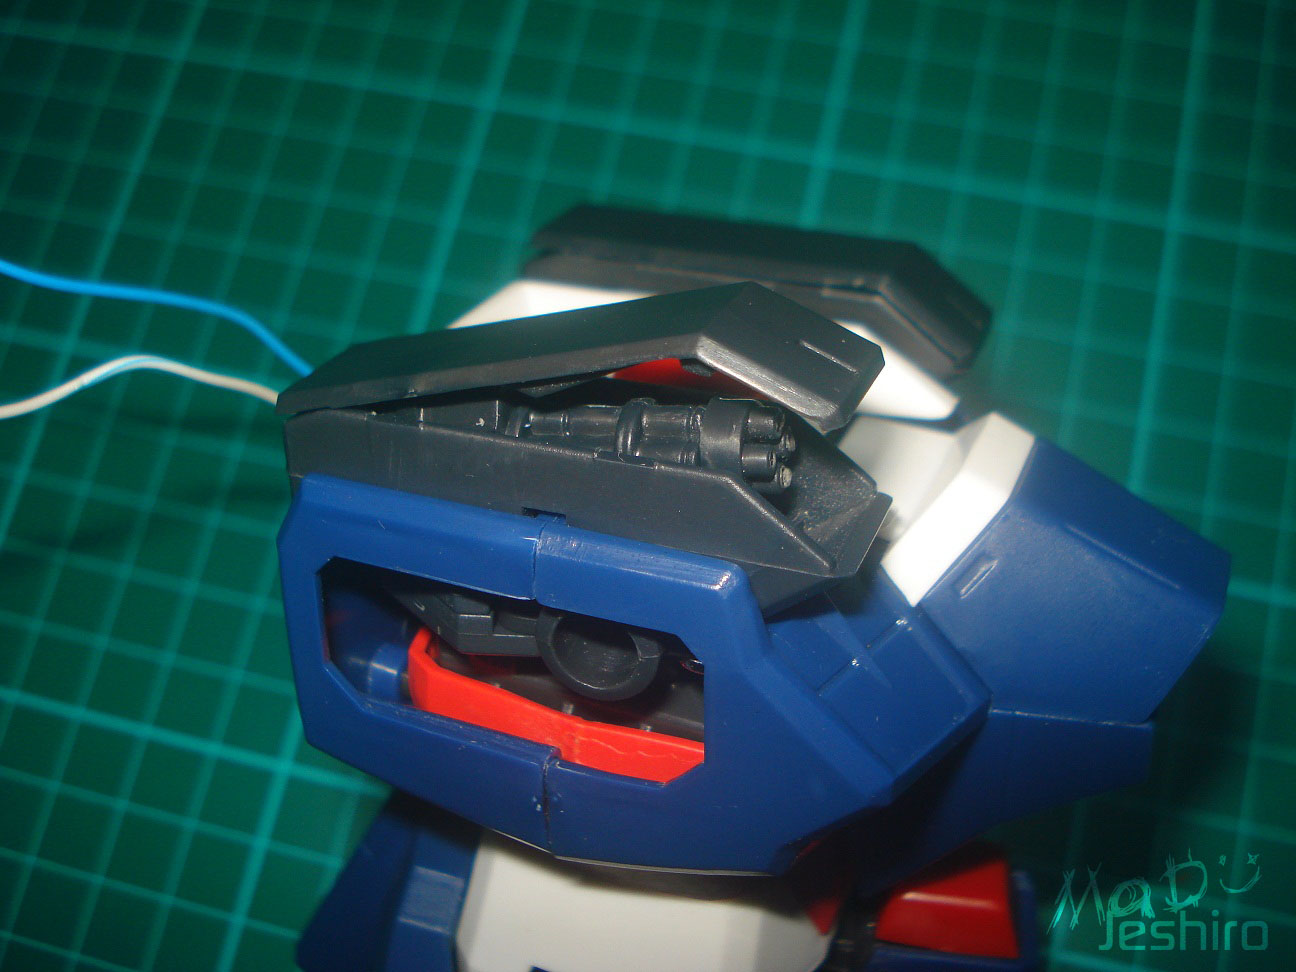
Other features here in the body are the cockpit hatch that you can lift up and the guns on the shoulder with a movable hatch.

So here’s a little preview what the backpack looks like from the inside. I won’t be able to show the images because it will hard for me to take a picture while the wires are already connected. :v
Head Unit:

Decent parts separation here in the head with good detailing and credits goes to Bandai. You will be using another LED here and set up the wiring on the nape and through the outer back armor
 |
 |
 |
So here’s the head without the lights.


I tested the LED before and after attaching it on the body. I don’t want to make mistakes connecting the wires and then later on find out that the LED doesn’t light up. :/
It's time for a little coffee break before I finish the wings..

Backpack Unit:
Secondary Wings:

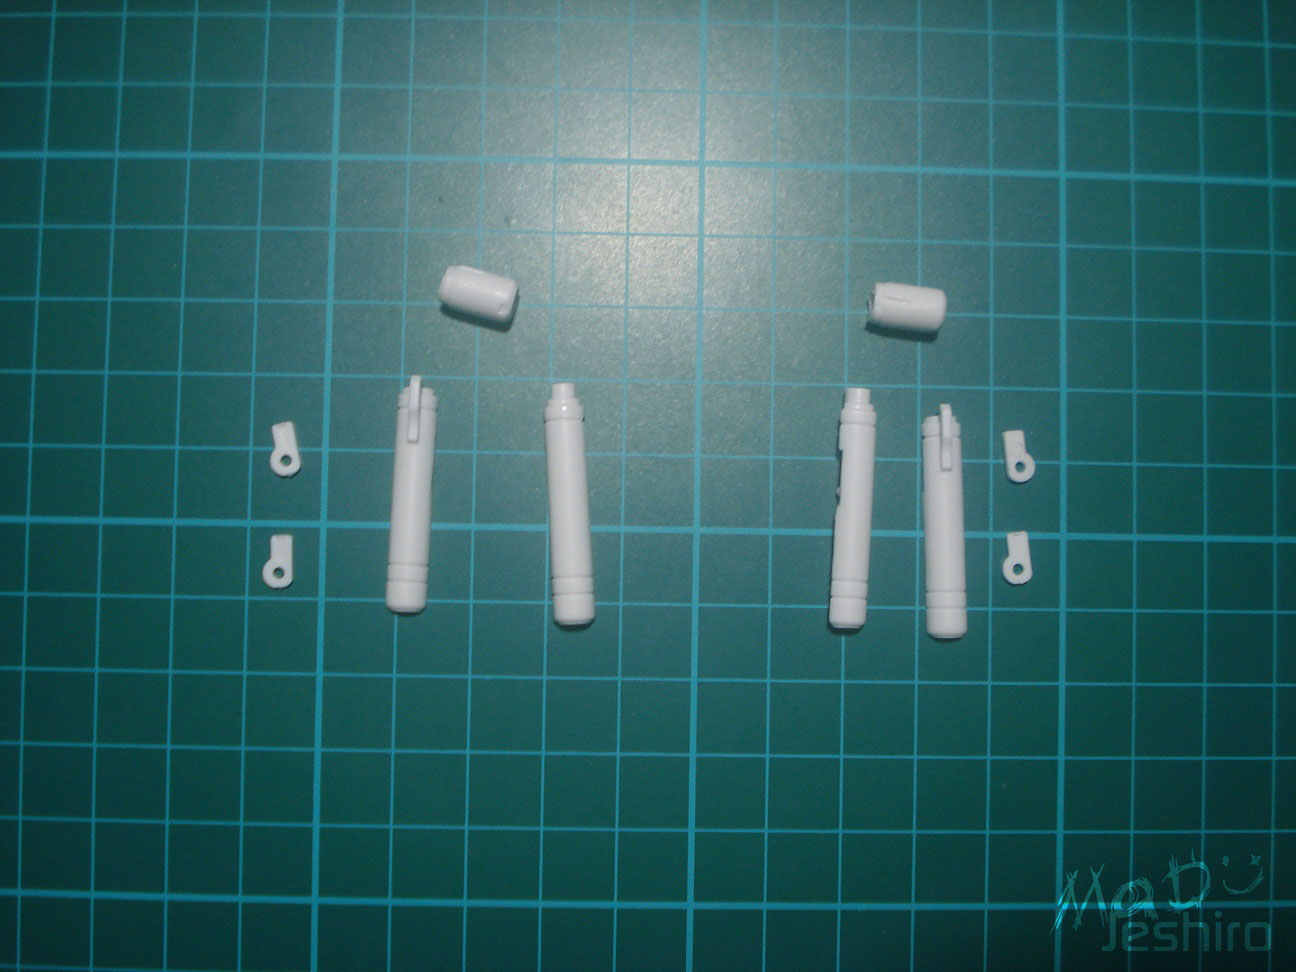
I will feature the wings in this segment. There are 2 kinds of wings here so I will just mention it as the primary and the secondary wings. So I started off with the secondary wings and here are the parts.
You will be using 3 types of “torsion springs” here. Some of theme pops off when you place them so you might want to check that out.

Here's a little comparison to the secondary wings when opened and the other one when closed.


The wings will expand automatically when you move the black connector outwards.


Because of the mentioned issue earlier regarding the body and waist metal parts being loose, the secondary wings are pulling the body backwards. I’m using this material box as support so it won’t fall. But if you can tighten up the waist and body, then there's no need to worry if the upper body would lean backwards.
Primary Wings:

The parts for the primary wings were very simple and Bandai didn’t design it to have other extra parts or gimmicks.


Not only that, the only parts articulated here are the rubbery feathers attached on it. Some of them are a bit loose even though you have already tightened the screws. I’m not sure if Bandai have this issue. The rubber feathers have this nub near the tin parts. Some of their tops were a slightly bent probably because of packaging. I have lined them using my mechanical pencil and added some blue color on those vents using Uniball Signo.
Anyways, I didn’t attach it to the WZC yet because I will do that on the Completed Model segment.
Weapons:
Twin Buster Rifle:

So here are the parts for the buster rifle and the other rifle (already built) on the top. There are no snap fitting issues here but it kind of lacks parts separation especially for a Perfect Grade kit. Or maybe because it’s just an old product so it didn’t have such features. :/

It was very plain and I was thinking if I should add some detailing using silver. :v

Some have problems how to open these kinds of connectors mostly when they don’t have any peg or gap you can pull. I did was simply push the rear part and the other end will lift up.

The rifle’s handle can be folded and hide them in.

As you can see, they have slots that you can use to attach them together. Be sure to read the manual carefully because they have a certain pattern to connect the two.


Once attached, you now have a bigger a rifle for WZC.
Beam Saber:
You have the usual beam sabers for WZC. They have two flat pegs on both sides, probably when using two manipulators to hold it. I haven’t tested it though. :/

You can attach these sabers on the secondary wing’s connector. It [Secondary Wing] has hollow space where you can fit it inside.
Completed Model:
 |
 |
 |
So here’s the completed model of Wing Gundam Zero Custom. I will attach the wings later because it will be harder for me to move him around. And I don’t want to brake any more pegs.

Well we know that the Gundam Wing units are small (16-17 meters I think), so even with the 1/60 scale, it still looks a bit small when you look at it personally and up close.

As for the articulation test, it wasn’t that good because of several factors. Firstly is the plastic quality isn’t that great so there were lots of very tight pegs and joints. I trimmed the inner parts of the female pegs but they were still tight. As a result, moving them was a pain and I don’t want to break any inner frame parts inside the body.
Second is that even if you have tightened the screws, the joints will tend to get loose a bit after some time. So the model becomes unsteady and it was hard for me to make him stand like that. This is how far you can move the legs because it’s not using a male-female peg joint. Instead of your usual -male-female peg, a ball joint peg is used.
 |
 |
 |
So here’s what WZC looks like with the wings attached. I love how it looks, although you will need something to support his back. Unless your ball joint in the waist is tighter than mine of course. Yeah I forgot to mention that I also added some metallic blue on those vents on the chest.

And here’s a look when I turned on the LED. I’m sorry I don’t have good shots. The problem is the lack of lighting and my half-broken camera.


So that’s it for the kit and here are my final thoughts for each feature. Check my rating below.

This is my rating board... :)
 |
| design based from GDC card |
Plastic Quality: 6/10
As a start, the molding is bad. If you recall the images on the Arm Unit, there were round nubs and I saw a lot of them. The parts weren’t glossy but they were not much of a big deal for me if you have patience in sanding them or using any nail buffers. Aside
And because the parts were larger, the gates were also large. I don’t have any new X-Acto blades so it led to visible stress marks. I had fun sanding them though. :P
I love Wing Gundam Zero Custom, but because of the issues here in its plastic quality, I had no choice but to give a six. :/
Assembly: 7/10
Well I did mention that there were several tight parts, but not all of them are like that and they didn’t pose any difficulty for me. I also trimmed/sanded some of those pegs to make sure they fit well. I may have some trouble with the wirings but it was fun and became a new experience for me as well.
Another issue to take note of are the metal parts. Some of them don’t fit together like you’ve seen in the waist. The metal parts on the legs were fine as long as you tighten the screws very well.
Detailing: 7/10
Well there were more added detailing here in the Perfect Grade line when compared to its MG version. Of course, it would have been nice if it also got the same treatment from the RG’s detailing.
It can’t be helped though because the PG WZC was released earlier before the RG WZC. At least, this gives you the option of adding the extra detailing yourself.
Articulation: 8/10
To me, the limited range of movement from the ball joint peg on the waist and on the legs were just minor ones. I saw a lot of movable parts because of the design from its inner frame. And the inner frame itself shares a remarkable range of movement. Seriously, the only hindrances here are the tight pegs.
I had a lot of fun moving the arms and legs. A lot of them were articulated, so all credits goes to Bandai for their unique design.
Gimmicks: 5/10
Am I too strict with the rating here? I was looking for cool gimmicks or “open hatch” features, but there weren’t any. It felt like it was just a master Grade in 1/60 scale. There should have been cool gimmicks like opening the outer armor of the calf on the legs. The wings were also simple and they [Bandai] could have added some other movable parts.
Weapons: 5/10
I am not going to give it lower than four unless there were literally no weapons in the kit. Only three weapons were seen here and that is the twin buster rifle, the beam sabers, and the machine cannon mounted on the shoulder. Of course it was the original design and I have no complaints.
Extras : 5/10
You only get 2 pieces of polycaps which is no longer needed and the beam saber effects. There weren’t any clear stickers too. However, you have a few more pieces of the srews, nuts, and another piece of the green led just in case something needs to be fixed. What’s worse is that there isn’t any base stand for WZC! A mobile suit designed for aerial/space combat but there’s no base stand! D:
Patience: 7/10
There were only few parts or units to build but I am giving it a 7 because of the issues you will encounter. If you will focus on cleaning the parts (sanding and such) and/or fixing the problems I have mentioned, it will surely take a lot of time.
Overall Rating: 7/10
Yes it is just probably my fault for expecting too much on this kit even though Wing Gundam Zero Custom doesn’t have fancy weapons. At least, placing the model on the shelf with more focus on the majestic look gives that breathtaking sight. Even so, there should have been nice pointers for the kit. It can’t be blamed to Bandai since ideas aren’t that easy to be compiled in just one go back in the old days. There were a lot of room for gimmicks in this kit but I doubt Bandai will look into that and release a new one.
There may be a possibility that the other third-party brands or bootleg brands come up with the idea of remaking this angelic mobile suit. It’s just a possibility and I am not claiming that Daban Model or Dragon Momoko will do this.
Now if I were to get the PG WZC, I would go for Bandai just to avoid the hassle of cleaning the parts. This option is recommended if you are planning for a plain straight build. But If you don’t want to mess things up in a PG Bandai by trying to paint it, then go for a cheaper shortcut here in TTH. But yeah, you will have a lot of work to do to make it look clean and nice.
So that’s just all I can say regarding this kit and I hope it can help you guys if you plan to get TTH or just cross this one on your wishlist and replace it with the Bandai. :)
I will try to look for more kits to review. Please do have a visit on our Facebook page - Click Here
This comment has been removed by a blog administrator.
ReplyDeleteThis comment has been removed by a blog administrator.
ReplyDeleteThis comment has been removed by a blog administrator.
ReplyDelete